



Diesel engine repair car Volkswagen Golf 2

Description of diesel and turbodiesel engines
Brief characteristics of diesel and turbodiesel diesel engines are given in table 1 . The GOLF II and Jetta II are equipped with diesel four-stroke in-line engines with a...
Brief characteristics of diesel and turbodiesel diesel engines are given in table 1 . The GOLF II and Jetta II are equipped with diesel four-stroke in-line engines with a...

Removal and installation the engine
Dismantling of diesel engines is similar to dismantling of petrol engines, the differences concern only the operations described below. Additionally, it is necessary to disconnect...
Dismantling of diesel engines is similar to dismantling of petrol engines, the differences concern only the operations described below. Additionally, it is necessary to disconnect...

Disassembling the engine
Disassemble the engine in the following order: Remove the vacuum pump, exhaust manifold, coolant pump and other auxiliary units from the engine. Unscrew the four bolts securing...
Disassemble the engine in the following order: Remove the vacuum pump, exhaust manifold, coolant pump and other auxiliary units from the engine. Unscrew the four bolts securing...
Engine assembly
The engine assembly is carried out in the reverse order. A more detailed description of individual operations will be given in the following sections. Below are some guidelines to...
The engine assembly is carried out in the reverse order. A more detailed description of individual operations will be given in the following sections. Below are some guidelines to...

Cylinder head
Below are some design features of the valve mechanism. It is necessary to carefully read them before proceeding with any concerns regarding the repair of the cylinder head. The...
Below are some design features of the valve mechanism. It is necessary to carefully read them before proceeding with any concerns regarding the repair of the cylinder head. The...

Removal the cylinder head from the engine installed on the vehicle
To remove the cylinder head, it is not necessary to remove the engine from the car. If the engine has already been removed, you can skip the description of the first operations....
To remove the cylinder head, it is not necessary to remove the engine from the car. If the engine has already been removed, you can skip the description of the first operations....

Disassembling the cylinder head
All valve mechanism components and parts that will not be replaced must be installed in their original places. In order not to accidentally mix them up, it is necessary to prepare...
All valve mechanism components and parts that will not be replaced must be installed in their original places. In order not to accidentally mix them up, it is necessary to prepare...
Checking valve springs
It should be remembered that valve springs from engines with hydraulic tappets cannot be used in other engines, as they are shorter. For identification, they are marked on the...
It should be remembered that valve springs from engines with hydraulic tappets cannot be used in other engines, as they are shorter. For identification, they are marked on the...

Checking the valve guides
Clean the bushings and valve stems with a rag soaked in gasoline. Insert the stems into the corresponding bushings. Secure the indicator holder to the mating surface of the...
Clean the bushings and valve stems with a rag soaked in gasoline. Insert the stems into the corresponding bushings. Secure the indicator holder to the mating surface of the...

Checking valve seats
The valve seats are machined according to Fig. 189. In the case of an engine with hydraulic tappets, the following instructions should be observed. It is necessary that after...
The valve seats are machined according to Fig. 189. In the case of an engine with hydraulic tappets, the following instructions should be observed. It is necessary that after...

Checking the valves
Diesel engines are equipped with reinforced valves (figure 190). They can be recognized by the three grooves at the end of the rod. The design of the crackers has also been...
Diesel engines are equipped with reinforced valves (figure 190). They can be recognized by the three grooves at the end of the rod. The design of the crackers has also been...
Checking the cylinder head
Thoroughly clean the mating surfaces of the cylinder head and engine block, and then check for warping of the mating surface of the cylinder head. Check using a metal ruler placed...
Thoroughly clean the mating surfaces of the cylinder head and engine block, and then check for warping of the mating surface of the cylinder head. Check using a metal ruler placed...

Checking the camshaft (engine with hydraulic tappets)
Engines with hydraulic valve lifters are equipped with a camshaft of a different design than those designed for use with conventional lifters. This shaft has nitrided cam working...
Engines with hydraulic valve lifters are equipped with a camshaft of a different design than those designed for use with conventional lifters. This shaft has nitrided cam working...
Checking hydraulic valve lifters
Hydraulic valve lifters have been installed on engines since 1986. Improper maintenance of hydraulic lifters can result in damage to engine parts: Therefore, after removing the...
Hydraulic valve lifters have been installed on engines since 1986. Improper maintenance of hydraulic lifters can result in damage to engine parts: Therefore, after removing the...

Cylinder head assembly
The cylinder head is assembled in the reverse order of its disassembly. When assembling, follow these instructions: Lubricate the valve stems well with engine oil and insert them...
The cylinder head is assembled in the reverse order of its disassembly. When assembling, follow these instructions: Lubricate the valve stems well with engine oil and insert them...

Installing the cylinder head
When ordering a cylinder head gasket, you should correctly specify the engine identification data in order to purchase a gasket designed specifically for a diesel engine or a...
When ordering a cylinder head gasket, you should correctly specify the engine identification data in order to purchase a gasket designed specifically for a diesel engine or a...

Pistons and connecting rods — design description
The connecting rod and piston group parts are shown in Figure 199. To remove the pistons, the engine must be removed from the vehicle and the cylinder head separated from the...
The connecting rod and piston group parts are shown in Figure 199. To remove the pistons, the engine must be removed from the vehicle and the cylinder head separated from the...

Removal connecting rod and piston group parts from the cylinder block
The pistons with connecting rods are removed from the cylinders upwards after removing the connecting rod bearing caps and liners. Before proceeding with these operations, you...
The pistons with connecting rods are removed from the cylinders upwards after removing the connecting rod bearing caps and liners. Before proceeding with these operations, you...

Checking the connecting rod and piston group parts
All parts of the connecting rod and piston group are subject to inspection and, if they have deep scratches or signs of wear, they are subject to replacement. Measure the gap...
All parts of the connecting rod and piston group are subject to inspection and, if they have deep scratches or signs of wear, they are subject to replacement. Measure the gap...

Assembly of the connecting rod and piston group
Heat the pistons to 60°C (by placing them in hot water), prepare a rod of equal or slightly smaller diameter than the piston pin diameter. Insert the piston pin into the heated...
Heat the pistons to 60°C (by placing them in hot water), prepare a rod of equal or slightly smaller diameter than the piston pin diameter. Insert the piston pin into the heated...

Installation of connecting rod and piston group
If the oil jets used to cool the pistons have been removed from a turbocharged engine, they must be reinstalled in their original locations (figure 206). Tighten the injector...
If the oil jets used to cool the pistons have been removed from a turbocharged engine, they must be reinstalled in their original locations (figure 206). Tighten the injector...

Measuring the axial clearance of the crankshaft
Before removing the crankshaft, which can only be done with the engine removed from the vehicle, it is necessary to measure its axial clearance to find out whether the thrust half...
Before removing the crankshaft, which can only be done with the engine removed from the vehicle, it is necessary to measure its axial clearance to find out whether the thrust half...

Removal the crankshaft
Remove the engine from the vehicle. Hold the flywheel ring gear with a screwdriver and unscrew the bolts. Usually, these bolts can be loosened with a regular wrench without...
Remove the engine from the vehicle. Hold the flywheel ring gear with a screwdriver and unscrew the bolts. Usually, these bolts can be loosened with a regular wrench without...
Replacing crankshaft seals
The front and rear oil seals must be replaced each time the crankshaft is removed from the cylinder block. A special tool and great care are required to install them. Both oil...
The front and rear oil seals must be replaced each time the crankshaft is removed from the cylinder block. A special tool and great care are required to install them. Both oil...
Checking the crankshaft
Carefully inspect the crankshaft: are there any signs of damage, and then measure the diameters of the main and connecting rod journals. The journals have three repair sizes,...
Carefully inspect the crankshaft: are there any signs of damage, and then measure the diameters of the main and connecting rod journals. The journals have three repair sizes,...

Installing the crankshaft
Wipe the main bearing seats in the engine block. Bearings with oil groove 6 ( see figure 183 ) insert into the sockets so that the protrusion enters the recess. Lubricate the...
Wipe the main bearing seats in the engine block. Bearings with oil groove 6 ( see figure 183 ) insert into the sockets so that the protrusion enters the recess. Lubricate the...
Cylinder Block — Check
To determine the degree of wear of the cylinder bore, a bore gauge is required ( see figure 71 ). The diameter measurements are made in two planes and in three sections along the...
To determine the degree of wear of the cylinder bore, a bore gauge is required ( see figure 71 ). The diameter measurements are made in two planes and in three sections along the...

Flywheel — replacement
Flywheel 10 (see figure 209) the flywheel of a diesel engine differs from the flywheel of a petrol engine in that it is not attached directly to the crankshaft, but by means of a...
Flywheel 10 (see figure 209) the flywheel of a diesel engine differs from the flywheel of a petrol engine in that it is not attached directly to the crankshaft, but by means of a...

Replacing the intermediate shaft
The intermediate shaft can only be replaced with the engine removed from the vehicle. The method for fastening the shaft is shown in Figure 211. To dismantle the shaft, first...
The intermediate shaft can only be replaced with the engine removed from the vehicle. The method for fastening the shaft is shown in Figure 211. To dismantle the shaft, first...

Automatic transmission drive
the automatic transmission is connected to the crankshaft by means of a drive disk secured with six bolts (figure 212). The reinforcement ring has a chamfer on the outer edge,...
the automatic transmission is connected to the crankshaft by means of a drive disk secured with six bolts (figure 212). The reinforcement ring has a chamfer on the outer edge,...
Valve timing mechanism — design description
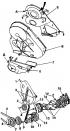
The diagram of the gas distribution mechanism is shown in Figure 214 (performance before January 1984). Until this time, the toothed belt was completely covered. The engine has...
The diagram of the gas distribution mechanism is shown in Figure 214 (performance before January 1984). Until this time, the toothed belt was completely covered. The engine has...

Toothed Belt Banners
.The timing belt can be replaced on an engine installed in a vehicle, for which: Remove the timing belt cover or covers. Loosen the generator fastenings by moving it towards the...
.The timing belt can be replaced on an engine installed in a vehicle, for which: Remove the timing belt cover or covers. Loosen the generator fastenings by moving it towards the...
Replacing the camshaft
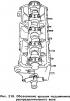
To remove the camshaft, you must do the following: Remove the timing belt cover(s). Remove the valve cover. Turn the flywheel so that the piston of the 1st cylinder is at TDC,...
To remove the camshaft, you must do the following: Remove the timing belt cover(s). Remove the valve cover. Turn the flywheel so that the piston of the 1st cylinder is at TDC,...
Replacing the camshaft seal
The camshaft seal can be replaced without removing the engine from the vehicle. The oil seal is located behind the toothed pulley of the camshaft. In order not to damage the...
The camshaft seal can be replaced without removing the engine from the vehicle. The oil seal is located behind the toothed pulley of the camshaft. In order not to damage the...

Adjusting valve clearances
In engines without hydraulic tappets, it is necessary to periodically check and, if necessary, adjust the valve clearance. This clearance is measured with a feeler gauge between...
In engines without hydraulic tappets, it is necessary to periodically check and, if necessary, adjust the valve clearance. This clearance is measured with a feeler gauge between...
Maintenance of diesel and petrol engines
External inspection An oil leak is checked for an engine that is splashed with oil and has high fuel consumption. The following areas and zones are checked: Open the oil filler...
External inspection An oil leak is checked for an engine that is splashed with oil and has high fuel consumption. The following areas and zones are checked: Open the oil filler...
This section is available on russian, bulgarian, belarusian, ukrainian, serbian, croatian, romanian, polish, slovak, hungarian
Similar sections from other manuals for VW cars:
Power unit: Engines 4-cylinder FZ Volkswagen Passat B2 (1981-1988)
Power unit: Petrol engines 1.4 and 1.6 Volkswagen Polo 3 (1995-2003)
Power unit: Petrol engine 4.2L Volkswagen Touareg 1 (2002-2006)
Power unit: Petrol engine 1.4 CAVA Volkswagen Tiguan 1 (2007-2015)
Power unit: Engine repair Volkswagen Transporter T4 (1990-2003)
Diesel engines: Engine repair Volkswagen Caddy 3 (2003-2010)
Power unit: Engines 4-cylinder FZ Volkswagen Passat B2 (1981-1988)
Power unit: Petrol engines 1.4 and 1.6 Volkswagen Polo 3 (1995-2003)
Power unit: Petrol engine 4.2L Volkswagen Touareg 1 (2002-2006)
Power unit: Petrol engine 1.4 CAVA Volkswagen Tiguan 1 (2007-2015)
Power unit: Engine repair Volkswagen Transporter T4 (1990-2003)
Diesel engines: Engine repair Volkswagen Caddy 3 (2003-2010)
Golf 5
Golf 4
Golf 3
Golf 2
Golf 2 (petrol)
Golf 1 (petrol)
Golf 1 (diesel)
- General information
- User manual
- Maintenance
- Troubleshooting
- Power unit
- Engine repair
- Cooling and ventilation system
- Fuel system
- Ignition system
- Transmission
- Clutch
- Mechanical gearbox
- Automatic gearbox
- Chassis
- Brake system
- Car suspension
- Steering
- Body
- Interior (internal elements)
- Exterior (external elements)
- Doors and covers
- Electrical equipment
- Power devices
- Washers and wipers
- Lighting and appliances
- Electrical circuits
- General information
- User manual
- Weekly checks
- Maintenance
- Power unit
- Petrol engines
- Diesel engines
- Cooling system
- Fuel system (petrol)
- Control system (petrol)
- Fuel system (diesel)
- Exhaust system
- Transmission
- Clutch
- Car gearbox
- Drive shafts
- Chassis
- Car suspension
- Steering
- Wheels and tires
- Brake system
- Body
- Exterior (external elements)
- Interior (internal elements)
- Ventilation and heating
- Car doors and sunroof
- Washers and glass cleaners
- Electrical equipment
- Power devices
- Lighting and appliances
- Electrical circuits
- Petrol engine
- Engine repair
- Lubrication system
- Cooling system
- Ignition system
- Diesel engine
- Engine repair
- Diesel injection system
- Pre-glow system
- Transmission
- Clutch
- Gearbox and drive shafts
- Chassis
- Steering
- Wheels and suspension
- Brake system
- Electrical equipment
- Lighting and appliances
- Electrical circuits
- General information
- Introduction to guide
- User manual
- Petrol engines 1.3 l
- Engine repair
- Lubrication system
- Cooling system
- Carburetors
- Supply system
- Ignition system
- Petrol engines 1.6/1.8 l
- Engine repair
- Supply system
- Ignition system
- Diesel engines
- Engine repair
- Lubrication system
- Cooling system
- Power and exhaust system
- Transmission
- Clutch
- 4-speed gearbox 084
- 5-speed gearbox 085
- 4-speed gearbox 020/4R
- 5-speed gearbox 020/4T
- Automatic gearbox
- Drive shafts
- Chassis
- Steering
- Car suspension
- Brake system
- Body
- Body elements
- Doors, locks and windows
- Electrical equipment
- Equipment and devices
- Power devices
- General information
- Characteristics
- Car care
- Maintenance
- Power unit
- Engine repair
- Engine 1.05/1.30
- Engine 1.60/1.80
- Cooling and lubrication system
- Power and exhaust system
- Transmission
- Clutch
- Car gearbox
- Drive shafts
- Chassis
- Brake system
- Steering
- Suspension
- Body
- Body and equipment
- Electrical equipment
- Lighting and appliances
- Electrical circuits
- General information
- Characteristics
- User manual
- Maintenance
- Power unit
- Engine adjustment
- Engine 1.1/1.3
- Engine 1.5/1.6/1.8
- Engine electrical equipment
- Cooling system
- Fuel system
- Transmission
- Clutch and manual gearbox
- Automatic gearbox
- Chassis
- Steering
- Front suspension
- Rear suspension
- Brake system
- Electrical equipment
- Lighting and appliances
- Electrical circuits
- Body
- Body and equipment
- Optional equipment
- General information
- Specifications
- Maintenance
- Power unit
- Engine repair
- Exhaust and turbocharger
- Cooling system
- Fuel system
- Fuel injection system
- Transmission
- Clutch and drive shafts
- Car gearbox
- Chassis
- Suspension and wheels
- Steering
- Brake system
- Wheels and tires
- Body
- Heating and ventilation
- Exterior (external elements)
- Interior (internal elements)
- Doors and windows
- Electrical equipment
- Equipment and devices
- Lighting system
- Power devices
- Electrical circuits