
English Русский
Български
Беларускі
Український
Српски
Hrvatski
Română
Polski
Slovenský
Magyar
  |  Articles  |  Sitemap  |  Contacts  |    |
Car maintenance Ford Car maintenance Hyundai Car maintenance Chevrolet Car maintenance BMW Car maintenance Audi Car maintenance Opel Car maintenance AvtoVAZ
VWmanual.ru


Main   Passat   Golf   Polo   Touareg   Tiguan   Sharan   Transporter   Others  
Golf 1 (1974-1984, diesel) Golf 1 (1974-1984, petrol) Golf 2 (1984-1993, petrol) Golf 2 (1984-1993) Golf 3 (1991-1997) Golf 4 (1997-2004) Golf 5 (2003-2008)

Replacing the intermediate shaft (VW Golf 2)

  • Main
  • Golf
  • Golf 2
  • Diesel engines
  • Engine repair
  • Replacing the intermediate shaft
            0


The intermediate shaft can only be replaced with the engine removed from the vehicle. The method for fastening the shaft is shown in Figure 211. To dismantle the shaft, first remove the high-pressure fuel pump (HPFP) and all units and parts connected to the camshaft. The cylinder head can remain on the engine. The intermediate shaft seal flange has a channel for supplying lubricant and is installed only in a certain position. The flange determines the axial clearance of the shaft and is subject to replacement when the clearance exceeds 0.25 mm. The flange seal is an O-ring. The ring must be replaced after each flange removal.

The shaft is installed as follows:

Insert the shaft, having previously installed a new oil seal on it in the same way as the front crankshaft oil seal. Tighten the oil seal holder mounting bolt to a torque of 25 Nm.

Place the tensioner roller on the intermediate shaft so that its projection fits into the groove. This will ensure that the roller is in the correct position. If you have to replace the roller, remember that only rollers for the drive of the design changed in 1984 are applicable, i.e. for an engine with a different toothed belt casing. When installing a new roller on an old type of engine with a casing covering the toothed belt, you need to measure the gap "A" (figure 211) between the roller and the pump bracket. This gap should be at least 0.5 mm (this also applies to the modified engine). If necessary, remove the bracket and use a file to remove excess metal in the indicated area.
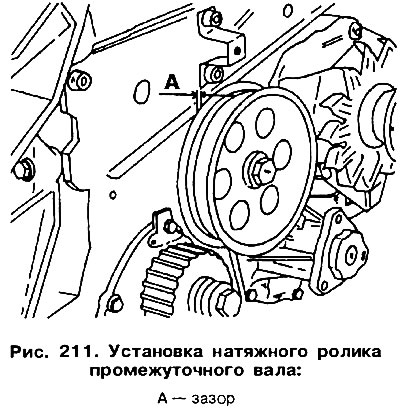


Place the tensioner roller on the intermediate shaft so that its projection fits into the groove.…


Insert the bolts with washers and tighten them to a torque of 45 Nm with the locking mechanism (for example with a rod), inserted into the hole of the roller and resting against the wall of the flywheel housing.

The remaining actions are performed in the reverse order of dismantling.

(The information is posted on this resource: «www.vwmanual.ru»)

This article is available at russian, bulgarian, belarusian, ukrainian, serbian, croatian, romanian, polish, slovak, hungarian
The text has been checked: Kolesnikov Artem

Share information:

Previous articles
Flywheel — replacement
Cylinder Block — Check
Installing the crankshaft
Checking the crankshaft
Replacing crankshaft seals
Removal the crankshaft
Next articles
Automatic transmission drive
Valve timing mechanism — design description
Toothed Belt Banners
Replacing the camshaft
Replacing the camshaft seal
Adjusting valve clearances


Similar articles from other manuals for VW cars:
Replacing the bearings of the reverse intermediate gear axle Passat B4 (1988-1996)
Replacing incandescent lamps Polo 3 (1995-2003)
Replacing the generator drive shaft seal Touareg 1 (2002-2006)
Balance shaft drive chain Tiguan 1 (2007-2015)
Intermediate shaft — removal and installation Sharan 1 (1995-2000)
Disassembling the cardan shaft, replacing the protective casing… Transporter T3 (1979-1992)
Replacing the axle shaft covers Beetle (1960-1986)
Link to this page in different formats


Visitor comments


No comments yet


How much will 46 + 23 =


Golf 5 
  • General information
  • User manual
  • Maintenance
  • Troubleshooting
  • Power unit
  • Engine repair
  • Cooling and ventilation system
  • Fuel system
  • Ignition system
  • Transmission
  • Clutch
  • Mechanical gearbox
  • Automatic gearbox
  • Chassis
  • Brake system
  • Car suspension
  • Steering
  • Body
  • Interior (internal elements)
  • Exterior (external elements)
  • Doors and covers
  • Electrical equipment
  • Power devices
  • Washers and wipers
  • Lighting and appliances
  • Electrical circuits
Golf 4 
  • General information
  • User manual
  • Weekly checks
  • Maintenance
  • Power unit
  • Petrol engines
  • Diesel engines
  • Cooling system
  • Fuel system (petrol)
  • Control system (petrol)
  • Fuel system (diesel)
  • Exhaust system
  • Transmission
  • Clutch
  • Car gearbox
  • Drive shafts
  • Chassis
  • Car suspension
  • Steering
  • Wheels and tires
  • Brake system
  • Body
  • Exterior (external elements)
  • Interior (internal elements)
  • Ventilation and heating
  • Car doors and sunroof
  • Washers and glass cleaners
  • Electrical equipment
  • Power devices
  • Lighting and appliances
  • Electrical circuits
Golf 3 
  • Petrol engine
  • Engine repair
  • Lubrication system
  • Cooling system
  • Ignition system
  • Diesel engine
  • Engine repair
  • Diesel injection system
  • Pre-glow system
  • Transmission
  • Clutch
  • Gearbox and drive shafts
  • Chassis
  • Steering
  • Wheels and suspension
  • Brake system
  • Electrical equipment
  • Lighting and appliances
  • Electrical circuits
Golf 2 
  • General information
  • Introduction to guide
  • User manual
  • Petrol engines 1.3 l
  • Engine repair
  • Lubrication system
  • Cooling system
  • Carburetors
  • Supply system
  • Ignition system
  • Petrol engines 1.6/1.8 l
  • Engine repair
  • Supply system
  • Ignition system
  • Diesel engines
  • Engine repair
  • Lubrication system
  • Cooling system
  • Power and exhaust system
  • Transmission
  • Clutch
  • 4-speed gearbox 084
  • 5-speed gearbox 085
  • 4-speed gearbox 020/4R
  • 5-speed gearbox 020/4T
  • Automatic gearbox
  • Drive shafts
  • Chassis
  • Steering
  • Car suspension
  • Brake system
  • Body
  • Body elements
  • Doors, locks and windows
  • Electrical equipment
  • Equipment and devices
  • Power devices
Golf 2 (petrol) 
  • General information
  • Characteristics
  • Car care
  • Maintenance
  • Power unit
  • Engine repair
  • Engine 1.05/1.30
  • Engine 1.60/1.80
  • Cooling and lubrication system
  • Power and exhaust system
  • Transmission
  • Clutch
  • Car gearbox
  • Drive shafts
  • Chassis
  • Brake system
  • Steering
  • Suspension
  • Body
  • Body and equipment
  • Electrical equipment
  • Lighting and appliances
  • Electrical circuits
Golf 1 (petrol) 
  • General information
  • Characteristics
  • User manual
  • Maintenance
  • Power unit
  • Engine adjustment
  • Engine 1.1/1.3
  • Engine 1.5/1.6/1.8
  • Engine electrical equipment
  • Cooling system
  • Fuel system
  • Transmission
  • Clutch and manual gearbox
  • Automatic gearbox
  • Chassis
  • Steering
  • Front suspension
  • Rear suspension
  • Brake system
  • Electrical equipment
  • Lighting and appliances
  • Electrical circuits
  • Body
  • Body and equipment
  • Optional equipment
Golf 1 (diesel) 
  • General information
  • Specifications
  • Maintenance
  • Power unit
  • Engine repair
  • Exhaust and turbocharger
  • Cooling system
  • Fuel system
  • Fuel injection system
  • Transmission
  • Clutch and drive shafts
  • Car gearbox
  • Chassis
  • Suspension and wheels
  • Steering
  • Brake system
  • Wheels and tires
  • Body
  • Heating and ventilation
  • Exterior (external elements)
  • Interior (internal elements)
  • Doors and windows
  • Electrical equipment
  • Equipment and devices
  • Lighting system
  • Power devices
  • Electrical circuits
VWmanual.ru © 2016-2026 | Mobile version | News and articles | Sitemap: EN BG BY UA RS HR RO PL SK HU | Write message | Site search
Passat B2 • Passat B3 • Passat B4 • Passat B5 • Passat B6 • Golf 1, diesel • Golf 1, petrol • Golf 2, petrol • Golf 2 • Golf 3 • Golf 4 • Golf 5 • Polo 3 • Polo 4 • Touareg 1 • Tiguan 1 • Sharan 1 • Transporter T3 • Transporter T4 • LT 28 • LT 2D • Beetle • Caddy 3 •
Our website uses cookies to ensure functionality and convenience.