



If new liners are installed, the flange liners 19 should be inserted into the central socket. The thrust half rings 20 are not spare parts and, if they are to be used again, they should be inserted on the left and right sides. Make sure that the projections in the half rings fit into the grooves. Lubricate all parts well.
Carefully place the crankshaft on the liners. If the connecting rods remain in the cylinders, move their lower heads to the connecting rod journals.
Insert the lower bearing shells 4 into the corresponding crankshaft bearing caps (protrusions into the recess) and generously lubricate their surfaces with engine oil. 3 Insert thrust half rings or flange liners 3 into the central cover.
Install the crankshaft covers and tap them with a rubber or plastic hammer.
Tighten the cover bolts slightly from the middle to the edges. Finally tighten the bolts to a torque of 65 Nm. While tightening the cover bolts, turn the hall several times to make sure that the stops do not protrude.
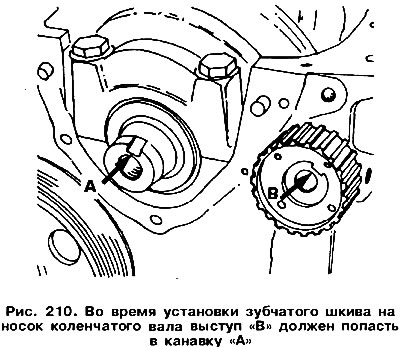
Check the crankshaft axial clearance again using the following method:, described here. Install the pistons with connecting rods. Install both seals. Install the toothed pulley on the front nose of the shaft. The nose of the shaft has a groove into which the projection of the toothed pulley should enter (figure 210). Install the intermediate shaft (see here). Place the toothed belt (see here) and install the cover.
Install the clutch pressure plate assembly using new bolts.
Lubricate the bolt threads with a thread locking compound, tightening torque - 75 Nm. To block the shaft, you can use a block, which is inserted between the shaft crank and the cylinder block wall.
Install the flywheel. The clutch disc must be correctly centered (see section "Clutch"). Tighten the bolts evenly "crosswise" with a torque of 20 Nm. Install the oil pump.
Install a new oil pan gasket on the sealant. Tighten the crankcase mounting bolts to a torque of 20 Nm. Screw in the drain plug with a new gasket, tightening torque - 30 Nm.
Perform all other operations in the reverse order of dismantling.
The original information is posted on the resource: www.VWManual.ru
Visitor comments