English Русский
Български
Беларускі
Український
Српски
Hrvatski
Română
Polski
Slovenský
Magyar
  |  Articles  |  Sitemap  |  Contacts  |    |
Car maintenance Ford Car maintenance Hyundai Car maintenance Chevrolet Car maintenance BMW Car maintenance Audi Car maintenance Opel Car maintenance AvtoVAZ
VWmanual.ru


Main   Passat   Golf   Polo   Touareg   Tiguan   Sharan   Transporter   Others  
Golf 1 (1974-1984, diesel) Golf 1 (1974-1984, petrol) Golf 2 (1984-1993, petrol) Golf 2 (1984-1993) Golf 3 (1991-1997) Golf 4 (1997-2004) Golf 5 (2003-2008)

Toothed Belt Banners (VW Golf 2)

  • Main
  • Golf
  • Golf 2
  • Diesel engines
  • Engine repair
  • Toothed Belt Banners
            0


.The timing belt can be replaced on an engine installed in a vehicle, for which:
  • Remove the timing belt cover or covers.
  • Loosen the generator fastenings by moving it towards the center, remove the V-belt.
  • Remove the valve cover.
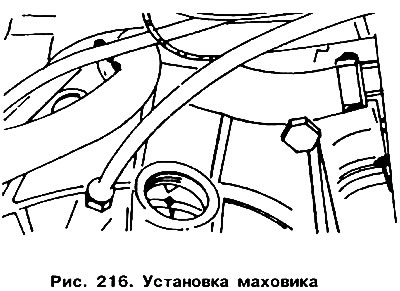
  • Install a special control plate (No. 2065 A) on the cylinder head from the flywheel side (figure 215), after setting the piston of the 1st cylinder to the TDC position. Then turn the crankshaft so that the control mark on the flywheel coincides with the mark in the control hole (after removing the plug from the wall of the gearbox housing), as shown in Figure 216.
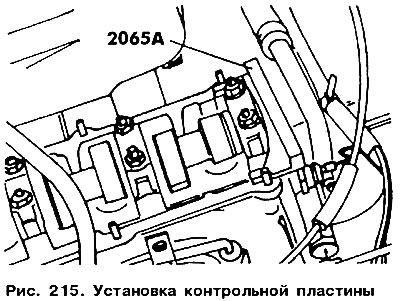
Install a special control plate (No. 2065 A) on the cylinder head from the flywheel side (figure…

Install the control plate as follows:
  • Install it by rotating the camshaft until one end of the plate rests against the surface of the cylinder head.
  • At the opposite end of the plate, measure the gap between the cylinder head and the plate.
  • Place a feeler gauge under the plate that is half the thickness of the measured gap.
  • Turn the camshaft so that the plate rests on the feeler gauge.
  • Insert a second feeler gauge of the same thickness on the other side between the cylinder head and the plate.

To perform the following operations, a special rod No.2064 is required, which is screwed into the toothed pulley of the fuel injection pump to block its rotation (figure 217).
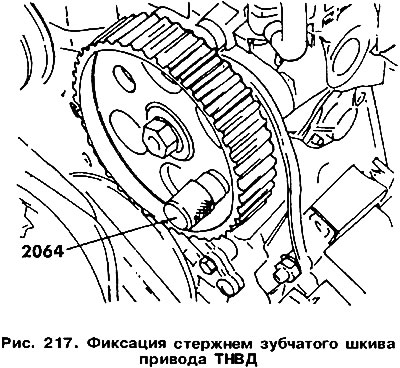


To perform the following operations, a special rod No.2064 is required, which is screwed into the…


Loosen the tensioner nuts and move it to the left, remove the pulley from the crankshaft and the toothed belt from the toothed pulleys.

If it is necessary to remove the rear timing belt cover (see figure 214), it is necessary to remove the fuel injection pump bracket. If necessary, unscrew the bolts securing the toothed pulley of the camshaft. To remove the pulley from the shaft, insert a small rod into the hole shown by the arrow and hit it with a hammer, thus loosening the fastening of the pulley boss on the cone.

Installing a timing belt (for example after replacing it) is performed in the following order:
  • First, make sure the flywheel is in the position shown in Figure 216.
  • Loosen the camshaft toothed pulley mounting bolts by half a turn (without turning the shaft itself). Hit the pulley with a rubber mallet to loosen its boss on the shaft cone. In the case of an engine with a closed belt cover, it is necessary to hit it in the place shown by the arrow on figure 214, insert the rod and hit it with a hammer, loosening the pulley boss on the shaft cone.

[The information is available on the website www.VWmanual.ru]


Carefully lay the timing belt and remove the mounting rod from the pump pulley.

Using the special tool VW 21O, check the tension of the timing belt (figure 218). Place the device between the camshaft and pump pulleys, and then, turning the tensioner to the right, set the belt tension value to 12-13 units on the device scale. There are special protrusions for turning the tensioner, shown by the arrow in Figure 218. You can also try to turn the tensioner roller by hand.
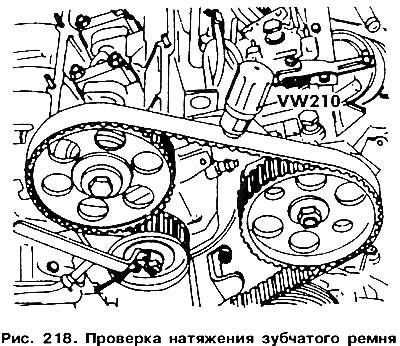
Using the special tool VW 21O, check the tension of the timing belt (figure 218). Place the device…


Tighten the tensioner mounting nuts to a torque of 45 Nm. Tighten the camshaft pulley mounting bolts to the same torque. Install all parts and assemblies in place. Rotate the pulley to turn the crankshaft two full revolutions.

Use a rubber mallet to strike the timing belt where the belt tensioner was installed.

After installing and adjusting the belt tension, you need to check the fuel pump installation using the following method, described here.

Install the V-belt pulley onto the crankshaft toothed pulley. Tighten its mounting bolts to 20 Nm. Support the flywheel while doing this. Install the toothed belt cover or covers.

Install the V-belt and adjust its tension.

Adjust the valve clearances (see here), if the engine was manufactured before 1986.

This article is available at russian, bulgarian, belarusian, ukrainian, serbian, croatian, romanian, polish, slovak, hungarian
The text has been checked: Kolesnikov Artem

Share information:

Previous articles
Valve timing mechanism — design description
Automatic transmission drive
Replacing the intermediate shaft
Flywheel — replacement
Cylinder Block — Check
Installing the crankshaft
Next articles
Replacing the camshaft
Replacing the camshaft seal
Adjusting valve clearances
Maintenance of diesel and petrol engines


Similar articles from other manuals for VW cars:
V-belt/toothed belt drive Passat B3 (1988-1993)
Toothed belt drive of the 1.4 l AUA/BBY/AUB/BBZ petrol engine… Polo 4 (2001-2009)
Seat belt warning light Touareg 1 (2002-2006)
Toothed belt transmission Tiguan 1 (2007-2015)
Removal the toothed drive belt Sharan 1 (1995-2000)
Toothed belt — design description Transporter T4 (1990-2003)
Replacing the fuel pump drive toothed belt (diesel engines AGX,… LT 2D (1996-2003)
Link to this page in different formats


Visitor comments


No comments yet


How much will 16 + 16 =


Golf 5 
  • General information
  • User manual
  • Maintenance
  • Troubleshooting
  • Power unit
  • Engine repair
  • Cooling and ventilation system
  • Fuel system
  • Ignition system
  • Transmission
  • Clutch
  • Mechanical gearbox
  • Automatic gearbox
  • Chassis
  • Brake system
  • Car suspension
  • Steering
  • Body
  • Interior (internal elements)
  • Exterior (external elements)
  • Doors and covers
  • Electrical equipment
  • Power devices
  • Washers and wipers
  • Lighting and appliances
  • Electrical circuits
Golf 4 
  • General information
  • User manual
  • Weekly checks
  • Maintenance
  • Power unit
  • Petrol engines
  • Diesel engines
  • Cooling system
  • Fuel system (petrol)
  • Control system (petrol)
  • Fuel system (diesel)
  • Exhaust system
  • Transmission
  • Clutch
  • Car gearbox
  • Drive shafts
  • Chassis
  • Car suspension
  • Steering
  • Wheels and tires
  • Brake system
  • Body
  • Exterior (external elements)
  • Interior (internal elements)
  • Ventilation and heating
  • Car doors and sunroof
  • Washers and glass cleaners
  • Electrical equipment
  • Power devices
  • Lighting and appliances
  • Electrical circuits
Golf 3 
  • Petrol engine
  • Engine repair
  • Lubrication system
  • Cooling system
  • Ignition system
  • Diesel engine
  • Engine repair
  • Diesel injection system
  • Pre-glow system
  • Transmission
  • Clutch
  • Gearbox and drive shafts
  • Chassis
  • Steering
  • Wheels and suspension
  • Brake system
  • Electrical equipment
  • Lighting and appliances
  • Electrical circuits
Golf 2 
  • General information
  • Introduction to guide
  • User manual
  • Petrol engines 1.3 l
  • Engine repair
  • Lubrication system
  • Cooling system
  • Carburetors
  • Supply system
  • Ignition system
  • Petrol engines 1.6/1.8 l
  • Engine repair
  • Supply system
  • Ignition system
  • Diesel engines
  • Engine repair
  • Lubrication system
  • Cooling system
  • Power and exhaust system
  • Transmission
  • Clutch
  • 4-speed gearbox 084
  • 5-speed gearbox 085
  • 4-speed gearbox 020/4R
  • 5-speed gearbox 020/4T
  • Automatic gearbox
  • Drive shafts
  • Chassis
  • Steering
  • Car suspension
  • Brake system
  • Body
  • Body elements
  • Doors, locks and windows
  • Electrical equipment
  • Equipment and devices
  • Power devices
Golf 2 (petrol) 
  • General information
  • Characteristics
  • Car care
  • Maintenance
  • Power unit
  • Engine repair
  • Engine 1.05/1.30
  • Engine 1.60/1.80
  • Cooling and lubrication system
  • Power and exhaust system
  • Transmission
  • Clutch
  • Car gearbox
  • Drive shafts
  • Chassis
  • Brake system
  • Steering
  • Suspension
  • Body
  • Body and equipment
  • Electrical equipment
  • Lighting and appliances
  • Electrical circuits
Golf 1 (petrol) 
  • General information
  • Characteristics
  • User manual
  • Maintenance
  • Power unit
  • Engine adjustment
  • Engine 1.1/1.3
  • Engine 1.5/1.6/1.8
  • Engine electrical equipment
  • Cooling system
  • Fuel system
  • Transmission
  • Clutch and manual gearbox
  • Automatic gearbox
  • Chassis
  • Steering
  • Front suspension
  • Rear suspension
  • Brake system
  • Electrical equipment
  • Lighting and appliances
  • Electrical circuits
  • Body
  • Body and equipment
  • Optional equipment
Golf 1 (diesel) 
  • General information
  • Specifications
  • Maintenance
  • Power unit
  • Engine repair
  • Exhaust and turbocharger
  • Cooling system
  • Fuel system
  • Fuel injection system
  • Transmission
  • Clutch and drive shafts
  • Car gearbox
  • Chassis
  • Suspension and wheels
  • Steering
  • Brake system
  • Wheels and tires
  • Body
  • Heating and ventilation
  • Exterior (external elements)
  • Interior (internal elements)
  • Doors and windows
  • Electrical equipment
  • Equipment and devices
  • Lighting system
  • Power devices
  • Electrical circuits
VWmanual.ru © 2016-2026 | Mobile version | News and articles | Sitemap: EN BG BY UA RS HR RO PL SK HU | Write message | Site search
Passat B2 • Passat B3 • Passat B4 • Passat B5 • Passat B6 • Golf 1, diesel • Golf 1, petrol • Golf 2, petrol • Golf 2 • Golf 3 • Golf 4 • Golf 5 • Polo 3 • Polo 4 • Touareg 1 • Tiguan 1 • Sharan 1 • Transporter T3 • Transporter T4 • LT 28 • LT 2D • Beetle • Caddy 3 •
Our website uses cookies to ensure functionality and convenience.