
Golf 1 (1974-1984, diesel)
Golf 1 (1974-1984, petrol)
Golf 2 (1984-1993, petrol)
Golf 2 (1984-1993)
Golf 3 (1991-1997)
Golf 4 (1997-2004)
Golf 5 (2003-2008)
Vehicle lighting and instrumentation VW Golf 2, petrol

Electrical system device
Current sources are a battery and a generator with a voltage and charging current regulator, which, together with the control equipment, make up the power supply circuit of the...
Current sources are a battery and a generator with a voltage and charging current regulator, which, together with the control equipment, make up the power supply circuit of the...

Battery
The battery consists of six battery cells of voltage - 2 V each. The element contains negative plates connected in parallel and positive plates connected in the same way. The...
The battery consists of six battery cells of voltage - 2 V each. The element contains negative plates connected in parallel and positive plates connected in the same way. The...
Battery test under load
1. A voltmeter must be connected to the battery poles (plus voltmeter - to the plus of the battery, minus - to minus). 2. Disconnect the wires from the spark plugs. 3. Run starter...
1. A voltmeter must be connected to the battery poles (plus voltmeter - to the plus of the battery, minus - to minus). 2. Disconnect the wires from the spark plugs. 3. Run starter...
Maintenance free batteries
All models are equipped with maintenance-free batteries. Such a battery under normal operating conditions practically does not require conservation. 1. If it is necessary to add...
All models are equipped with maintenance-free batteries. Such a battery under normal operating conditions practically does not require conservation. 1. If it is necessary to add...
Removing and installing the battery
1. Tilt the cover forward on the left side and remove. 2. Disconnect the battery wires from the clamps, first to ground, and then to the positive drive. 3. Unscrew the bolt of the...
1. Tilt the cover forward on the left side and remove. 2. Disconnect the battery wires from the clamps, first to ground, and then to the positive drive. 3. Unscrew the bolt of the...
Accumulator charging
Attention: Never close the battery terminals! In the event of a short circuit, the battery heats up and may burst. Do not approach the battery with an open flame During the...
Attention: Never close the battery terminals! In the event of a short circuit, the battery heats up and may burst. Do not approach the battery with an open flame During the...

Alternator
The generator, unlike the accumulator, is a dynamic current source. It has a more positive characteristic than a DC generator. Due to its design, the alternator can rotate at a...
The generator, unlike the accumulator, is a dynamic current source. It has a more positive characteristic than a DC generator. Due to its design, the alternator can rotate at a...

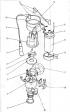
Removal and installation of the generator
1. Disconnect the wire to the battery ground. 2. On the rear cover of the generator, unfasten the springy latch 20 that secures the plug of the wire bundle (pic. 4.3). Pic. 4.3....
1. Disconnect the wire to the battery ground. 2. On the rear cover of the generator, unfasten the springy latch 20 that secures the plug of the wire bundle (pic. 4.3). Pic. 4.3....

V-belt replacement
1. Loosen the top bolt securing the alternator to the bracket. 2. Loosen the bottom bolt securing the alternator to the slotted movable bracket (photo 4.2). 3. Loosen bolt 2 that...
1. Loosen the top bolt securing the alternator to the bracket. 2. Loosen the bottom bolt securing the alternator to the slotted movable bracket (photo 4.2). 3. Loosen bolt 2 that...

Generator brush replacement
The brushes must be checked every 60,000 km and replaced if they are badly worn. Extraction 1. There is no need to remove the alternator to replace the brushes. 2. Disconnect the...
The brushes must be checked every 60,000 km and replaced if they are badly worn. Extraction 1. There is no need to remove the alternator to replace the brushes. 2. Disconnect the...
Generator disassembly
1. Remove the wire to ground from the battery. 2. Immobilize pulley 4, unscrew nut 1 and remove spring washer 2 and distance ring 3. 3. Pull the pulley off the shaft. 4. Remove...
1. Remove the wire to ground from the battery. 2. Immobilize pulley 4, unscrew nut 1 and remove spring washer 2 and distance ring 3. 3. Pull the pulley off the shaft. 4. Remove...

Control of generator elements
1. Bearings with increased radial clearances must be replaced with new ones. 2. Check the stator winding by connecting one terminal of the thermometer to the body, and the second...
1. Bearings with increased radial clearances must be replaced with new ones. 2. Check the stator winding by connecting one terminal of the thermometer to the body, and the second...

Starter
The starter is a suitably designed electric motor that provides a crankshaft speed of at least 70 rpm. The large transmission torque between the starter and the crankshaft allows...
The starter is a suitably designed electric motor that provides a crankshaft speed of at least 70 rpm. The large transmission torque between the starter and the crankshaft allows...

Starter disassembly
1. Remove the starter from the vehicle as described in point 13. 2. Clean the starter from dirt and dust. 3. Unscrew the two bolts indicated by arrows (photo 4.6). 4. Mark the...
1. Remove the starter from the vehicle as described in point 13. 2. Clean the starter from dirt and dust. 3. Unscrew the two bolts indicated by arrows (photo 4.6). 4. Mark the...
Control of starter elements
1. Wash all parts in extractive gasoline. 2. Connect one clamp of the homometer to the rotor shaft, and the second to the corresponding sections of the commutator. resistance...
1. Wash all parts in extractive gasoline. 2. Connect one clamp of the homometer to the rotor shaft, and the second to the corresponding sections of the commutator. resistance...

Ignition system
The ignition system generates an ignition spark in each cylinder of the engine at the appropriate moment. This spark ignites the entrained air/fuel mixture. To this end, in the...
The ignition system generates an ignition spark in each cylinder of the engine at the appropriate moment. This spark ignites the entrained air/fuel mixture. To this end, in the...
The device and principle of operation of the classical ignition system
Classical ignition systems are controlled by contacts. The ignition distributor contains a pair of hammer and anvil contacts. At the moment when the contacts are closed, the...
Classical ignition systems are controlled by contacts. The ignition distributor contains a pair of hammer and anvil contacts. At the moment when the contacts are closed, the...
TSZ-H ignition system
Transistor ignition target with gallotron (TSZ-H) is a non-contact ignition system. Instead of an interrupter in the ignition distributor, a gallotron that does not require...
Transistor ignition target with gallotron (TSZ-H) is a non-contact ignition system. Instead of an interrupter in the ignition distributor, a gallotron that does not require...
VEZ ignition system
The fully electronic ignition system type VEZ is a transistorized equipment with an electronic control system. This system is designed to control ignition timing based on an...
The fully electronic ignition system type VEZ is a transistorized equipment with an electronic control system. This system is designed to control ignition timing based on an...
Precautions When Repairing Electronic Ignition Systems
Electronic ignition systems produce a spark up to 30 kV. Under unfavorable conditions, for example, with humidity in the motor chamber, insulation breakdown may occur. When the...
Electronic ignition systems produce a spark up to 30 kV. Under unfavorable conditions, for example, with humidity in the motor chamber, insulation breakdown may occur. When the...

Removing the ignition distributor
Removing the ignition distributor is only necessary for major repairs. 1. Disconnect the wire to the battery ground. 2. Disconnect the low pressure connection from the regulator....
Removing the ignition distributor is only necessary for major repairs. 1. Disconnect the wire to the battery ground. 2. Disconnect the low pressure connection from the regulator....
Checking breaker contacts
A) Remove the ignition distributor cap. b) Pry out the contacts with a screwdriver. Slight blue burns on the pins indicate damage to the capacitor. At the same time, gray or black...
A) Remove the ignition distributor cap. b) Pry out the contacts with a screwdriver. Slight blue burns on the pins indicate damage to the capacitor. At the same time, gray or black...
Replacing breaker contacts
During operation, the contacts burn out and must be replaced. 1. Remove the cap of the ignition distributor, pull off the finger, remove the sealing washer. 2. Disconnect the wire...
During operation, the contacts burn out and must be replaced. 1. Remove the cap of the ignition distributor, pull off the finger, remove the sealing washer. 2. Disconnect the wire...

Setting the ignition timing
Before setting the ignition timing, it is necessary to check whether the flexible pipe must be pulled off the reduced pressure regulator or not. The engine number and designation...
Before setting the ignition timing, it is necessary to check whether the flexible pipe must be pulled off the reduced pressure regulator or not. The engine number and designation...
Capacitor check
The condenser is only available with contact ignition distributors. It is fixed on the outside of the ignition distributor housing and has a greater ability to obtain the required...
The condenser is only available with contact ignition distributors. It is fixed on the outside of the ignition distributor housing and has a greater ability to obtain the required...
Cap check
The cap must be dry. Ignition wire sockets must not be rusted or burnt. The inner contacts should also not be very deeply burned, as this will increase the distance between the...
The cap must be dry. Ignition wire sockets must not be rusted or burnt. The inner contacts should also not be very deeply burned, as this will increase the distance between the...
Gallotron check
1. Disconnect the high voltage wire from terminal No. 4 of the ignition distributor and connect to ground. Use an extension auxiliary cable for this purpose. 2. Pull off the...
1. Disconnect the high voltage wire from terminal No. 4 of the ignition distributor and connect to ground. Use an extension auxiliary cable for this purpose. 2. Pull off the...
Checking the TSZ-H control system
1. Remove the plug from the TSZ-H control system, to do this press the wire protector and remove it from the plug. 2. Connect a voltmeter between pins #4 and #2 of the plug. 3....
1. Remove the plug from the TSZ-H control system, to do this press the wire protector and remove it from the plug. 2. Connect a voltmeter between pins #4 and #2 of the plug. 3....
Spark plug
The spark plug consists of a central electrode, an insulator with a housing and an outer electrode. An ignition spark runs between these electrodes, which ignites the fuel...
The spark plug consists of a central electrode, an insulator with a housing and an outer electrode. An ignition spark runs between these electrodes, which ignites the fuel...
Type of spark plug
By the look of a spark plug that has worked for a long time (at least 1000 km from the moment of installation on the engine), you can determine the quality of its work, whether...
By the look of a spark plug that has worked for a long time (at least 1000 km from the moment of installation on the engine), you can determine the quality of its work, whether...
Lighting equipment
Lighting equipment includes: A) Headlights b) parking lights V) stop lights G) Registration table lights d) Registration table light e) reversing light and) Interior lamp h)...
Lighting equipment includes: A) Headlights b) parking lights V) stop lights G) Registration table lights d) Registration table light e) reversing light and) Interior lamp h)...

Replacing headlight bulbs
Turn off the light switch before changing light bulbs. 1. Disconnect the plug with rubber cover from the headlight (photo 4.8). 2. Squeeze the yoke that secures the lamp and...
Turn off the light switch before changing light bulbs. 1. Disconnect the plug with rubber cover from the headlight (photo 4.8). 2. Squeeze the yoke that secures the lamp and...

Replacing the side light bulb
1. Turn off side lights. 2. Turn the side light bulb holder to the left and remove it from the headlight (photo 4.11). 3. Press the bulb into the holder, turn it to the left and...
1. Turn off side lights. 2. Turn the side light bulb holder to the left and remove it from the headlight (photo 4.11). 3. Press the bulb into the holder, turn it to the left and...

Headlight replacement
1. Disconnect the lamp plug (photo 4.9) 2. Remove side light bulbs (photo 4.11). 3. Remove the plastic radiator cover 4 (pic. 11.1). Picture name 1 - point 1, 2 - point 2, etc. 4....
1. Disconnect the lamp plug (photo 4.9) 2. Remove side light bulbs (photo 4.11). 3. Remove the plastic radiator cover 4 (pic. 11.1). Picture name 1 - point 1, 2 - point 2, etc. 4....

Lighting installation (Sveta)
To adjust the light setting, there are two adjusting bolts accessible from the front of the car (pic. 4.12 and photo 4.13). The exact setting of the headlights is only possible...
To adjust the light setting, there are two adjusting bolts accessible from the front of the car (pic. 4.12 and photo 4.13). The exact setting of the headlights is only possible...

Replacing the front turn signal bulb
1. Loosen the screws and remove the lamp cover (photo 4.16). 2. Press the bulb into the holder, turn to the left and remove. 3. Insert a new bulb and turn to the right until it...
1. Loosen the screws and remove the lamp cover (photo 4.16). 2. Press the bulb into the holder, turn to the left and remove. 3. Insert a new bulb and turn to the right until it...

Removing the cover of the rear complex (connected) lamps
1. Open the trunk hood. 2. Press the latches inward and remove the housing of the complex lamp (photo 4.17). 3. Unscrew the three fixing nuts and remove the cap. If it is...
1. Open the trunk hood. 2. Press the latches inward and remove the housing of the complex lamp (photo 4.17). 3. Unscrew the three fixing nuts and remove the cap. If it is...

Replacing the Registration Table Lamp (numbers)
1. Unscrew the lamp cover in the trunk lid. 2. Pull out the socket with the bulb (photo 4.18). 3. Remove the lamp and insert a new one. 4. Insert the cartridge into the socket. 5....
1. Unscrew the lamp cover in the trunk lid. 2. Pull out the socket with the bulb (photo 4.18). 3. Remove the lamp and insert a new one. 4. Insert the cartridge into the socket. 5....

Relay in Golf and Jetta
The relays are under the shelf on the driver's side. To get into the fuse box, you need to remove the plug on the driver's side. Finding the right relay is very easy as each relay...
The relays are under the shelf on the driver's side. To get into the fuse box, you need to remove the plug on the driver's side. Finding the right relay is very easy as each relay...
Mass points summary
1 wire to battery ground 2 wire to gear box ground 10 near relay plate 12 engine chamber left side 14 near the steering column 15 on the engine head 17 on the intake manifold 18...
1 wire to battery ground 2 wire to gear box ground 10 near relay plate 12 engine chamber left side 14 near the steering column 15 on the engine head 17 on the intake manifold 18...
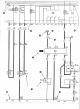
Detailed wiring diagrams
How to use an electrical circuit. It is necessary to find damage in the wiring or install an additional current consumer (it is impossible to do without knowing the purpose of the...
How to use an electrical circuit. It is necessary to find damage in the wiring or install an additional current consumer (it is impossible to do without knowing the purpose of the...
This section is available on russian, bulgarian, belarusian, ukrainian, serbian, croatian, romanian, polish, slovak, hungarian
Similar sections from other manuals for VW cars:
Electrical equipment: Lighting and appliances Volkswagen Passat B5 (1996-2005)
Electrical equipment: Lighting and appliances Volkswagen Passat B5 (1996-2005)
Golf 5
Golf 4
Golf 3
Golf 2
Golf 2 (petrol)
Golf 1 (petrol)
Golf 1 (diesel)
- General information
- User manual
- Maintenance
- Troubleshooting
- Power unit
- Engine repair
- Cooling and ventilation system
- Fuel system
- Ignition system
- Transmission
- Clutch
- Mechanical gearbox
- Automatic gearbox
- Chassis
- Brake system
- Car suspension
- Steering
- Body
- Interior (internal elements)
- Exterior (external elements)
- Doors and covers
- Electrical equipment
- Power devices
- Washers and wipers
- Lighting and appliances
- Electrical circuits
- General information
- User manual
- Weekly checks
- Maintenance
- Power unit
- Petrol engines
- Diesel engines
- Cooling system
- Fuel system (petrol)
- Control system (petrol)
- Fuel system (diesel)
- Exhaust system
- Transmission
- Clutch
- Car gearbox
- Drive shafts
- Chassis
- Car suspension
- Steering
- Wheels and tires
- Brake system
- Body
- Exterior (external elements)
- Interior (internal elements)
- Ventilation and heating
- Car doors and sunroof
- Washers and glass cleaners
- Electrical equipment
- Power devices
- Lighting and appliances
- Electrical circuits
- Petrol engine
- Engine repair
- Lubrication system
- Cooling system
- Ignition system
- Diesel engine
- Engine repair
- Diesel injection system
- Pre-glow system
- Transmission
- Clutch
- Gearbox and drive shafts
- Chassis
- Steering
- Wheels and suspension
- Brake system
- Electrical equipment
- Lighting and appliances
- Electrical circuits
- General information
- Introduction to guide
- User manual
- Petrol engines 1.3 l
- Engine repair
- Lubrication system
- Cooling system
- Carburetors
- Supply system
- Ignition system
- Petrol engines 1.6/1.8 l
- Engine repair
- Supply system
- Ignition system
- Diesel engines
- Engine repair
- Lubrication system
- Cooling system
- Power and exhaust system
- Transmission
- Clutch
- 4-speed gearbox 084
- 5-speed gearbox 085
- 4-speed gearbox 020/4R
- 5-speed gearbox 020/4T
- Automatic gearbox
- Drive shafts
- Chassis
- Steering
- Car suspension
- Brake system
- Body
- Body elements
- Doors, locks and windows
- Electrical equipment
- Equipment and devices
- Power devices
- General information
- Characteristics
- Car care
- Maintenance
- Power unit
- Engine repair
- Engine 1.05/1.30
- Engine 1.60/1.80
- Cooling and lubrication system
- Power and exhaust system
- Transmission
- Clutch
- Car gearbox
- Drive shafts
- Chassis
- Brake system
- Steering
- Suspension
- Body
- Body and equipment
- Electrical equipment
- Lighting and appliances
- Electrical circuits
- General information
- Characteristics
- User manual
- Maintenance
- Power unit
- Engine adjustment
- Engine 1.1/1.3
- Engine 1.5/1.6/1.8
- Engine electrical equipment
- Cooling system
- Fuel system
- Transmission
- Clutch and manual gearbox
- Automatic gearbox
- Chassis
- Steering
- Front suspension
- Rear suspension
- Brake system
- Electrical equipment
- Lighting and appliances
- Electrical circuits
- Body
- Body and equipment
- Optional equipment
- General information
- Specifications
- Maintenance
- Power unit
- Engine repair
- Exhaust and turbocharger
- Cooling system
- Fuel system
- Fuel injection system
- Transmission
- Clutch and drive shafts
- Car gearbox
- Chassis
- Suspension and wheels
- Steering
- Brake system
- Wheels and tires
- Body
- Heating and ventilation
- Exterior (external elements)
- Interior (internal elements)
- Doors and windows
- Electrical equipment
- Equipment and devices
- Lighting system
- Power devices
- Electrical circuits
VWmanual.ru © 2016-2024 | Mobile version | News and articles | Sitemap: EN BG BY UA RS HR RO PL SK HU | Write message | Site search
Passat B2 • Passat B3 • Passat B4 • Passat B5 • Passat B6 • Golf 1, diesel • Golf 1, petrol • Golf 2, petrol • Golf 2 • Golf 3 • Golf 4 • Golf 5 • Polo 3 • Polo 4 • Touareg 1 • Tiguan 1 • Sharan 1 • Transporter T3 • Transporter T4 • Beetle • Caddy 3 •
Passat B2 • Passat B3 • Passat B4 • Passat B5 • Passat B6 • Golf 1, diesel • Golf 1, petrol • Golf 2, petrol • Golf 2 • Golf 3 • Golf 4 • Golf 5 • Polo 3 • Polo 4 • Touareg 1 • Tiguan 1 • Sharan 1 • Transporter T3 • Transporter T4 • Beetle • Caddy 3 •