English Русский
Български
Беларускі
Український
Српски
Hrvatski
Română
Polski
Slovenský
Magyar
  |  Articles  |  Sitemap  |  Contacts  |    |
Car maintenance Ford Car maintenance Hyundai Car maintenance Chevrolet Car maintenance BMW Car maintenance Audi Car maintenance Opel Car maintenance AvtoVAZ
VWmanual.ru


Main   Passat   Golf   Polo   Touareg   Tiguan   Sharan   Transporter   Others  
Golf 1 (1974-1984, diesel) Golf 1 (1974-1984, petrol) Golf 2 (1984-1993, petrol) Golf 2 (1984-1993) Golf 3 (1991-1997) Golf 4 (1997-2004) Golf 5 (2003-2008)

Cylinder head assembly (VW Golf 2)

  • Main
  • Golf
  • Golf 2
  • Diesel engines
  • Engine repair
  • Cylinder head assembly
            0


The cylinder head is assembled in the reverse order of its disassembly. When assembling, follow these instructions:

Lubricate the valve stems well with engine oil and insert them into the guide bushings.

Insert the lower valve spring plates using special pliers.

Install the valve stem seals on the valve stem. You can use the special tool shown in the figure for installation figure 59, as follows:
  • place the plastic sleeve included in the tool kit onto the protruding valve stem;
  • lubricate the oil deflector cap of the stem 2 and put it on the sleeve of the device 3. Move the device to the cap and carefully put it on the valve stem.

Warning: Attempting to install the cap without using a special tool may result in damage to the cap, which will result in significant oil consumption.


Please note that if the valves were previously lapped, they must be installed in their original locations, otherwise their working chamfers will not match.

Reinstall the inner and outer springs in their original positions (if they have not been replaced). When replacing valve springs in an engine with hydraulic tappets, it is necessary to pay attention that they were shorter.

Install the upper spring plate and install the special spring compressor. When the end of the rod appears above the plate after the spring is compressed, insert both crackers into the groove with pliers and slowly release the spring compression. Before doing this, check whether the crackers previously used fit the new valves. They must match the valve shown in Figure 190.


Use a plastic hammer to hit the end of the valve stem several times. If the crackers were installed incorrectly, they should fall out of the grooves. To be on the safe side, cover the stem with a rag.

Install the pushers in their original places according to their marks (see figure 43) and corresponding adjusting washers.

Lubricate the camshaft journals and bearings with engine oil. Install the shaft so that both cam lobe projections above the valves of the first cylinder are directed upward.

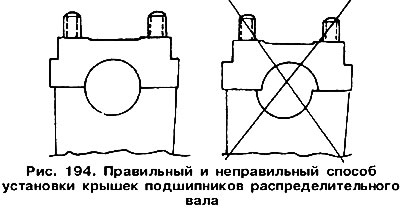
Install bearing caps Nq 1, 3 and 5 (figure 193) and lightly press them with nuts. Since the covers cannot be swapped, you should check whether they are installed correctly (figure 194).
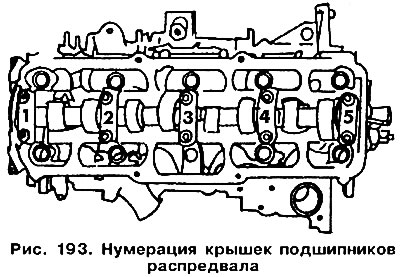
Install bearing caps Nq 1, 3 and 5 (figure 193) and lightly press them with nuts. Since the covers…

Tighten the cover mounting nuts gradually, in a criss-cross pattern, and then tighten to a torque of 20 Nm.


Take the camshaft oil seal and determine which side the working edge is on. After installation, it should be facing outward. Lightly lubricate the working edge of the oil seal and the place where it contacts the shaft. Install the oil seal on the shaft journal using a pipe of a suitable diameter. The oil seal should be installed flush with the end surface of the cylinder head. The oil seal can be installed in another way, just like the front crankshaft oil seal.

Install the toothed pulley (not forgetting about the key) and tighten the bolts of its fastening. Lock the toothed pulley (for example, with an old toothed belt) and tighten the bolts to a torque of 45 Nm.

Install the intake and exhaust manifolds (using new gaskets).

Screw in the injectors. Install other auxiliary units and cylinder head parts.

This article is available at russian, bulgarian, belarusian, ukrainian, serbian, croatian, romanian, polish, slovak, hungarian
The text has been checked: Kolesnikov Artem

Share information:

Previous articles
Checking hydraulic valve lifters
Checking the camshaft (engine with hydraulic tappets)
Checking the cylinder head
Checking the valves
Checking valve seats
Checking the valve guides
Next articles
Installing the cylinder head
Pistons and connecting rods — design description
Removal connecting rod and piston group parts from the cylinder block
Checking the connecting rod and piston group parts
Assembly of the connecting rod and piston group
Installation of connecting rod and piston group


Similar articles from other manuals for VW cars:
Removal and installation the cylinder head Passat B3 (1988-1993)
Cylinder head Polo 3 (1995-2003)
Removal and installation the cylinder head cover Touareg 1 (2002-2006)
Cylinder head Tiguan 1 (2007-2015)
Removal the cylinder head Sharan 1 (1995-2000)
Removal and installation the cylinder head (petrol 4-cylinder) Transporter T4 (1990-2003)
Checking the cylinder head for warpage Caddy 3 (2003-2010)
Link to this page in different formats


Visitor comments


No comments yet


How much will 15 + 31 =


Golf 5 
  • General information
  • User manual
  • Maintenance
  • Troubleshooting
  • Power unit
  • Engine repair
  • Cooling and ventilation system
  • Fuel system
  • Ignition system
  • Transmission
  • Clutch
  • Mechanical gearbox
  • Automatic gearbox
  • Chassis
  • Brake system
  • Car suspension
  • Steering
  • Body
  • Interior (internal elements)
  • Exterior (external elements)
  • Doors and covers
  • Electrical equipment
  • Power devices
  • Washers and wipers
  • Lighting and appliances
  • Electrical circuits
Golf 4 
  • General information
  • User manual
  • Weekly checks
  • Maintenance
  • Power unit
  • Petrol engines
  • Diesel engines
  • Cooling system
  • Fuel system (petrol)
  • Control system (petrol)
  • Fuel system (diesel)
  • Exhaust system
  • Transmission
  • Clutch
  • Car gearbox
  • Drive shafts
  • Chassis
  • Car suspension
  • Steering
  • Wheels and tires
  • Brake system
  • Body
  • Exterior (external elements)
  • Interior (internal elements)
  • Ventilation and heating
  • Car doors and sunroof
  • Washers and glass cleaners
  • Electrical equipment
  • Power devices
  • Lighting and appliances
  • Electrical circuits
Golf 3 
  • Petrol engine
  • Engine repair
  • Lubrication system
  • Cooling system
  • Ignition system
  • Diesel engine
  • Engine repair
  • Diesel injection system
  • Pre-glow system
  • Transmission
  • Clutch
  • Gearbox and drive shafts
  • Chassis
  • Steering
  • Wheels and suspension
  • Brake system
  • Electrical equipment
  • Lighting and appliances
  • Electrical circuits
Golf 2 
  • General information
  • Introduction to guide
  • User manual
  • Petrol engines 1.3 l
  • Engine repair
  • Lubrication system
  • Cooling system
  • Carburetors
  • Supply system
  • Ignition system
  • Petrol engines 1.6/1.8 l
  • Engine repair
  • Supply system
  • Ignition system
  • Diesel engines
  • Engine repair
  • Lubrication system
  • Cooling system
  • Power and exhaust system
  • Transmission
  • Clutch
  • 4-speed gearbox 084
  • 5-speed gearbox 085
  • 4-speed gearbox 020/4R
  • 5-speed gearbox 020/4T
  • Automatic gearbox
  • Drive shafts
  • Chassis
  • Steering
  • Car suspension
  • Brake system
  • Body
  • Body elements
  • Doors, locks and windows
  • Electrical equipment
  • Equipment and devices
  • Power devices
Golf 2 (petrol) 
  • General information
  • Characteristics
  • Car care
  • Maintenance
  • Power unit
  • Engine repair
  • Engine 1.05/1.30
  • Engine 1.60/1.80
  • Cooling and lubrication system
  • Power and exhaust system
  • Transmission
  • Clutch
  • Car gearbox
  • Drive shafts
  • Chassis
  • Brake system
  • Steering
  • Suspension
  • Body
  • Body and equipment
  • Electrical equipment
  • Lighting and appliances
  • Electrical circuits
Golf 1 (petrol) 
  • General information
  • Characteristics
  • User manual
  • Maintenance
  • Power unit
  • Engine adjustment
  • Engine 1.1/1.3
  • Engine 1.5/1.6/1.8
  • Engine electrical equipment
  • Cooling system
  • Fuel system
  • Transmission
  • Clutch and manual gearbox
  • Automatic gearbox
  • Chassis
  • Steering
  • Front suspension
  • Rear suspension
  • Brake system
  • Electrical equipment
  • Lighting and appliances
  • Electrical circuits
  • Body
  • Body and equipment
  • Optional equipment
Golf 1 (diesel) 
  • General information
  • Specifications
  • Maintenance
  • Power unit
  • Engine repair
  • Exhaust and turbocharger
  • Cooling system
  • Fuel system
  • Fuel injection system
  • Transmission
  • Clutch and drive shafts
  • Car gearbox
  • Chassis
  • Suspension and wheels
  • Steering
  • Brake system
  • Wheels and tires
  • Body
  • Heating and ventilation
  • Exterior (external elements)
  • Interior (internal elements)
  • Doors and windows
  • Electrical equipment
  • Equipment and devices
  • Lighting system
  • Power devices
  • Electrical circuits
VWmanual.ru © 2016-2026 | Mobile version | News and articles | Sitemap: EN BG BY UA RS HR RO PL SK HU | Write message | Site search
Passat B2 • Passat B3 • Passat B4 • Passat B5 • Passat B6 • Golf 1, diesel • Golf 1, petrol • Golf 2, petrol • Golf 2 • Golf 3 • Golf 4 • Golf 5 • Polo 3 • Polo 4 • Touareg 1 • Tiguan 1 • Sharan 1 • Transporter T3 • Transporter T4 • LT 28 • LT 2D • Beetle • Caddy 3 •
Our website uses cookies to ensure functionality and convenience.