
Exterior elements of car body Volkswagen Tiguan 1

Front carrier
1 - Front carrier panel with parts attached to it 2 - Bolt, 2 pcs., 2 Nm 3 - Air duct 4 - 8int, 2 per side, 8 Nm 5 - Bolt, 1 per side, 8 Nm 6 - Bracket left 7 - Driver front...
1 - Front carrier panel with parts attached to it 2 - Bolt, 2 pcs., 2 Nm 3 - Air duct 4 - 8int, 2 per side, 8 Nm 5 - Bolt, 1 per side, 8 Nm 6 - Bracket left 7 - Driver front...

Service position
Remove the front bumper cover. For vehicles with intercooler, disconnect: air hoses. Release screws -4- on side members on right and left. Screw in guide pins -T10093- on side...
Remove the front bumper cover. For vehicles with intercooler, disconnect: air hoses. Release screws -4- on side members on right and left. Screw in guide pins -T10093- on side...

Removal and installation of the forward bearing panel assy
Instruction: The front carrier panel is a part, the condition of which determines the safety of the vehicle operation. For this reason, it cannot be repaired. If there is damage,...
Instruction: The front carrier panel is a part, the condition of which determines the safety of the vehicle operation. For this reason, it cannot be repaired. If there is damage,...

Removal and installation of wings
Front fender Instructions: The illustrations show the left side of the vehicle. On the right, the work is done in a similar way. 1 - Wing 2 - Foam element, inserted from above...
Front fender Instructions: The illustrations show the left side of the vehicle. On the right, the work is done in a similar way. 1 - Wing 2 - Foam element, inserted from above...

Soundproof casing
Long execution Instruction: The design depends on the installed engine. Take into account the resulting deviations in the removal and installation work. The threads of the new...
Long execution Instruction: The design depends on the installed engine. Take into account the resulting deviations in the removal and installation work. The threads of the new...

Device, removal and installation of the hood
1 - Hood 2 - Adjustable stop, 2 pcs. left and right 3 - Noise isolation 4 - Loop 5 - Hose to windshield washer jets 6 - Windshield washer jets 7 - Protective film -7D0 827 471- 8...
1 - Hood 2 - Adjustable stop, 2 pcs. left and right 3 - Noise isolation 4 - Loop 5 - Hose to windshield washer jets 6 - Windshield washer jets 7 - Protective film -7D0 827 471- 8...

Disconnecting the hood cable
Open the hood. The connector -2- is located on the front support panel -6- above the headlight on the driver's side. Detach cable connector -2- from panel -6- in direction of...
Open the hood. The connector -2- is located on the front support panel -6- above the headlight on the driver's side. Detach cable connector -2- from panel -6- in direction of...

Hood adjustment
Instructions: When adjusting the hood, the vehicle must be on a level surface. The adjustable stops -2- on the left and right are not intended for adjusting the hood. They are...
Instructions: When adjusting the hood, the vehicle must be on a level surface. The adjustable stops -2- on the left and right are not intended for adjusting the hood. They are...

Hood release lever
1 - Support bracket 2 - Hood release lever 3 - Retaining ring 4 - Bolt, 2 pcs., 1.5 Nm 5 - Cable, fixed on the support bracket 6 - Bracket 7 - Nuts, 2 pcs. Removal and...
1 - Support bracket 2 - Hood release lever 3 - Retaining ring 4 - Bolt, 2 pcs., 1.5 Nm 5 - Cable, fixed on the support bracket 6 - Bracket 7 - Nuts, 2 pcs. Removal and...

Luggage compartment door
1 - Tailgate 2 - Overlay of the handle with a key, it is possible to have a rear view camera 3 - Tailgate lock 4 - Loop 5 - Emphasis 6 - Seal 7 - Lock bracket 8 - Gas stop 9 -...
1 - Tailgate 2 - Overlay of the handle with a key, it is possible to have a rear view camera 3 - Tailgate lock 4 - Loop 5 - Emphasis 6 - Seal 7 - Lock bracket 8 - Gas stop 9 -...

Removal and installation of loops of a door of a luggage compartment
Removing Remove tailgate -5-. Shine the back of the ceiling panel. Unscrew hexagon nut -4- from interior from hinge stud -1- and remove external hinge -1-. Installation Insert the...
Removing Remove tailgate -5-. Shine the back of the ceiling panel. Unscrew hexagon nut -4- from interior from hinge stud -1- and remove external hinge -1-. Installation Insert the...

Tailgate locking mechanism
1 - Tailgate lock 2 - Bolt, 2 pcs., 23 Nm 3 - Handle cover with key, screw tightening torque: 2 Nm 4 - Connectors, rear view cameras 5 - The key, and in this case the key with the...
1 - Tailgate lock 2 - Bolt, 2 pcs., 23 Nm 3 - Handle cover with key, screw tightening torque: 2 Nm 4 - Connectors, rear view cameras 5 - The key, and in this case the key with the...

Removal and installation of the lock of a door of a luggage compartment
Removing Remove tailgate trim. Release screws -3- and remove tailgate lock -1-. Unplug connector -2- on back of lock. If there is a malfunction in the electrical circuit of the...
Removing Remove tailgate trim. Release screws -3- and remove tailgate lock -1-. Unplug connector -2- on back of lock. If there is a malfunction in the electrical circuit of the...

Removal and installation of a cover of the handle with a key for opening
Removing Remove tailgate trim. Disconnect connector -6- in tailgate. Unscrew hexagon nuts -5- from button studs on tailgate. Remove bolts -2- and remove rear door handle cover...
Removing Remove tailgate trim. Disconnect connector -6- in tailgate. Unscrew hexagon nuts -5- from button studs on tailgate. Remove bolts -2- and remove rear door handle cover...

Tailgate adjustment
Instructions: When adjusting the tailgate, the vehicle must be on a level surface. The tailgate lock -3- is bolted directly to the tailgate itself -1-. It does not have slotted...
Instructions: When adjusting the tailgate, the vehicle must be on a level surface. The tailgate lock -3- is bolted directly to the tailgate itself -1-. It does not have slotted...

Lock shackle adjustment
Release latches -arrow- on both covers. -1-. Pull plugs -1- out of rear end panel trim -2-. Instruction: By loosening the screws -2-, you can adjust the position of the lock...
Release latches -arrow- on both covers. -1-. Pull plugs -1- out of rear end panel trim -2-. Instruction: By loosening the screws -2-, you can adjust the position of the lock...

Stop adjustment
Stop -2- secured with bolt -3-, tightening torque: 10 Nm. The position of this stop is not adjustable. Remove cover from stop holder -4-. Slightly loosen the bolt -5- securing the...
Stop -2- secured with bolt -3-, tightening torque: 10 Nm. The position of this stop is not adjustable. Remove cover from stop holder -4-. Slightly loosen the bolt -5- securing the...

Gas stops
1 - Gas stop 2 - Bracket with ball pin 3 - Bolts, 2 pcs. per bracket, 10 Nm 4 - Ball pin, 20 Nm Removal and installation of the gas stop Open the tailgate and support it. Insert a...
1 - Gas stop 2 - Bracket with ball pin 3 - Bolts, 2 pcs. per bracket, 10 Nm 4 - Ball pin, 20 Nm Removal and installation of the gas stop Open the tailgate and support it. Insert a...

Filler cap and actuator
Instruction: If the fuel filler flap cannot be opened, the actuator -4- can be released manually. The actuator can be reached through the gap between the sidewall and the...
Instruction: If the fuel filler flap cannot be opened, the actuator -4- can be released manually. The actuator can be reached through the gap between the sidewall and the...

Front door device
1 - Door 2 - Door handle 3 - Lining 4 - Lid 5 - Lock cylinder 6 - Door lock, removed only assembled with a carrier panel 7 - Carrier panel 8 - Bolt, 32 Nm, always replace removed...
1 - Door 2 - Door handle 3 - Lining 4 - Lid 5 - Lock cylinder 6 - Door lock, removed only assembled with a carrier panel 7 - Carrier panel 8 - Bolt, 32 Nm, always replace removed...

Door hinges
Instructions: The illustrations show the right side of the vehicle. For the left side, the work is done in a similar way. Loose hinge bolts must always be replaced with new ones....
Instructions: The illustrations show the right side of the vehicle. For the left side, the work is done in a similar way. Loose hinge bolts must always be replaced with new ones....

Removal and installation of door hinges
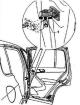
Removing By pressing the latch, remove the bellows -2- -arrow a- and disconnect from the A-pillar. Turn the locking lever -3- downwards -arrow b- and disconnect the electrical...
Removing By pressing the latch, remove the bellows -2- -arrow a- and disconnect from the A-pillar. Turn the locking lever -3- downwards -arrow b- and disconnect the electrical...

Upper door hinge bolt
Instructions: The top bolt can be loosened without removing the dashboard. The procedure is written off for the driver's side of a car with a left-hand drive. Remove dash panel...
Instructions: The top bolt can be loosened without removing the dashboard. The procedure is written off for the driver's side of a car with a left-hand drive. Remove dash panel...

Door adjustment
Instructions: Before carrying out work on adjusting the position of the front door, place the car on a hard, level surface. It is considered that the door is adjusted correctly...
Instructions: Before carrying out work on adjusting the position of the front door, place the car on a hard, level surface. It is considered that the door is adjusted correctly...

Carrier door panel with attachments
Instructions: The illustrations show the right side of the vehicle. For the left side, the work is done in a similar way. 1 - Door 2 - Cable from the inside handle to the lock 3 -...
Instructions: The illustrations show the right side of the vehicle. For the left side, the work is done in a similar way. 1 - Door 2 - Cable from the inside handle to the lock 3 -...

Removal and installation of the carrier panel with attachments
Instructions: Below is a description of the removal and installation of the right carrier panel. The left carrier panel is removed and installed in the same way, the bolts are...
Instructions: Below is a description of the removal and installation of the right carrier panel. The left carrier panel is removed and installed in the same way, the bolts are...

Door opening limiter
1 - Door opening limiter 2 - Casing, boot 3 - Bolt, 2 pcs., 9 Nm 4 - Bolt, 30 Nm
1 - Door opening limiter 2 - Casing, boot 3 - Bolt, 2 pcs., 9 Nm 4 - Bolt, 30 Nm

Door handle and lock
Instructions: The illustrations show the left side of the vehicle. On the right, the work is done in a similar way. 1 - Door lock. The door lock can only be removed together with...
Instructions: The illustrations show the left side of the vehicle. On the right, the work is done in a similar way. 1 - Door lock. The door lock can only be removed together with...

Removal and installation of a roof of a larva of the lock
Removing Instructions: While removing the cover of the lock cylinder, do not turn the key, and do not try to break off the cover. The lock cylinder is available only in the...
Removing Instructions: While removing the cover of the lock cylinder, do not turn the key, and do not try to break off the cover. The lock cylinder is available only in the...

Removal and installation of a stammering larva
Removing Instruction: The lock cylinder is available only in the driver's door. The hatch cover has been removed. Remove cover -4- from retaining bolt. Release locking bolt -3- of...
Removing Instruction: The lock cylinder is available only in the driver's door. The hatch cover has been removed. Remove cover -4- from retaining bolt. Release locking bolt -3- of...

Removing and installing the cover (without larva)
Removing Insert hook -3438- 40 mm -dimension A- into the door behind the locking clip -1-. Pull hook -3438-backwards -arrow a-. Pull handle -3- slightly away from door -arrow c-....
Removing Insert hook -3438- 40 mm -dimension A- into the door behind the locking clip -1-. Pull hook -3438-backwards -arrow a-. Pull handle -3- slightly away from door -arrow c-....

Removal and installation of the external door handle
Instructions: Below is a description of the removal and installation of the outer right door handle. The outer handle of the left door is removed and installed in the same way....
Instructions: Below is a description of the removal and installation of the outer right door handle. The outer handle of the left door is removed and installed in the same way....

Removal and installation of a door stutter
Instructions: Below is a description of the removal and installation of the right door lock. The lock of the left door is removed and installed in the same way. Remove support...
Instructions: Below is a description of the removal and installation of the right door lock. The lock of the left door is removed and installed in the same way. Remove support...

Removal and installation of the case of the external handle
Removing Remove carrier panel. Press catch -arrow a- on handle housing -1- downwards. Move the handle housing -1- in the direction of the -arrow b- until the fasteners -6- and the...
Removing Remove carrier panel. Press catch -arrow a- on handle housing -1- downwards. Move the handle housing -1- in the direction of the -arrow b- until the fasteners -6- and the...

Removal and installation of an arm of the lock of a door
Removing Remove carrier panel. Release locks -arrows a-. Remove bracket -1- from door lock -2- -arrow c-. Installation Slide bracket into place in lock -arrow b-. Fasten the clips...
Removing Remove carrier panel. Release locks -arrows a-. Remove bracket -1- from door lock -2- -arrow c-. Installation Slide bracket into place in lock -arrow b-. Fasten the clips...

Door soundproofing
1 - Door 2 - Noise isolation, self-adhesive. Installation: if necessary, cut and place between the door walls, heat up with an industrial hot air gun -VAG 1416- and press firmly...
1 - Door 2 - Noise isolation, self-adhesive. Installation: if necessary, cut and place between the door walls, heat up with an industrial hot air gun -VAG 1416- and press firmly...

Central locking
1 - Convenience systems central control unit -J393-. Fitting location: under dash panel on passenger side 2 - Block. Installation location: right A-pillar, to disconnect the...
1 - Convenience systems central control unit -J393-. Fitting location: under dash panel on passenger side 2 - Block. Installation location: right A-pillar, to disconnect the...
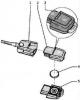
Removal and installation of a battery of a folding key of ignition with remote control
1 - Key with transponder (floating code) 2 - Transmitter housing - upper part. Version with three buttons 3 - The LED, when you press the remote control buttons, should blink, if...
1 - Key with transponder (floating code) 2 - Transmitter housing - upper part. Version with three buttons 3 - The LED, when you press the remote control buttons, should blink, if...

Backdoor
1 - Door 2 - Door handle with gasket 3 - Lid 4 - Carrier panel with door lock, the door lock can only be removed together with the carrier panel 5 - Bolt, 30 Nm 6 - Door hinge,...
1 - Door 2 - Door handle with gasket 3 - Lid 4 - Carrier panel with door lock, the door lock can only be removed together with the carrier panel 5 - Bolt, 30 Nm 6 - Door hinge,...

Rear door hinges
Instructions: The illustrations show the right side of the vehicle. For the left side, the work is done in a similar way. Loose hinge bolts must always be replaced with new ones....
Instructions: The illustrations show the right side of the vehicle. For the left side, the work is done in a similar way. Loose hinge bolts must always be replaced with new ones....
Lubrication of new door hinges
Instruction: The description is made for the right side of the car. The left side is similar to the right. A new loop is lubricated after painting. Lubricate the upper hinge -1-...
Instruction: The description is made for the right side of the car. The left side is similar to the right. A new loop is lubricated after painting. Lubricate the upper hinge -1-...

Installing the hinges after replacing the B-pillar
ATTENTION: If the B-pillar has been replaced, the bolts on the B-pillar must be tightened as described below. The B-pillar has been replaced, installation is carried out in the...
ATTENTION: If the B-pillar has been replaced, the bolts on the B-pillar must be tightened as described below. The B-pillar has been replaced, installation is carried out in the...

Rear door adjustment
Instructions: Before carrying out work on adjusting the position of the rear door, place the car on a hard, level surface. The position of the rear door is adjusted correctly if,...
Instructions: Before carrying out work on adjusting the position of the rear door, place the car on a hard, level surface. The position of the rear door is adjusted correctly if,...

Carrier panel with attachments
Instructions: The illustrations show the right side of the vehicle. For the left side, the work is done in a similar way. 1 - Carrier panel 2 - Cable from the inside handle to the...
Instructions: The illustrations show the right side of the vehicle. For the left side, the work is done in a similar way. 1 - Carrier panel 2 - Cable from the inside handle to the...

Removal and installation of the carrier panel with attachments
Instructions: Below is a description of the removal and installation of the right carrier panel. The left carrier panel is removed and installed in the same way. The carrier panel...
Instructions: Below is a description of the removal and installation of the right carrier panel. The left carrier panel is removed and installed in the same way. The carrier panel...

Tailgate handle and lock
Instructions: The illustrations show the right side of the vehicle. S.leva works are performed in a similar way. 1 - Door lock. The door lock can only be removed together with the...
Instructions: The illustrations show the right side of the vehicle. S.leva works are performed in a similar way. 1 - Door lock. The door lock can only be removed together with the...

Removing and installing the lock cover
Removing Instructions: Below is a description of the removal and installation of the right cover. Removal and installation of the left cover is carried out in the same way. Insert...
Removing Instructions: Below is a description of the removal and installation of the right cover. Removal and installation of the left cover is carried out in the same way. Insert...

Removal and installation of the rear door handle
Removing Instructions: Below is a description of the removal and installation of the outer right door handle. The outer handle of the left door is removed and installed in the...
Removing Instructions: Below is a description of the removal and installation of the outer right door handle. The outer handle of the left door is removed and installed in the...

Removal and installation of the lock of a back door
Instructions: The process of removing and installing the right door stutter is described. Removal and installation of the lock of the left door is made in the same way. Remove...
Instructions: The process of removing and installing the right door stutter is described. Removal and installation of the lock of the left door is made in the same way. Remove...

Removing and installing the handle housing
Removing Remove carrier panel. Press lock -arrow a- on handle housing -5- downwards. Slide handle housing -1- in direction of -arrow b- until fasteners -6- in bracket guide -2-...
Removing Remove carrier panel. Press lock -arrow a- on handle housing -5- downwards. Slide handle housing -1- in direction of -arrow b- until fasteners -6- in bracket guide -2-...

Removal and installation of an arm of a back door
Removing Remove carrier panel. Release locks -arrows a-. Remove bracket -1- from door lock -2- -arrow c-. Installation Slide bracket into place in lock -arrow b-. Fasten the clips...
Removing Remove carrier panel. Release locks -arrows a-. Remove bracket -1- from door lock -2- -arrow c-. Installation Slide bracket into place in lock -arrow b-. Fasten the clips...

Panoramic sunroof control
The panoramic sunroof can only be operated when the ignition is on. After the ignition is turned off, the sunroof can be operated until the front left or front right door is...
There is 1 comment
The panoramic sunroof can only be operated when the ignition is on. After the ignition is turned off, the sunroof can be operated until the front left or front right door is...
There is 1 comment

Sunblind motor initialization
The ignition is on. Press the sunshade close button -3- and hold it in this position during the entire initialization process (about 20 s). During initialization, the blind first...
The ignition is on. Press the sunshade close button -3- and hold it in this position during the entire initialization process (about 20 s). During initialization, the blind first...

Removal and installation of a forward glass section of the hatch
Removing Slide section -1- far enough to allow strip -2- to be removed. Slide the strip -2- downwards in the direction of -arrow A- and carefully remove it from the holder -3- on...
Removing Slide section -1- far enough to allow strip -2- to be removed. Slide the strip -2- downwards in the direction of -arrow A- and carefully remove it from the holder -3- on...

Removal and installation of back glass section of the hatch
Removing Instructions: When unscrewing the bolts, use a magnetic screwdriver so that the bolts cannot fall into the guides of the sunroof mechanism. Turn the adjuster ring beyond...
Removing Instructions: When unscrewing the bolts, use a magnetic screwdriver so that the bolts cannot fall into the guides of the sunroof mechanism. Turn the adjuster ring beyond...

Height adjustment of the front and rear sunroof sections
Instructions: The front section is only adjustable from the front, and the back section is only adjustable from the back. To achieve the best appearance, it is essential that the...
Instructions: The front section is only adjustable from the front, and the back section is only adjustable from the back. To achieve the best appearance, it is essential that the...

Replacing the hatch seals
Replacing the front and inner seals Remove the corresponding rear section seal -1-. 2 - front seal 3 - internal seal Remove adhesive residue with nozzle -VAS 6349- The adhesive...
Replacing the front and inner seals Remove the corresponding rear section seal -1-. 2 - front seal 3 - internal seal Remove adhesive residue with nozzle -VAS 6349- The adhesive...

Removal and installation of a fairing of the hatch
Fully open the front section. Loosen retaining clips -3- on bracket -2- for fairing -1- using a screwdriver. Unclip bracket -2- for fairing -1- using a screwdriver. Remove bolts...
Fully open the front section. Loosen retaining clips -3- on bracket -2- for fairing -1- using a screwdriver. Unclip bracket -2- for fairing -1- using a screwdriver. Remove bolts...

Removal and installation of a sun-protection blind
Removing Fully open the sun shade. Instruction: If the electric drive fails, the blind can be fully opened. turning the motor with an ordinary hex wrench. Remove the rear sunroof....
Removing Fully open the sun shade. Instruction: If the electric drive fails, the blind can be fully opened. turning the motor with an ordinary hex wrench. Remove the rear sunroof....

Removal and installation of the mechanism of a raising and a cable of a drive of forward section of the hatch
Removing Remove the front sunroof section. Remove the rear sunroof. Remove frame. Remove sunroof motor. Remove the rear frame. Once the rear part has been removed, the lifting...
Removing Remove the front sunroof section. Remove the rear sunroof. Remove frame. Remove sunroof motor. Remove the rear frame. Once the rear part has been removed, the lifting...

Hatch frame device
1 - Curtain guide, does not change separately 2 - Guide rail, not changeable separately, fixed at the front 3 - Bolt, 2 Nm 4 - Back 5 - Rear engine panel 6 - Front engine panel 7...
1 - Curtain guide, does not change separately 2 - Guide rail, not changeable separately, fixed at the front 3 - Bolt, 2 Nm 4 - Back 5 - Rear engine panel 6 - Front engine panel 7...

Sunroof Maintenance
In general, a panoramic sunroof does not require regular maintenance. If heavily soiled, use solvent -D 009 401 04- for cleaning. Then grease the sliding surfaces -3- of the...
In general, a panoramic sunroof does not require regular maintenance. If heavily soiled, use solvent -D 009 401 04- for cleaning. Then grease the sliding surfaces -3- of the...

Opening and closing the hatch in the absence of electrical power
Glass section of the hatch Instruction: In the absence of power supply, the front section of the sunroof can be moved by rotating the drive motor using an ordinary hex wrench. The...
Glass section of the hatch Instruction: In the absence of power supply, the front section of the sunroof can be moved by rotating the drive motor using an ordinary hex wrench. The...

Cleaning the drain hoses
Instructions: For cleaning, it is recommended to use a tool made from an old speedometer cable (length approx. 2300 mm). Front drain hoses The front drain hoses run along the...
Instructions: For cleaning, it is recommended to use a tool made from an old speedometer cable (length approx. 2300 mm). Front drain hoses The front drain hoses run along the...

Front bumper cover
General instructions The Tiguan is available with two bumper finishes. The urban bumper cover is designed for an overhang angle of 18°. The off-road bumper cover is designed for...
General instructions The Tiguan is available with two bumper finishes. The urban bumper cover is designed for an overhang angle of 18°. The off-road bumper cover is designed for...

Removal and installation of facing of a forward bumper
The description also applies to vehicles with Volkswagen Individual equipment. Instructions: It should be noted that depending on the model, the removal and installation of the...
The description also applies to vehicles with Volkswagen Individual equipment. Instructions: It should be noted that depending on the model, the removal and installation of the...

Hinged details of facing of a forward bumper
The description also applies to vehicles with Volkswagen Individual equipment. Instructions: Some differences in the design of parts depending on the model should be taken into...
The description also applies to vehicles with Volkswagen Individual equipment. Instructions: Some differences in the design of parts depending on the model should be taken into...

Internal details of fastening of facing of a forward bumper
1 - Guide, left and right 2- Headlights with sockets for fastening the bumper trim 3 - Cross member for attaching bumper cover, pedestrian protection, not for all markets
1 - Guide, left and right 2- Headlights with sockets for fastening the bumper trim 3 - Cross member for attaching bumper cover, pedestrian protection, not for all markets

Details and components of the front bumper
Instructions: Bumper beams for city and off-road models are not made interchangeable. 1 - front bumper beam 2 - Bolt, left and right, 2 pcs. each side, 8 Nm 3 - Bolt, 8 pcs., 60...
Instructions: Bumper beams for city and off-road models are not made interchangeable. 1 - front bumper beam 2 - Bolt, left and right, 2 pcs. each side, 8 Nm 3 - Bolt, 8 pcs., 60...

Front bumper cover, off-road version
1 - Front bumper cover made of PP material (polypropylene) /EPRM 2 - Overlay 3 - Bolt, 3 pcs., 2 Nm 4 - Bolt, 4 pcs., 2 Nm 5 - Bolt, 2 pcs., 6 Nm 6 - Guide, bumper fastened to the...
1 - Front bumper cover made of PP material (polypropylene) /EPRM 2 - Overlay 3 - Bolt, 3 pcs., 2 Nm 4 - Bolt, 4 pcs., 2 Nm 5 - Bolt, 2 pcs., 6 Nm 6 - Guide, bumper fastened to the...

Removal and installation of facing of a forward bumper
Instructions: It should be noted that depending on the model, the removal and installation of the front bumper trim occurs with some differences. Detach the fender liner at the...
Instructions: It should be noted that depending on the model, the removal and installation of the front bumper trim occurs with some differences. Detach the fender liner at the...

Hinged details of facing of a forward bumper
Instructions: Some differences in the design of parts depending on the model should be taken into account. 1 - Front bumper cover made of PP material (polypropylene) /EROM 2 -...
Instructions: Some differences in the design of parts depending on the model should be taken into account. 1 - Front bumper cover made of PP material (polypropylene) /EROM 2 -...

Details and components of the front bumper
Note: Bumper beams for city and off-road models are not interchangeable. 1 - Front bumper beam 2 - Foam element, self-adhesive 3 - Bolt, 4 pcs. each side, 60 Nm 4 - Bolt, 2 pcs....
Note: Bumper beams for city and off-road models are not interchangeable. 1 - Front bumper beam 2 - Foam element, self-adhesive 3 - Bolt, 4 pcs. each side, 60 Nm 4 - Bolt, 2 pcs....

Rear bumper cover
The description also applies to vehicles with Volkswagen Individual equipment. 1 - Rear bumper cover made of PP material (polypropylene) /EPRM 2 - Bolt, 6 pcs., 3.5 Nm 3 - Guide,...
The description also applies to vehicles with Volkswagen Individual equipment. 1 - Rear bumper cover made of PP material (polypropylene) /EPRM 2 - Bolt, 6 pcs., 3.5 Nm 3 - Guide,...

Removal and installation of facing of a back bumper
The description also applies to vehicles with Volkswagen Individual equipment. Instructions: Please note that, depending on the model, the removal and installation of the rear...
The description also applies to vehicles with Volkswagen Individual equipment. Instructions: Please note that, depending on the model, the removal and installation of the rear...

Hinged details of facing of a rear bumper
Instructions: Some differences in the design of parts depending on the model should be taken into account. 1 - Rear bumper cover made of PP material (polypropylene) /EPRM 2 -...
Instructions: Some differences in the design of parts depending on the model should be taken into account. 1 - Rear bumper cover made of PP material (polypropylene) /EPRM 2 -...

Rear bumper lining inner fittings
1 - Guide, left and right 2 - Bolts, 3 pcs, on each side, 3.5 Nm 3 - Spacer insert, 6 pieces
1 - Guide, left and right 2 - Bolts, 3 pcs, on each side, 3.5 Nm 3 - Spacer insert, 6 pieces

Rear bumper beam
1 - Rear bumper beam 2 - Bolt, 3 pcs. left, 4 pcs. right, 20 Nm 3 - Right foam damper, fixed to the bumper beam with double-sided adhesive tape 4 - Left foam damper, fixed to the...
1 - Rear bumper beam 2 - Bolt, 3 pcs. left, 4 pcs. right, 20 Nm 3 - Right foam damper, fixed to the bumper beam with double-sided adhesive tape 4 - Left foam damper, fixed to the...

Drawbar hitch
Instructions: Only the cover and flat retainer on the button bracket are interchangeable. The remaining parts of the swivel towing hitch cannot be replaced. If individual parts...
Instructions: Only the cover and flat retainer on the button bracket are interchangeable. The remaining parts of the swivel towing hitch cannot be replaced. If individual parts...

Glued glass
Windshield 1 - Windshield 2 - Adjusting wedge, 443 845 631 A 3 - Polyurethane adhesive-sealant. Glue bead dimensions: width = 7 mm, height = 11 mm (including pre-applied layer,...
Windshield 1 - Windshield 2 - Adjusting wedge, 443 845 631 A 3 - Polyurethane adhesive-sealant. Glue bead dimensions: width = 7 mm, height = 11 mm (including pre-applied layer,...

Front door glass
Instruction: The consideration is carried out on the example of the right side, for the left side the work is performed in a similar way. 1 - Door glass 2 - Molding, inserted into...
Instruction: The consideration is carried out on the example of the right side, for the left side the work is performed in a similar way. 1 - Door glass 2 - Molding, inserted into...

Removal and installation of the electric motor of a window regulator
Removing Remove the front door trim. Secure the glass with tape so it doesn't slide down. Disconnect all connectors -3-. Remove three screws -2-. Remove power window motor...
Removing Remove the front door trim. Secure the glass with tape so it doesn't slide down. Disconnect all connectors -3-. Remove three screws -2-. Remove power window motor...

Removal and installation of glass guide
Instructions: Below is a description of the removal and installation of the right door glass guide. The left door glass guide is removed and installed in the same way. Do not bend...
Instructions: Below is a description of the removal and installation of the right door glass guide. The left door glass guide is removed and installed in the same way. Do not bend...

Rear door glass
Instruction: The consideration is carried out on the example of the right side, for the left side the work is performed in a similar way. 1 - Door glass 2 - Double-sided adhesive...
Instruction: The consideration is carried out on the example of the right side, for the left side the work is performed in a similar way. 1 - Door glass 2 - Double-sided adhesive...

Removal and installation of glass of a back door
Removing The glass seal has been removed. The cover has been removed. Remove rear door trim. Remove plugs -5-. Lower door window until expansion pin -4- and spacer insert -3- are...
Removing The glass seal has been removed. The cover has been removed. Remove rear door trim. Remove plugs -5-. Lower door window until expansion pin -4- and spacer insert -3- are...

Removal and installation of the electric motor of a window regulator of a back door
Removing Instruction: Describes the removal and installation process for the right door power window. Removal and installation of a window regulator for the left door is made in...
Removing Instruction: Describes the removal and installation process for the right door power window. Removal and installation of a window regulator for the left door is made in...

Details and assemblies of fender liner
Front fender liner Instructions: The illustrations show the left side of the vehicle. On the right, the work is done in a similar way. Please note that depending on the model, the...
Front fender liner Instructions: The illustrations show the left side of the vehicle. On the right, the work is done in a similar way. Please note that depending on the model, the...

Exterior mirrors
Instructions: The drawings show the right side of the car. On the left, work is carried out in a similar way. 1 - Mirror holder 2 - Mirror housing, material - ABS plastic 3 -...
Instructions: The drawings show the right side of the car. On the left, work is carried out in a similar way. 1 - Mirror holder 2 - Mirror housing, material - ABS plastic 3 -...

Removal and installation of a radiator grille
Removing the grille Remove screws -2 and 3-. Pull upper part of grille -1- out of front support panel -5-. Unlock latches -4- (2 pcs. left and right next to the emblem) -7- by...
Removing the grille Remove screws -2 and 3-. Pull upper part of grille -1- out of front support panel -5-. Unlock latches -4- (2 pcs. left and right next to the emblem) -7- by...

Roof rails
1 - Roof rails 2- Bolt 3 - Top conical washer 4 - Lower conical washer 5 - Bracket 6 - Hexagonal nut for screwing the railing, 4 pcs. each side, 20 Nm 7 - Bolt for screwing the...
1 - Roof rails 2- Bolt 3 - Top conical washer 4 - Lower conical washer 5 - Bracket 6 - Hexagonal nut for screwing the railing, 4 pcs. each side, 20 Nm 7 - Bolt for screwing the...

Moldings and trims
Drainage box cover 1 - Right side of the casing of the drain box 2 - The left side of the casing of the drainage box 3 - Framing profile, an integral part of the windshield 4 -...
Drainage box cover 1 - Right side of the casing of the drain box 2 - The left side of the casing of the drainage box 3 - Framing profile, an integral part of the windshield 4 -...

Removal and installation of overlays of wheel arches
Removing the front arches Instructions: The illustrations show the left side of the vehicle. The right side has a similar design. Remove the front fender. Press tabs -2- -arrow a-...
Removing the front arches Instructions: The illustrations show the left side of the vehicle. The right side has a similar design. Remove the front fender. Press tabs -2- -arrow a-...

Add-on parts for vehicles with Volkswagen Individual special equipment
Instructions: The figure shows the left side of the vehicle. On the right, the car is arranged in a similar way. 1 - Rear spoiler 2 - Facing the rear bumper 3 - Wheel arch lining...
Instructions: The figure shows the left side of the vehicle. On the right, the car is arranged in a similar way. 1 - Rear spoiler 2 - Facing the rear bumper 3 - Wheel arch lining...

Nameplates
Dimensions for installing rear nameplates 1 - Dimension a = 23 mm, maintain dimension -a- from the outer edge of the lantern to the nameplate 2 - Dimension b = 25 mm, maintain...
Dimensions for installing rear nameplates 1 - Dimension a = 23 mm, maintain dimension -a- from the outer edge of the lantern to the nameplate 2 - Dimension b = 25 mm, maintain...
This section is available on russian, bulgarian, belarusian, ukrainian, serbian, croatian, romanian, polish, slovak, hungarian
Tiguan 1
- General information
- Characteristics
- Vehicle overview
- Power unit
- Petrol engine 1.4 BWK
- Petrol engine 1.4 CAVA
- Engine 2.0 (petrol)
- Engine 2.0 (diesel)
- Transmission
- 6-speed manual gearbox 0A6
- 6-speed automatic gearbox 09M
- Drive shafts
- Chassis
- Front suspension
- Rear suspension (2x4)
- Rear suspension (4x4)
- Air suspension
- Wheels and rims
- Brake system
- Steering gear
- Body
- External equipment
- Internal equipment
- Electrical equipment
- Power devices
- Appliances and lighting
- Communication systems
- Heating and air conditioning
- Electrical circuits
VWmanual.ru © 2016-2024 | Mobile version | News and articles | Sitemap: EN BG BY UA RS HR RO PL SK HU | Write message | Site search
Passat B2 • Passat B3 • Passat B4 • Passat B5 • Passat B6 • Golf 1, diesel • Golf 1, petrol • Golf 2, petrol • Golf 2 • Golf 3 • Golf 4 • Golf 5 • Polo 3 • Polo 4 • Touareg 1 • Tiguan 1 • Sharan 1 • Transporter T3 • Transporter T4 • Beetle • Caddy 3 •
Passat B2 • Passat B3 • Passat B4 • Passat B5 • Passat B6 • Golf 1, diesel • Golf 1, petrol • Golf 2, petrol • Golf 2 • Golf 3 • Golf 4 • Golf 5 • Polo 3 • Polo 4 • Touareg 1 • Tiguan 1 • Sharan 1 • Transporter T3 • Transporter T4 • Beetle • Caddy 3 •