
English Русский
Български
Беларускі
Український
Српски
Hrvatski
Română
Polski
Slovenský
Magyar
  |  Articles  |  Sitemap  |  Contacts  |    |
Car maintenance Ford Car maintenance Hyundai Car maintenance Chevrolet Car maintenance BMW Car maintenance Audi Car maintenance Opel Car maintenance AvtoVAZ
VWmanual.ru


Main   Passat   Golf   Polo   Touareg   Tiguan   Sharan   Transporter   Others  
Tiguan 1 (2007-2015)

Removal and installation the rear bumper trim (VW Tiguan 1)

  • Main
  • Tiguan
  • Tiguan 1
  • Body
  • External equipment
  • Removal and installation the rear bumper trim
            0


The description also applies to vehicles with the Volkswagen Individual trim level.

Instructions: Please note that depending on the model, removal and installation of the rear bumper trim may have some peculiarities.
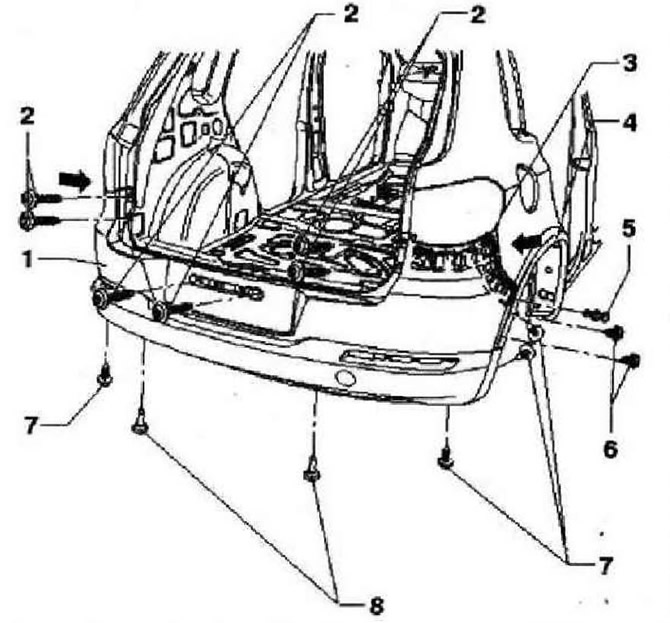

Instructions: Please note that depending on the model, removal and installation of the rear bumper…


Remove the mounting bolts from the left and right mudguards "7". Press the latches "6" of the trim "4" out of the bumper from the inside. Using a screwdriver, pry up and remove the spacer clips "5" on the left and right. Remove the screws "8" located below. Remove the bolts "2" located on the left, right and under the license plate or under the license plate frame. Further operations are possible only with the participation of an assistant. Remove the rear bumper trim "1" from the fasteners on the guide profile "3" "arrows". Disconnect all existing electrical connectors.

This article is available at russian, bulgarian, belarusian, ukrainian, serbian, croatian, romanian, polish, slovak, hungarian
The text has been checked: Tarasov Ivan

Share information:

Previous articles
Rear bumper trim
Front bumper parts and components
Front bumper trim add-on parts
Removal and installation the front bumper trim
Front bumper trim in off-road version
Front bumper parts and components
Next articles
Rear bumper trim add-on parts
Internal fastening parts of the rear bumper trim
Rear bumper beam
Hitching device
Glued glass
Front door glass


Similar articles from other manuals for VW cars:
Removal and installation the rear bumper trim Passat B6 (2005-2010)
Trim above rear wheel arch inside cabin (Golf) Golf 5 (2003-2008)
Front and rear bumper Polo 3 (1995-2003)
Removal and installation the rear bumper trim Touareg 1 (2002-2006)
Rear suspension — design description Sharan 1 (1995-2000)
Removal and installation the rear bumper Transporter T3 (1979-1992)
Removal and installation the front and rear crankshaft covers Caddy 3 (2003-2010)
Link to this page in different formats


Visitor comments


No comments yet


How much will 20 + 21 =


Tiguan 1 
  • General information
  • Characteristics
  • Vehicle overview
  • Power unit
  • Petrol engine 1.4 BWK
  • Petrol engine 1.4 CAVA
  • Engine 2.0 (petrol)
  • Engine 2.0 (diesel)
  • Transmission
  • 6-speed manual gearbox 0A6
  • 6-speed automatic gearbox 09M
  • Drive shafts
  • Chassis
  • Front suspension
  • Rear suspension (2x4)
  • Rear suspension (4x4)
  • Air suspension
  • Wheels and rims
  • Brake system
  • Steering gear
  • Body
  • External equipment
  • Internal equipment
  • Electrical equipment
  • Power devices
  • Appliances and lighting
  • Communication systems
  • Heating and air conditioning
  • Electrical circuits
VWmanual.ru © 2016-2026 | Mobile version | News and articles | Sitemap: EN BG BY UA RS HR RO PL SK HU | Write message | Site search
Passat B2 • Passat B3 • Passat B4 • Passat B5 • Passat B6 • Golf 1, diesel • Golf 1, petrol • Golf 2, petrol • Golf 2 • Golf 3 • Golf 4 • Golf 5 • Polo 3 • Polo 4 • Touareg 1 • Tiguan 1 • Sharan 1 • Transporter T3 • Transporter T4 • LT 28 • LT 2D • Beetle • Caddy 3 •
Our website uses cookies to ensure functionality and convenience.