
Internal elements of car body Volkswagen Tiguan 1

Interior rear view mirror
Auto-dimming interior rearview mirror To avoid dazzling the driver from behind, the interior rearview mirror automatically dims steplessly. The mirror consists of a mirror element...
Auto-dimming interior rearview mirror To avoid dazzling the driver from behind, the interior rearview mirror automatically dims steplessly. The mirror consists of a mirror element...

Linings, casings and decorative shields
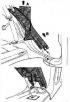
Removal and installation of facing of space for legs Instructions: The following describes the removal and installation work on the left side of the car Removal and installation...
Removal and installation of facing of space for legs Instructions: The following describes the removal and installation work on the left side of the car Removal and installation...

Removal and installation of the center console without armrest
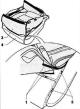
Switch off the ignition. Remove the electromechanical parking brake button. Remove the center console cover. Remove footwell trim on both sides. Remove two screws -1- (1.5 Nm)....
Switch off the ignition. Remove the electromechanical parking brake button. Remove the center console cover. Remove footwell trim on both sides. Remove two screws -1- (1.5 Nm)....

Removal and installation of the center console with armrest
Switch off the ignition. Remove button for electromechanical parking brake -E538-. If present, remove CD changer. Remove if available "connector for connecting multimedia...
Switch off the ignition. Remove button for electromechanical parking brake -E538-. If present, remove CD changer. Remove if available "connector for connecting multimedia...

Removal and installation of brackets of the center console
Switch off the ignition. Remove the electromechanical parking brake button. Remove the center console cover. Remove footwell trim on both sides. Vehicles with center console...
Switch off the ignition. Remove the electromechanical parking brake button. Remove the center console cover. Remove footwell trim on both sides. Vehicles with center console...

Replacing the rear cup holder
A defective rear cupholder can be replaced separately once. This does not require changing the rear panel of the center console assembly. Switch off the ignition. Cars with a...
A defective rear cupholder can be replaced separately once. This does not require changing the rear panel of the center console assembly. Switch off the ignition. Cars with a...

Removal and installation of the central decorative overlay of the forward panel
Switch off the ignition. If present, remove the phone holder. Using wedge -3409-, pry off and remove card compartment -1-. A / m with a control lamp off. front passenger airbags...
Switch off the ignition. If present, remove the phone holder. Using wedge -3409-, pry off and remove card compartment -1-. A / m with a control lamp off. front passenger airbags...

Removal and installation of a ware box
Switch off the ignition. Remove the right side trim of the front panel. Remove glove compartment light -W6-. Remove screws -1-...-5- (1.5 Nm). Instructions: When installing,...
Switch off the ignition. Remove the right side trim of the front panel. Remove glove compartment light -W6-. Remove screws -1-...-5- (1.5 Nm). Instructions: When installing,...

Removal and installation of facing of the block of understeering switches
Unlock the steering wheel adjustment lever. Extend and move the steering wheel as far as possible. Remove the negative terminal from the battery. Remove the driver's airbag....
Unlock the steering wheel adjustment lever. Extend and move the steering wheel as far as possible. Remove the negative terminal from the battery. Remove the driver's airbag....

Removal and installation of an overlay of the control panel of a heater and air conditioner
Remove carpet -2- from compartment in cover -1-. Remove screw -3- (1.5 Nm). Remove trim from front panel.
Remove carpet -2- from compartment in cover -1-. Remove screw -3- (1.5 Nm). Remove trim from front panel.

Removal and installation of the left facing from the driver's side
Instruction: For clarity, the steering wheel is not shown in the figure, its removal is not required. Switch off the ignition. Remove the driver's side dash panel trim. Remove...
Instruction: For clarity, the steering wheel is not shown in the figure, its removal is not required. Switch off the ignition. Remove the driver's side dash panel trim. Remove...

Removal and installation of the bottom facing of the forward panel
Switch off the ignition. Remove the front panel side trims. Remove storage box. Unlock the locks and remove the steering column switch cover. It is not necessary to remove the...
Switch off the ignition. Remove the front panel side trims. Remove storage box. Unlock the locks and remove the steering column switch cover. It is not necessary to remove the...

Removal and installation of the ceiling console
Switch off the ignition. Remove front interior light and reading light -1-. Remove two screws -2- (3 Nm). Loosen two screws in storage compartment -3- (3 Nm). Unscrew the screw in...
Switch off the ignition. Remove front interior light and reading light -1-. Remove two screws -2- (3 Nm). Loosen two screws in storage compartment -3- (3 Nm). Unscrew the screw in...

Removing and installing sun visors
Instructions: The following describes the removal and installation work on the left side of the car. Removal and installation on the right side is carried out in a similar way....
Instructions: The following describes the removal and installation work on the left side of the car. Removal and installation on the right side is carried out in a similar way....
Removal and installation of rear overlays of thresholds
Instructions: The following describes the removal and installation work on the left side of the car. Removal and installation on the right side of the car is carried out in a...
Instructions: The following describes the removal and installation work on the left side of the car. Removal and installation on the right side of the car is carried out in a...

Removal and installation of facing of a back wheel arch
Vehicles without rear side airbags Instructions: The following describes the removal and installation work on the left side of the car. Removal and installation on the right side...
Vehicles without rear side airbags Instructions: The following describes the removal and installation work on the left side of the car. Removal and installation on the right side...

Removal and installation of forward seat belts
Instructions: The work on removing and installing the left side of the car is described below. Removal and installation on the right side is carried out in the same way. Observe...
Instructions: The work on removing and installing the left side of the car is described below. Removal and installation on the right side is carried out in the same way. Observe...

Removal and installation of the seat belt height adjustment mechanism
Instructions: The following describes the removal and installation work on the left side of the car. Removal and installation on the right and side is carried out in a similar...
Instructions: The following describes the removal and installation work on the left side of the car. Removal and installation on the right and side is carried out in a similar...

Removal and installation of the lock of a forward seat belt
Instructions: The following describes the removal and installation of the left seat belt buckle. Removal and installation on the right side of the car is carried out in a similar...
Instructions: The following describes the removal and installation of the left seat belt buckle. Removal and installation on the right side of the car is carried out in a similar...

Removal and installation of rear side seat belts
Vehicles without rear side airbags Instructions: The following describes the removal and installation work on the left side of the car Removal and installation on the right side...
Vehicles without rear side airbags Instructions: The following describes the removal and installation work on the left side of the car Removal and installation on the right side...

Removal and installation of a 3-point central seat belt
1 - Console 2 - Inertial seat belt reel 3 - Hexagon nut, 40 Nm 4 - Screw, 40 Nm 5 - Seat belt eyelet Remove the left side of the rear seat. Remove the cushion and backrest...
1 - Console 2 - Inertial seat belt reel 3 - Hexagon nut, 40 Nm 4 - Screw, 40 Nm 5 - Seat belt eyelet Remove the left side of the rear seat. Remove the cushion and backrest...

Safety regulations for working with airbags
Inspection, installation and repair work must only be carried out by trained specialists. Disconnect the negative battery terminal before working on the airbag system. You can...
Inspection, installation and repair work must only be carried out by trained specialists. Disconnect the negative battery terminal before working on the airbag system. You can...

Removing and installing the airbag control unit
Remove the negative terminal from the battery. Remove trims in footwell. Instructions: For clarity, the center console is not shown in the figures. Unscrew the two nuts -1- (2...
Remove the negative terminal from the battery. Remove trims in footwell. Instructions: For clarity, the center console is not shown in the figures. Unscrew the two nuts -1- (2...

Removal and installation of the driver's airbag
Removing Instruction: The removal and installation of the airbag is described for the case of the multifunction steering wheel. Carry out work with a screwdriver about 175 mm long...
Removing Instruction: The removal and installation of the airbag is described for the case of the multifunction steering wheel. Carry out work with a screwdriver about 175 mm long...

Removal and installation of a pillow of safety of the forward passenger
Remove the negative terminal from the battery. Remove the right side trim of the front panel. Remove glove compartment light -W6-. Remove storage box. Disconnect the wiring...
Remove the negative terminal from the battery. Remove the right side trim of the front panel. Remove glove compartment light -W6-. Remove storage box. Disconnect the wiring...

Checking the need for laying an additional ground wire in the car
Check if the ground wire is installed on the front passenger airbag housing. Front passenger airbag with ground wire -1- has a three-wire wiring harness -2-, while additional wire...
Check if the ground wire is installed on the front passenger airbag housing. Front passenger airbag with ground wire -1- has a three-wire wiring harness -2-, while additional wire...

Front passenger and driver seats
Front passenger seat without height adjustment Remove the backrest adjustment knob. Remove trim from sill side. Front passenger seat with backrest folding mechanism for...
Front passenger seat without height adjustment Remove the backrest adjustment knob. Remove trim from sill side. Front passenger seat with backrest folding mechanism for...

Removal and installation of a back lateral pillow of safety
Instructions: The removal and installation work on the right side of the car is described below. The removal and installation work on the left side is carried out in the same way....
Instructions: The removal and installation work on the right side of the car is described below. The removal and installation work on the left side is carried out in the same way....

Removal and installation of the upper airbag on the driver / passenger side
Removing Instructions: The following describes the removal and installation work on the right side of the car. Removal and installation work on the left side are carried out in...
Removing Instructions: The following describes the removal and installation work on the right side of the car. Removal and installation work on the left side are carried out in...

Removing and installing seat occupancy sensor
Removing and installing front passenger seat occupied sensor -G128- WARNING: When replacing the front passenger seat occupied sensor -0128-, the seat cushion must be replaced!...
Removing and installing front passenger seat occupied sensor -G128- WARNING: When replacing the front passenger seat occupied sensor -0128-, the seat cushion must be replaced!...
Procedure after an accident with deployment of pretensioners and/or airbags
After each deployment of the front passenger airbag and/or the front passenger belt pretensioner, the basic setting of the seat occupied detection control unit -J706- must be...
After each deployment of the front passenger airbag and/or the front passenger belt pretensioner, the basic setting of the seat occupied detection control unit -J706- must be...

Seat occupied recognition (USA)
1 - Seat cushion frame 2 - Mat to determine if the seat is occupied. Do not disconnect hose -4- and seat cushion -3- 3 - Front seat cushion, do not remove from seat occupancy mat...
1 - Seat cushion frame 2 - Mat to determine if the seat is occupied. Do not disconnect hose -4- and seat cushion -3- 3 - Front seat cushion, do not remove from seat occupancy mat...

Seat occupancy detection repair kit
If one of the system components fails, replace the entire system (install repair kit). The repair kit is made taking into account the characteristics of the repaired vehicle. It...
If one of the system components fails, replace the entire system (install repair kit). The repair kit is made taking into account the characteristics of the repaired vehicle. It...

Removing Seat Occupancy Detection Components
Note: Seat cushion, seat occupancy mat, control unit and pressure sensor should only be shaded as a single set. Components are compatible only within one set, the use of...
Note: Seat cushion, seat occupancy mat, control unit and pressure sensor should only be shaded as a single set. Components are compatible only within one set, the use of...

Shock sensors
Removing and installing driver front airbag crash sensor -G283- (vehicle only for US and Canadian markets) Note: The driver's front airbag crash sensor -G283- is installed in the...
Removing and installing driver front airbag crash sensor -G283- (vehicle only for US and Canadian markets) Note: The driver's front airbag crash sensor -G283- is installed in the...

Removing and installing the front panel
Remove the negative terminal from the battery. Remove the driver's airbag. Remove steering wheel. Remove cover for steering column switch box. Remove steering column control unit...
Remove the negative terminal from the battery. Remove the driver's airbag. Remove steering wheel. Remove cover for steering column switch box. Remove steering column control unit...

Removal and installation of the supporting frame
Before disconnecting or removing wire harnesses, photograph their position. This will allow them to be installed properly afterwards. Remove the negative terminal from the...
Before disconnecting or removing wire harnesses, photograph their position. This will allow them to be installed properly afterwards. Remove the negative terminal from the...

Putting the Front Panel in the Correct Position
Installing the front panel in the proper position relative to the body To increase the vertical gap between the door upholstery and the front panel, it is not necessary to change...
Installing the front panel in the proper position relative to the body To increase the vertical gap between the door upholstery and the front panel, it is not necessary to change...

Front panel adjustment
Front panel height adjustment Instructions: The front panel is adjusted higher using eccentric screws -3- and -4- In the so-called "zero position" the protrusion of the eccentric...
Front panel height adjustment Instructions: The front panel is adjusted higher using eccentric screws -3- and -4- In the so-called "zero position" the protrusion of the eccentric...

Removal and installation of an upholstery of a forward door
Instructions: The following describes the removal and installation work on the left side of the car The removal and installation work on the right side of the car is carried out...
Instructions: The following describes the removal and installation work on the left side of the car The removal and installation work on the right side of the car is carried out...

Removal and installation of an upholstery of a back door
Instructions: The following describes the removal and installation work on the left side of the car. Removal and installation work on the right side of the car is carried out in...
Instructions: The following describes the removal and installation work on the left side of the car. Removal and installation work on the right side of the car is carried out in...

Rack trims
Removal and installation of the top facing of a rack And Instructions: The work on removing and installing the left side of the car is described below. Removal and installation...
Removal and installation of the top facing of a rack And Instructions: The work on removing and installing the left side of the car is described below. Removal and installation...

Luggage compartment door linings
Removal and installation of the top facing of a door of a luggage compartment Detach trim -1- in the middle (trim tabs must pop out of tailgate slots). Detach trim from side trim...
Removal and installation of the top facing of a door of a luggage compartment Detach trim -1- in the middle (trim tabs must pop out of tailgate slots). Detach trim from side trim...

Luggage compartment trims
Removal and installation of facing of the back end panel Remove the cargo floor from the vehicle. Remove the spare wheel from the vehicle. Remove other parts in the luggage...
Removal and installation of facing of the back end panel Remove the cargo floor from the vehicle. Remove the spare wheel from the vehicle. Remove other parts in the luggage...

Ceiling lining
Removal and installation of the ceiling end cap Open the tailgate. Pull headliner -1- downwards to detach it from the roof cross member and remove it from the tailgate seal bezel....
Removal and installation of the ceiling end cap Open the tailgate. Pull headliner -1- downwards to detach it from the roof cross member and remove it from the tailgate seal bezel....

Removal and installation of a forward seat
Instructions: The following describes the removal and installation work on the left side of the car. Removal and installation work on the right side of the car is carried out in...
Instructions: The following describes the removal and installation work on the left side of the car. Removal and installation work on the right side of the car is carried out in...

Removal and installation of elements of a forward seat
Removing and installing the drawer nest Drawer nest (option) is installed on the following types of seats: front seat with manual height adjustment, front passenger seat with...
Removing and installing the drawer nest Drawer nest (option) is installed on the following types of seats: front seat with manual height adjustment, front passenger seat with...

Front seat with manual height adjustment
Removal and installation of lining from the side of the threshold Instructions: The following describes the removal and installation work on the left side of the car. Removal and...
Removal and installation of lining from the side of the threshold Instructions: The following describes the removal and installation work on the left side of the car. Removal and...

Driver's seat with electric controls
Removal and installation of lining from the side of the threshold Switch off the ignition. Remove screw -1- (2 Nm). Press expansion pin -2- out of expansion piston -3- and remove...
Removal and installation of lining from the side of the threshold Switch off the ignition. Remove screw -1- (2 Nm). Press expansion pin -2- out of expansion piston -3- and remove...

Rear seats
Removal and installation of a back bench seat Vehicles with cargo floor Detach the load platform -18- from the backrest trim -17- and remove it from the vehicle, All Remove screws...
Removal and installation of a back bench seat Vehicles with cargo floor Detach the load platform -18- from the backrest trim -17- and remove it from the vehicle, All Remove screws...
Cushions and upholstery front seats
Removal and installation of an upholstery and a pillow of a forward seat Instructions: The following describes the work on the removal and installation of parts and assemblies of...
Removal and installation of an upholstery and a pillow of a forward seat Instructions: The following describes the work on the removal and installation of parts and assemblies of...

Rear seat upholstery and cushions
Removal and installation of an upholstery and a pillow of a back seat Instructions: The removal and installation work for the left side of the rear bench seat is described below....
Removal and installation of an upholstery and a pillow of a back seat Instructions: The removal and installation work for the left side of the rear bench seat is described below....
This section is available on russian, bulgarian, belarusian, ukrainian, serbian, croatian, romanian, polish, slovak, hungarian
Tiguan 1
- General information
- Characteristics
- Vehicle overview
- Power unit
- Petrol engine 1.4 BWK
- Petrol engine 1.4 CAVA
- Engine 2.0 (petrol)
- Engine 2.0 (diesel)
- Transmission
- 6-speed manual gearbox 0A6
- 6-speed automatic gearbox 09M
- Drive shafts
- Chassis
- Front suspension
- Rear suspension (2x4)
- Rear suspension (4x4)
- Air suspension
- Wheels and rims
- Brake system
- Steering gear
- Body
- External equipment
- Internal equipment
- Electrical equipment
- Power devices
- Appliances and lighting
- Communication systems
- Heating and air conditioning
- Electrical circuits
VWmanual.ru © 2016-2024 | Mobile version | News and articles | Sitemap: EN BG BY UA RS HR RO PL SK HU | Write message | Site search
Passat B2 • Passat B3 • Passat B4 • Passat B5 • Passat B6 • Golf 1, diesel • Golf 1, petrol • Golf 2, petrol • Golf 2 • Golf 3 • Golf 4 • Golf 5 • Polo 3 • Polo 4 • Touareg 1 • Tiguan 1 • Sharan 1 • Transporter T3 • Transporter T4 • Beetle • Caddy 3 •
Passat B2 • Passat B3 • Passat B4 • Passat B5 • Passat B6 • Golf 1, diesel • Golf 1, petrol • Golf 2, petrol • Golf 2 • Golf 3 • Golf 4 • Golf 5 • Polo 3 • Polo 4 • Touareg 1 • Tiguan 1 • Sharan 1 • Transporter T3 • Transporter T4 • Beetle • Caddy 3 •