
English Русский
Български
Беларускі
Український
Српски
Hrvatski
Română
Polski
Slovenský
Magyar
  |  Articles  |  Sitemap  |  Contacts  |    |
Car maintenance Ford Car maintenance Hyundai Car maintenance Chevrolet Car maintenance BMW Car maintenance Audi Car maintenance Opel Car maintenance AvtoVAZ
VWmanual.ru


Main   Passat   Golf   Polo   Touareg   Tiguan   Sharan   Transporter   Others  
Tiguan 1 (2007-2015)

Replacing the rear cup holder (VW Tiguan 1)

  • Main
  • Tiguan
  • Tiguan 1
  • Body
  • Internal equipment
  • Replacing the rear cup holder
            0


A faulty rear cup holder can be replaced separately once. This does not require replacing the rear panel of the center console as a whole. Turn off the ignition.

Cars with multimedia system


Remove the multimedia system control panel.

Cars with inverter with socket, 12V-230V "U13"


Remove the inverter with the socket, 12 V-230 V "U13". Remove the rear panel of the central console. Drill out the welding points "1" located along the perimeter from the back of the panel, use a 10 mm steel drill. Remove the faulty cup holder "2" from the panel. Install a new cup holder in the panel. Using the heated tip of a suitable punch, melt the remains of the fixing protrusions (plastic pins) "3".
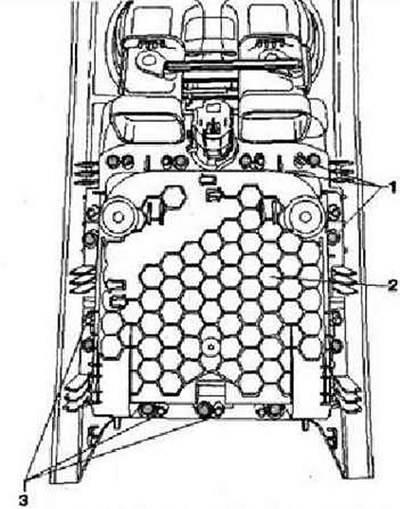
Remove the inverter with the socket, 12 V-230 V «U13». Remove the rear panel of the central…


The panel is installed in reverse order.

This article is available at russian, bulgarian, belarusian, ukrainian, serbian, croatian, romanian, polish, slovak, hungarian
The text has been checked: Tarasov Ivan

Share information:

Previous articles
Removal and installation center console brackets
Removal and installation the center console with armrest
Removal and installation the center console without armrest
Overlays, covers and decorative shields
Interior rear view mirror
Next articles
Removal and installation the central decorative trim of the front panel
Removal and installation the glove box
Removal and installation the steering column switch block trim
Removal and installation the heater and air conditioning control panel trim
Removal and installation the left trim panel on the driver's side
Removal and installation the lower trim of the front panel


Similar articles from other manuals for VW cars:
Replacing the rear light bulbs Passat B3 (1988-1993)
Replacing rear drum brake pads Golf 1 (1974-1984, petrol)
Removal and installation the rear door mechanism holder together… Polo 4 (2001-2009)
Replacing the PTO/Rear Propeller Shaft Flange Seal (Transfer… Touareg 1 (2002-2006)
Replacing rear brake pads Sharan 1 (1995-2000)
Replacing rubber wiper blades Transporter T4 (1990-2003)
Replacing the rear brake drums Beetle (1960-1986)
Link to this page in different formats


Visitor comments


No comments yet


How much will 48 + 14 =


Tiguan 1 
  • General information
  • Characteristics
  • Vehicle overview
  • Power unit
  • Petrol engine 1.4 BWK
  • Petrol engine 1.4 CAVA
  • Engine 2.0 (petrol)
  • Engine 2.0 (diesel)
  • Transmission
  • 6-speed manual gearbox 0A6
  • 6-speed automatic gearbox 09M
  • Drive shafts
  • Chassis
  • Front suspension
  • Rear suspension (2x4)
  • Rear suspension (4x4)
  • Air suspension
  • Wheels and rims
  • Brake system
  • Steering gear
  • Body
  • External equipment
  • Internal equipment
  • Electrical equipment
  • Power devices
  • Appliances and lighting
  • Communication systems
  • Heating and air conditioning
  • Electrical circuits
VWmanual.ru © 2016-2026 | Mobile version | News and articles | Sitemap: EN BG BY UA RS HR RO PL SK HU | Write message | Site search
Passat B2 • Passat B3 • Passat B4 • Passat B5 • Passat B6 • Golf 1, diesel • Golf 1, petrol • Golf 2, petrol • Golf 2 • Golf 3 • Golf 4 • Golf 5 • Polo 3 • Polo 4 • Touareg 1 • Tiguan 1 • Sharan 1 • Transporter T3 • Transporter T4 • LT 28 • LT 2D • Beetle • Caddy 3 •
Our website uses cookies to ensure functionality and convenience.