
You can check the thickness of the pads through the inspection holes in the shields without removing the brake drums.
Replace brake pads in sets (those. all four pads at the same time). Replacing the pads on only one brake results in uneven braking.
Pad Replacement - Manual Brake (pic. A:14)

1. Loosen the rear wheel bolts, lift and support the rear of the vehicle and remove the wheels. Fully release the handbrake.
2. Remove the hub cap, then remove the cotter pin and slotted nut holder from the hub trunnion, unscrew the hub nut and remove the thrust washer.
Slide the brake shoes to free the drum. To do this, turn the adjusting nut with a screwdriver through the adjusting hole in the brake shield.
3. Carefully remove the hub and brake drum together with the bearings.
NOTE: On vehicles with a rear brake pressure regulator, drum removal may be difficult due to residual pressure in the system. To relieve residual pressure, it is necessary to press the pressure regulator lever towards the rear axle.
4. Remove the upper shoe return spring. The spring is U-shaped and heavily tensioned - be careful when disconnecting the spring.
5. Remove the pad retainers. To remove the retainer, press down on the retainer and pull the retainer off the block so that the strut head comes out of the retainer slot.
6. Remove the adjusting spacer between the shoes.
7. Disconnect the front block from the wheel cylinder and lower support; unhook the lower return spring from the shoe.
8. In the same way, remove the rear brake shoe; Disconnect the handbrake cable from the shoe lever.
9. Put a rubber ring on the wheel brake cylinder to press the pistons together.
10. Inspect wheel cylinder, brake drum and springs. If there are signs of fluid leakage, replace or repair the cylinder.
11. Clean the brake shield and brake drum from dust. Apply a small amount of refractory grease to the pad supports on the brake shield and the ends of the brake pads.
12. Thoroughly clean the brake drum from dust and dirt. If there are roughnesses on the friction surface of the drum, the drum must be bored out or replaced, otherwise the roughness will cause accelerated wear of the new pads.
13. Examine coupling springs of pads. In the presence of cracks, deep corrosion, traces of an overheat and other defects replace a spring.
14. Check up ease of rotation of an adjusting nut. If necessary, carefully clean the threads and lubricate the parts of the adjusting strut.
15. Attach the handbrake cable to the lever on the rear shoe. To hook the end of the cable to the lever, pull back on the cable return spring.
16. Install the brake shoes and return springs on the brake shield in the reverse order of removal. Check that the springs, brake shoes, and adjusting strut are properly positioned. Secure the pads with stands and clamps.
17. Install the hub and brake drum and adjust the hub bearings (see chapter "Rear suspension").
18. Inserting a screwdriver into the brake shield adjustment hole, turn the adjusting nut until the shoes block the drum. Then turn the nut back just enough so that the drum begins to rotate freely. Adjust handbrake cable (see chapter "Vehicle maintenance work").
19. After replacing the pads on both brakes, install the wheels, lower the vehicle to the ground and tighten the wheel bolts to the torque specified in section "Technical data".
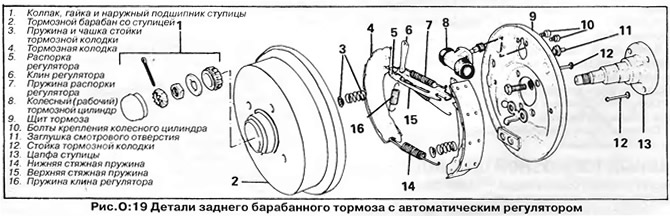
Pad Replacement - Automatic Adjustment Brake (pic. A:19)
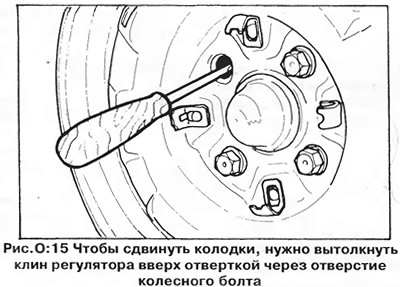
1. Raise and jack up the rear of the vehicle. Remove the rear wheels, fully release the handbrake and remove the brake drums as described above. To move the brake pads, insert a screwdriver through the wheel bolt hole and push the adjuster wedge up (pic. A:15).
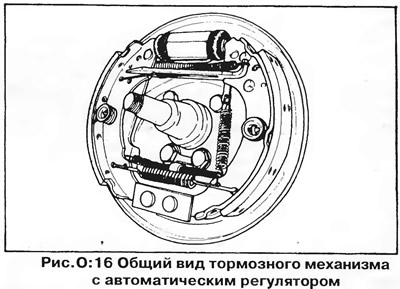
2. Remove racks of brake pads. To remove the stand, press down on the stand cup and remove it by turning it a quarter of a turn. Remove the strut spring (pic. A:16).
3. Disconnect the lower ends of the shoes from the support and unhook the lower return spring from the shoes.
4. Unhook the spring from the lower end of the adjuster wedge and from the front brake shoe. Unhook the upper return spring from the front end of the adjuster brace and the rear brake shoe. Remove the front brake shoe from the brake shield.
5. Remove the rear brake shoe from the brake shield and disconnect the handbrake cable from the lever on the shoe.
6. Put a rubber ring on the wheel brake cylinder to press the pistons together.
7. Clamp the governor spacer in a vise and unhook the spring from its end, then separate the spacer, regulator wedge and front brake shoe from each other.
8. Check up a condition of the wheel cylinder, a brake drum and springs.
9. Clean the brake shield and brake drum from dust. Apply a small amount of refractory grease to the brake shield support and brake shoe ends, and to the adjuster wedge, adjuster brace ends, and handbrake lever axle.
10. Attach the handbrake cable to the lever on the rear shoe. To hook the end of the cable to the lever, pull back on the cable return spring.
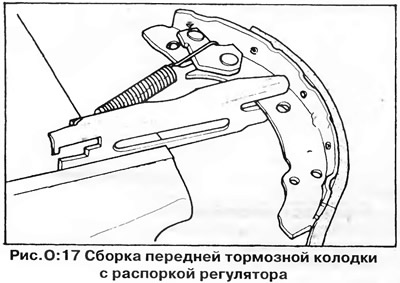
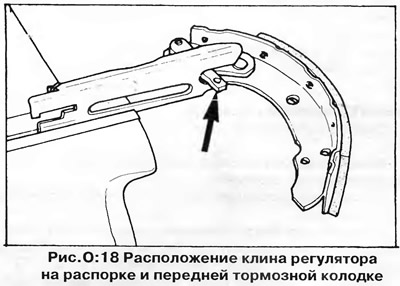
11. Assemble the spacer and adjuster wedge to the front brake shoe as shown in fig. A:17 and A:18. Insert the wedge with the bulge towards the brake shield.
12. Install the brake shoes and return springs on the brake shield in the reverse order of removal. Check that the springs, brake shoes, spacers and adjuster wedge are properly positioned. Secure the pads with racks with springs and cups.
13. Install the brake drum and adjust the hub bearings (see chapter "Rear suspension").
14. Firmly depress the brake pedal several times to set the brake pads into position. Adjust handbrake cable (see chapter "Vehicle maintenance work").
15. After replacing the pads on both brakes, install the wheels, lower the vehicle to the ground and tighten the wheel bolts to the torque specified in section "Technical data".
Visitor comments