
English Русский
Български
Беларускі
Український
Српски
Hrvatski
Română
Polski
Slovenský
Magyar
  |  Articles  |  Sitemap  |  Contacts  |    |
Car maintenance Ford Car maintenance Hyundai Car maintenance Chevrolet Car maintenance BMW Car maintenance Audi Car maintenance Opel Car maintenance AvtoVAZ
VWmanual.ru


Main   Passat   Golf   Polo   Touareg   Tiguan   Sharan   Transporter   Others  
Tiguan 1 (2007-2015)

Removal and installation rear brake pads CII41 (VW Tiguan 1)

  • Main
  • Tiguan
  • Tiguan 1
  • Chassis
  • Brake system
  • Removal and installation rear brake pads CII41
            0


Contents: Removal ↓ Installation ↓

Removal


When removing, mark the brake pads suitable for further use. They must be installed back in the same places, otherwise there will be uneven distribution of braking forces between the wheels!

Instructions: Do not disconnect the connectors of the parking brake actuator motors. Do not apply the parking brake.


Remove the wheels. The parking brake pistons must be depressed (set to initial position) using the -VAS 5051-. Before setting the pistons to the initial position, the brake fluid must be pumped out of the expansion tank. If brake fluid was added as the brake pads wore out, this will prevent leaks and the damage caused by it. Connect the -VAS 5051- tester and select the function. In doing so, select "Electromechanical parking brake" and the function 'Extending and setting the pistons of the parking brake actuator motor to the initial position'. Using the -VAS 5051-, set the pistons to the initial position. You can then unscrew the mounting bolts from the brake caliper, holding the guide against turning. Remove the caliper from the brake caliper.
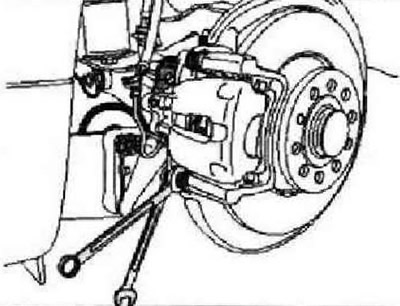
Remove the wheels. The parking brake pistons must be depressed (set to initial position) using the…


Instruction: Performing the operation 'Setting the pistons to the initial position' using -VAS 5051-often does not result in the pistons themselves being moved (however, it is necessary to do this). The thing is that the running nut slides freely in the piston cavity, as a result it can only extend, but not move the piston back. When performing this operation, only the screw moves back together with the running nut (they move back inside the piston).


Caution: First perform the "Set pistons to initial position" operation using -MS 5051-.


[The information is posted on this resource: www.VWMANUAL.ru]
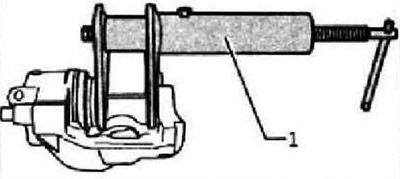
Caution: First perform the «Set pistons to initial position» operation using -MS 5051-.


After this, finally push the piston back using the "T10145" device. Suspend the brake caliper using wire so that the brake hose is unloaded and cannot be damaged. Remove the brake pads and brake pad holders "arrows".
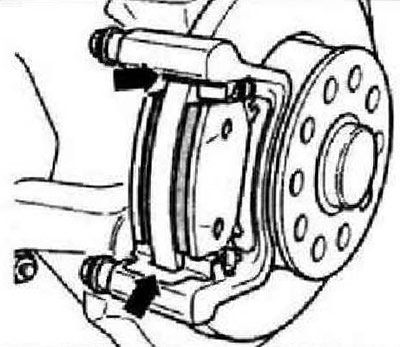
After this, finally push the piston back using the «T10145» device. Suspend the brake caliper using…


Thoroughly clean the brake pad support surfaces on the brake caliper, remove corrosion products. Clean the caliper. Use only alcohol to clean the brake caliper.

Installation


Install the brake shoe holders and the brake shoes "arrows" on the brake caliper. Make sure that the brake shoes are in the correct position in the "arrows" holders.
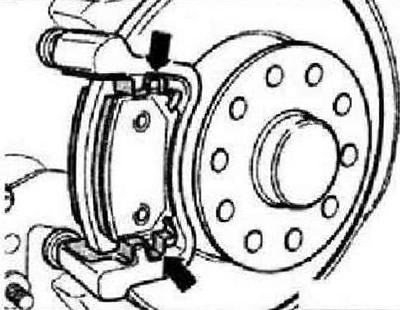

Install the brake shoe holders and the brake shoes «arrows» on the brake caliper. Make sure that…


Secure the brake caliper with new self-locking bolts. The repair kit contains four self-locking bolts, which must be used. After extending the pistons with the -VAS 5051-, the basic setting of the brake system must also be performed. Perform the basic setting of the brake system with the -VAS 5051-. Mount the wheels. After replacing the pads, check the brake fluid level.

Tightening torque: Hexagon head bolt, brake caliper to bracket, use only new bolts - 35 Nm.

This article is available at russian, bulgarian, belarusian, ukrainian, serbian, croatian, romanian, polish, slovak, hungarian
The text has been checked: Tarasov Ivan

Share information:

Previous articles
CII41 Rear Brake Repair
Removal and installation the front brake caliper FN 3
Removal and installation front brake pads FN 3
Front brake repair, brake caliper FN 3
Removal and installation of ESP system components
Removal and installation of rear axle ABS system components (4x4)
Next articles
Removal and installation the rear brake caliper CII41
Electromechanical parking brake
Removal and installation the parking brake electric motor
Brake pedal
Repair of brake caliper FN 3
Repair of rear brake calipers


Similar articles from other manuals for VW cars:
Checking the rear brake pads Passat B5 (1996-2005)
Replacing rear drum brake pads Golf 1 (1974-1984, petrol)
Removal and installation rear disc brake pads Polo 4 (2001-2009)
Adjusting brake pads on two wheels Touareg 1 (2002-2006)
Checking the thickness of the rear brake pads Sharan 1 (1995-2000)
Rear drum brake, brake lining control Transporter T3 (1979-1992)
Removal and installation rear brake pads Caddy 3 (2003-2010)
Link to this page in different formats


Visitor comments


No comments yet


How much will 37 + 40 =


Tiguan 1 
  • General information
  • Characteristics
  • Vehicle overview
  • Power unit
  • Petrol engine 1.4 BWK
  • Petrol engine 1.4 CAVA
  • Engine 2.0 (petrol)
  • Engine 2.0 (diesel)
  • Transmission
  • 6-speed manual gearbox 0A6
  • 6-speed automatic gearbox 09M
  • Drive shafts
  • Chassis
  • Front suspension
  • Rear suspension (2x4)
  • Rear suspension (4x4)
  • Air suspension
  • Wheels and rims
  • Brake system
  • Steering gear
  • Body
  • External equipment
  • Internal equipment
  • Electrical equipment
  • Power devices
  • Appliances and lighting
  • Communication systems
  • Heating and air conditioning
  • Electrical circuits
VWmanual.ru © 2016-2026 | Mobile version | News and articles | Sitemap: EN BG BY UA RS HR RO PL SK HU | Write message | Site search
Passat B2 • Passat B3 • Passat B4 • Passat B5 • Passat B6 • Golf 1, diesel • Golf 1, petrol • Golf 2, petrol • Golf 2 • Golf 3 • Golf 4 • Golf 5 • Polo 3 • Polo 4 • Touareg 1 • Tiguan 1 • Sharan 1 • Transporter T3 • Transporter T4 • LT 28 • LT 2D • Beetle • Caddy 3 •
Our website uses cookies to ensure functionality and convenience.