
English Русский
Български
Беларускі
Український
Српски
Hrvatski
Română
Polski
Slovenský
Magyar
  |  Articles  |  Sitemap  |  Contacts  |    |
Car maintenance Ford Car maintenance Hyundai Car maintenance Chevrolet Car maintenance BMW Car maintenance Audi Car maintenance Opel Car maintenance AvtoVAZ
VWmanual.ru


Main   Passat   Golf   Polo   Touareg   Tiguan   Sharan   Transporter   Others  
Polo 3 (1995-2003) Polo 4 (2001-2009)

Removal and installation rear disc brake pads (VW Polo 4)

  • Main
  • Polo
  • Polo 4
  • Chassis
  • Brake system
  • Removal and installation rear disc brake pads
            0


Contents: Removal ↓ Installation ↓
Note: Removing and installing the brake pads of the rear disc brake is basically the same as for the front disc brake. Therefore, you should also read the chapter "Removal and installation front brake pads". Strictly follow all general instructions and safety instructions given in this chapter.

This chapter only provides the distinguishing features for removing and installing brake pads for the rear disc brake.

Removal


Caution: If the brake pads are to be reinstalled, their location must be marked before removal. Changing the pads around, for example, swapping the outer pad with the inner pad or moving the pad from the right wheel to the left wheel and vice versa, is not allowed. Changing the location of the pads may result in uneven braking action. It is recommended to use only original brake pads approved for use by the vehicle manufacturer. It is imperative to replace all the brake pads on the axle at the same time, even if only one of them has reached the wear limit.


For vehicles with a brake pad wear sensor, disconnect the sensor plug connector, see the relevant chapter for the front disc brake.
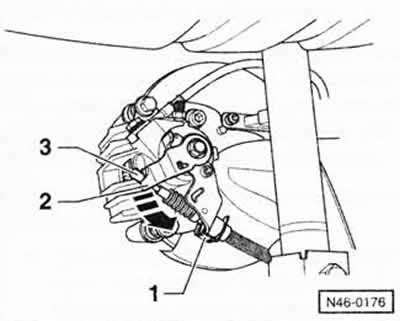
For vehicles with a brake pad wear sensor, disconnect the sensor plug connector, see the relevant…


Release the handbrake lever. Using a screwdriver, press the locking bracket "1" and remove it with a downward movement.


Press the brake lever "2" in the direction of the arrow and unfasten the handbrake cable "3". Remove the handbrake cable from the holder on the brake caliper.
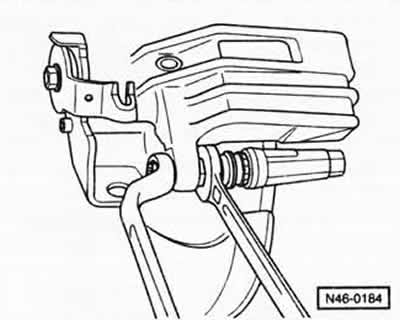
Press the brake lever «2» in the direction of the arrow and unfasten the handbrake cable «3».…


Remove the upper and lower brake caliper mounting bolts "15" while holding the corresponding guide pins, see figure S46-0097.

Remove the caliper body and hang it on a wire to the body or a coil spring.

Caution: The brake hose must not be stretched or twisted.

Caution: The brake hose must not be stretched or twisted.


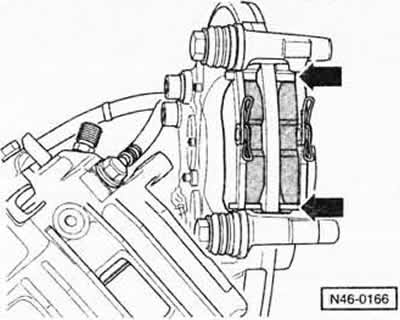
Remove the brake pads and the arrow springs holding them.

Measure the thickness of the brake disc, see the relevant chapter.

Clean the brake caliper.

Caution: Do not use any wire brushes to clean the housing. Clean the brake caliper only with alcohol.


Installation


Installation


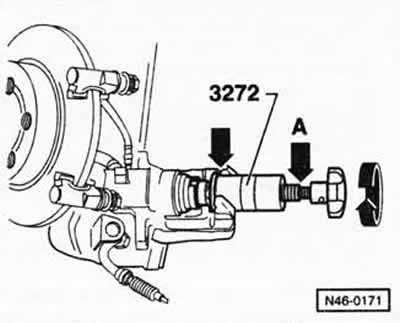
Using the special tool VW-3272 or HAZET 4970/6, press the piston into the brake caliper cylinder.


Caution: Do not push the piston back with a normal return tool as this will destroy the handbrake adjustment mechanism.


Using a special tool, slowly screw in the piston under strong pressure, turning it to the right (clockwise). The tool shoulder - left arrow - should rest on the brake caliper. If the piston stroke is heavy, turn it with a 13 mm wrench by the chamfers "A" on the tool spindle.

Remove the protective film from the back of the brake pads.
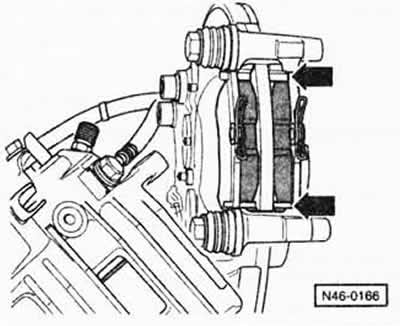
Remove the protective film from the back of the brake pads.


Insert the retaining springs "arrows" and brake shoes into the brake shoe guide.

Note: The repair kit contains 4 self-locking bolts.

These bolts must be used every time.

While holding the guide pins, screw the brake caliper to the brake shoe guide using new self-locking bolts. Tighten the mounting bolts to a torque of 35 Nm.

Press the brake lever down and attach the handbrake cable to it.

Secure the handbrake cable to the counter support with a locking bracket.

Adjust the handbrake, see the relevant chapter.

Press the brake pedal hard several times with the vehicle stationary, check the brake fluid level in the expansion tank.

This article is available at russian, bulgarian, belarusian, ukrainian, serbian, croatian, romanian, polish, slovak, hungarian
The text has been checked: Semenova Anna

Share information:

Previous articles
Rear disc brake mechanism
Removal and installation rear drum brake shoes
Rear drum brake mechanism
Removal and installation of front brake pads of IBIZA cars
Removal and installation front brake pads on POLO vehicles
Front disc brake mechanism FS-III
Next articles
Checking the thickness of brake discs
Removal and installation the brake disc/brake caliper together with the pad guide
Adjusting the handbrake
Removal and installation the wheel brake cylinder
Bleeding the brake system
Removal and installation the brake hose


Similar articles from other manuals for VW cars:
Removal and installation rear disc brake pads Passat B3 (1988-1993)
Checking the rear disc brake pads Golf 4 (1997-2004)
Adjusting brake pads on two wheels Touareg 1 (2002-2006)
Removal and installation rear brake pads CII41 Tiguan 1 (2007-2015)
Checking the thickness of the rear brake pads Sharan 1 (1995-2000)
Front disc brake pads (14-inch wheels) Transporter T4 (1990-2003)
Checking the thickness of disc brake pads Caddy 3 (2003-2010)
Link to this page in different formats


Visitor comments


No comments yet


How much will 10 + 34 =


Polo 4 
  • General information
  • User manual
  • Maintenance
  • Power unit
  • Engine repair
  • Cooling and lubrication system
  • Control system
  • Injection system (diesel)
  • Supply system
  • Exhaust system
  • Chassis
  • Front suspension
  • Rear suspension
  • Steering
  • Wheels and tires
  • Brake system
  • Body
  • Interior
  • Exterior
  • Electrical equipment
  • Equipment and devices
  • Wiper system
  • Lighting system
  • Electrical circuits
Polo 3 
  • General information
  • User manual
  • Maintenance
  • Power unit
  • Petrol engines 1.4 and 1.6
  • Petrol engines 1.4 (V16)
  • Petrol engines 1.6 and 1.8
  • Diesel engines 1.7 and 1.9
  • Diesel engines 1.9 D and TD
  • Transmission
  • Mechanical gearbox 085
  • Mechanical gearbox 020/02K
  • Chassis
  • Front suspension
  • Rear suspension
  • Steering
  • Brake system
  • Body
  • Exterior
  • Interior
  • Electrical equipment
  • Equipment and instruments (until 2000)
  • Equipment and instruments (after 2000)
  • Electrical circuits
  • Wiring diagrams (petrol)
  • Wiring diagrams (diesel)
VWmanual.ru © 2016-2026 | Mobile version | News and articles | Sitemap: EN BG BY UA RS HR RO PL SK HU | Write message | Site search
Passat B2 • Passat B3 • Passat B4 • Passat B5 • Passat B6 • Golf 1, diesel • Golf 1, petrol • Golf 2, petrol • Golf 2 • Golf 3 • Golf 4 • Golf 5 • Polo 3 • Polo 4 • Touareg 1 • Tiguan 1 • Sharan 1 • Transporter T3 • Transporter T4 • LT 28 • LT 2D • Beetle • Caddy 3 •
Our website uses cookies to ensure functionality and convenience.