



Contents: Removal ↓ Installation ↓
Removal
Please note: Brake pads are subject to the operating permit and are intended by the factory for the corresponding vehicle model. Therefore, it is recommended to use only brake pads approved for use by the vehicle manufacturer.
Safety instructions
There is a risk of accident when lifting the vehicle! Please read the section beforehand "Lifting a car".
Mark the direction of rotation of the tires with an arrow. Loosen the wheel bolts. Raise the rear of the car onto jack stands and remove the wheels.
Attention: Strictly follow the instructions given in the chapter "Removal and installation a wheel".
Note: If the brake pads are to be reinstalled, their location must be marked before removal. Swapping the pads, for example, swapping the outer pad with the inner pad or moving the right wheel to the left and vice versa, is not allowed. It is necessary to replace all the brake pads on the axle at the same time, even if only one of them has reached the wear limit.
Note: Remove the brake pads from only one side of the vehicle so that the brake mechanism on the other side can serve as a reference during assembly.
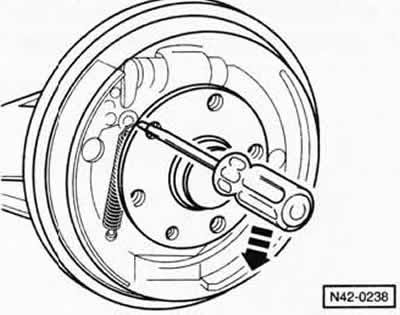
Move the brake shoes away from the brake drum. To do this, insert a screwdriver into the threaded hole of the brake drum and press the wedge up.
Remove the Phillips head screw and remove the brake drum.
Note: If the brake drum is firmly seated, remove it from the hub using light blows from a plastic hammer, a regular puller, or press it out with a screwdriver.
Press the spring plate "1" firmly with pliers to the pressure spring "2" and turn it ¼ turn (90°). Remove the spring plate. Remove the second spring plate in the same way. At the same time, hold the spring pin from the back side.
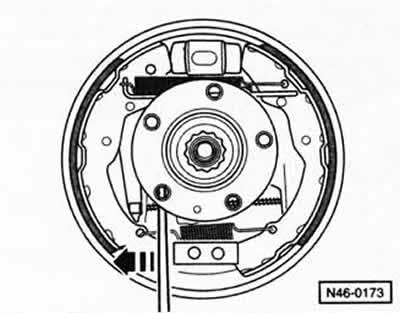
Using a screwdriver, press the brake shoe in the direction of the arrow.
Unhook the lower tension spring "5" and remove the brake shoes, see figure N46-0145.
Unhook and pull out the handbrake cable.
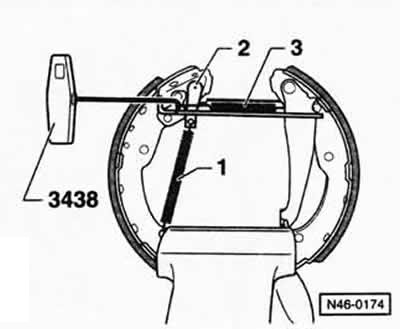
Clamp the brake pads in a vice.
Unhook the tension spring "1" from the wedge "2". Using the special tool VW-3438 or HAZET 4964-1, unhook the tension spring "3". You can also use pliers or a hook with a handle.
Caution: Risk of injury!
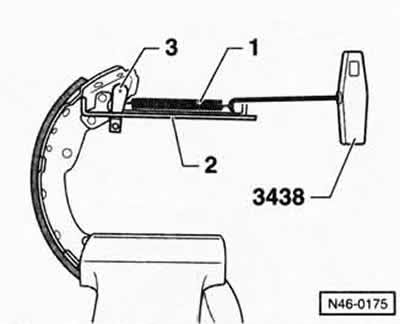
Using the hook, unhook the contact spring "1".
Remove the expansion bar "2" and wedge "3" from the brake shoe.
Installation
Be sure to replace all 4 brake pads of the bridge and use products from the same manufacturer. Clean the brake drum and brake shield only with alcohol. Clean the parts thoroughly before reusing.
Caution: Do not inhale brake dust as it may be harmful to health. When replacing brake pads, do not press the brake pedal, otherwise the piston will be pushed out of the wheel brake cylinder.
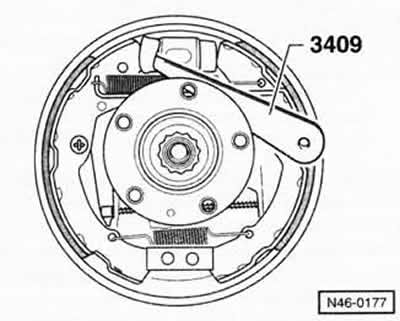
Using your hand or a blunt mounting wedge, lift the dust seal near the wheel brake cylinder.
Note: The brake cylinder piston must not be pulled out during this process.
If there is moisture under the dust seal, the wheel brake cylinder must be replaced. Reinstall the dust seal.
Use your fingers to check the working surface of the brake drum for dents. Replace brake drums with dents, and be sure to replace both brake drums.
Minor irregularities and traces of corrosion on the working surface of the drums can be removed using sandpaper (with grain size 150).
Measure the inner diameter of the brake drum. If the wear limit is reached, replace the brake drum. In this case, both brake drums of the axle must be replaced. The nominal dimensions and wear limits of the parts are given in the chapter "Technical characteristics of the brake system".
Apply VW Group G000650 plastic grease to the contact surfaces of the tension spring and the expansion bar.
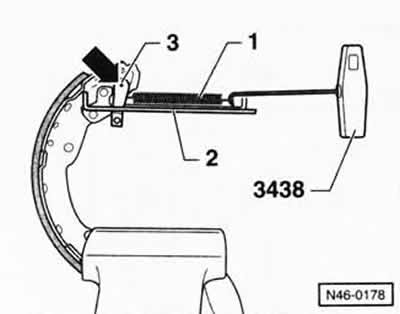
Using the hook, hang the contact spring "1" on the expansion bar "2" and simultaneously insert the wedge "3".
Note: The protrusion at wedge "3" must remain visible during installation.
Insert the brake shoe with the lever for the handbrake cable into the expansion bar.
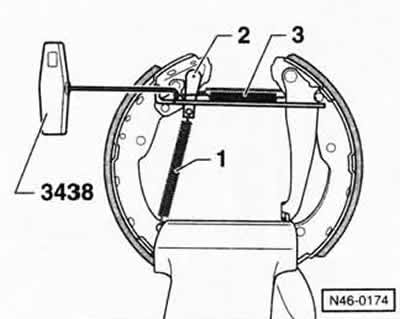
Using the hook, hang the tension spring "3".
Hang the tension spring "1" on the wedge "2".
Place the brake pads on the pistons of the wheel brake cylinder.
Attach the handbrake cable to the brake shoe lever.
Insert the lower tension spring and place the brake shoes on the lower support.
Install the pressure springs and spring plates. To do this, press the spring plate firmly against the pressure spring with pliers and turn it ¼ turn (90°). At the same time, hold the spring pin from the back.
Install the brake drum and secure it with the Phillips head screw.
With the handbrake released, fully depress the brake pedal. This centers the brake pads and ensures that they are in the correct position for the operating conditions.
Adjust the handbrake, see the relevant chapter.
Ensure the previous direction of rotation of the tires, tighten the wheels with bolts, lower the car and only then tighten the wheel bolts in a crosswise manner with a torque of 120 Nm.
Attention: Strictly follow the instructions given in the chapter "Removal and installation a wheel".
Check the brake fluid level in the expansion tank and, if necessary, top up the tank with fluid up to the MAX mark.
Carefully work in new brake pads by repeatedly braking the car from 80 km/h to 40 km/h by lightly pressing the brake pedal. Allow the brakes to cool between braking operations.
Caution: New brake pads must be run in. Avoid unnecessary braking until the vehicle has covered approximately 200 km.
Attention, perform a safety compliance check:
- Are the brake hoses tightly tightened?
- Is the brake hose in the holder?
- Are the air bleed valves tightened?
- Is there enough fluid in the brake system?
- With the engine running, perform a leak test. To do this, apply a force of 200 to 300 N to the brake pedal for approximately 10 seconds (from 20 to 30 kg). Do not loosen the brake pedal. Check all connections for leaks.
Visitor comments