
English Русский
Български
Беларускі
Український
Српски
Hrvatski
Română
Polski
Slovenský
Magyar
  |  Articles  |  Sitemap  |  Contacts  |    |
Car maintenance Ford Car maintenance Hyundai Car maintenance Chevrolet Car maintenance BMW Car maintenance Audi Car maintenance Opel Car maintenance AvtoVAZ
VWmanual.ru


Main   Passat   Golf   Polo   Touareg   Tiguan   Sharan   Transporter   Others  
Polo 3 (1995-2003) Polo 4 (2001-2009)

Adjusting the handbrake (VW Polo 4)

  • Main
  • Polo
  • Polo 4
  • Chassis
  • Brake system
  • Adjusting the handbrake
            0


Contents: Adjustment ↓ Car with rear drum brakes ↓ Car with rear disc brakes ↓
Thanks to the automatic adjustment of the rear brakes, adjustment of the handbrake is not required as part of maintenance. Adjustment is necessary after the following parts have been removed and installed:
  • handbrake cable:
  • brake caliper/rear brake pad guide:
  • rear disc brake pads;
  • rear wheel brake disc;
  • rear drum brake shoes.

Adjustment


Release the handbrake lever.

Press the brake pedal hard several times.

The original can be found at: VWmanual.ru

The brake system must be bled and functioning properly.

Safety note: There is a risk of accident when lifting the vehicle! Please read the section "Lifting a car".


Raise the car from behind onto jacks, the rear wheels should hang freely.

Car with rear drum brakes


Tighten the handbrake lever onto the 4 locking grooves.
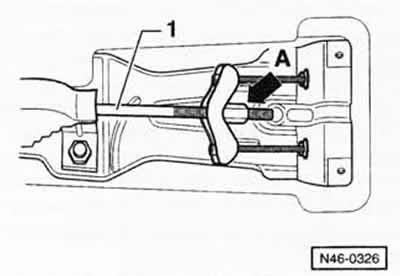
Tighten the handbrake lever onto the 4 locking grooves.


Tighten the adjusting nut "A" so that both rear wheels can be turned with difficulty by hand. The adjusting nut "A" must be screwed through the end of the rod "1".

Release the handbrake and check whether the rear wheels turn freely. If necessary, loosen the adjusting nut slightly.


Car with rear disc brakes
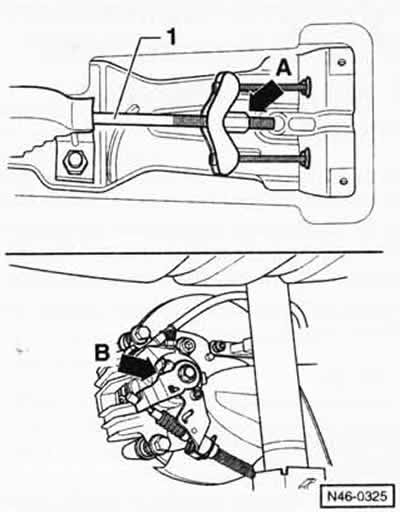


Car with rear disc brakes


The brake lever must be in its original position. Tighten the adjusting nut "A" so that the handbrake drive lever "B" at the brake calipers rises from the stop.

The adjusting nut "A" must be screwed through the end of the rod "1".

Turn the adjusting nut so that when the handbrake lever is released, the distance "arrow" between the lever and the stop on both brake calipers is no more than 1.5 mm.

Pull the handbrake lever firmly and release it again.

Make sure the rear wheels turn freely. If not, loosen the adjusting nut slightly.

This article is available at russian, bulgarian, belarusian, ukrainian, serbian, croatian, romanian, polish, slovak, hungarian
The text has been checked: Semenova Anna

Share information:

Previous articles
Removal and installation the brake disc/brake caliper together with the pad guide
Checking the thickness of brake discs
Removal and installation rear disc brake pads
Rear disc brake mechanism
Removal and installation rear drum brake shoes
Rear drum brake mechanism
Next articles
Removal and installation the wheel brake cylinder
Bleeding the brake system
Removal and installation the brake hose
Checking the brake booster
Handbrake lever/wiring diagram
Removal and installation the handbrake cable


Similar articles from other manuals for VW cars:
Adjusting the handbrake Passat B3 (1988-1993)
Adjusting the handbrake Golf 4 (1997-2004)
Adjusting headrests Touareg 1 (2002-2006)
Adjusting the hood Tiguan 1 (2007-2015)
Adjusting the tension of the drive belt of engine units Sharan 1 (1995-2000)
Adjusting the handbrake Transporter T4 (1990-2003)
Adjusting the windshield washer jets Caddy 3 (2003-2010)
Link to this page in different formats


Visitor comments


No comments yet


How much will 28 + 26 =


Polo 4 
  • General information
  • User manual
  • Maintenance
  • Power unit
  • Engine repair
  • Cooling and lubrication system
  • Control system
  • Injection system (diesel)
  • Supply system
  • Exhaust system
  • Chassis
  • Front suspension
  • Rear suspension
  • Steering
  • Wheels and tires
  • Brake system
  • Body
  • Interior
  • Exterior
  • Electrical equipment
  • Equipment and devices
  • Wiper system
  • Lighting system
  • Electrical circuits
Polo 3 
  • General information
  • User manual
  • Maintenance
  • Power unit
  • Petrol engines 1.4 and 1.6
  • Petrol engines 1.4 (V16)
  • Petrol engines 1.6 and 1.8
  • Diesel engines 1.7 and 1.9
  • Diesel engines 1.9 D and TD
  • Transmission
  • Mechanical gearbox 085
  • Mechanical gearbox 020/02K
  • Chassis
  • Front suspension
  • Rear suspension
  • Steering
  • Brake system
  • Body
  • Exterior
  • Interior
  • Electrical equipment
  • Equipment and instruments (until 2000)
  • Equipment and instruments (after 2000)
  • Electrical circuits
  • Wiring diagrams (petrol)
  • Wiring diagrams (diesel)
VWmanual.ru © 2016-2026 | Mobile version | News and articles | Sitemap: EN BG BY UA RS HR RO PL SK HU | Write message | Site search
Passat B2 • Passat B3 • Passat B4 • Passat B5 • Passat B6 • Golf 1, diesel • Golf 1, petrol • Golf 2, petrol • Golf 2 • Golf 3 • Golf 4 • Golf 5 • Polo 3 • Polo 4 • Touareg 1 • Tiguan 1 • Sharan 1 • Transporter T3 • Transporter T4 • LT 28 • LT 2D • Beetle • Caddy 3 •
Our website uses cookies to ensure functionality and convenience.