



Safety instructions
Brake fluid is poisonous. Never suck brake fluid out with your mouth through a hose. Pour brake fluid only into containers from which accidental consumption is excluded.
- Brake fluid is caustic and therefore should not come into contact with car paint, otherwise it should be wiped off immediately and the contact area should be washed with plenty of water.
- Brake fluid is hygroscopic, i.e. it absorbs moisture from the air. Therefore, store brake fluid only in closed containers.
Caution: Make sure that children do not accidentally consume brake fluid.
- Brake fluid that has already been used in the brake system cannot be reused. When bleeding air from the brake system, only new brake fluid should be used.
- Brake fluid specification: FMVSS 116 DOT 4.
Caution: The brake fluid level in the expansion tank must always be between the MAX and MIN marks.
- Brake fluid must not come into contact with mineral oils. Even minor traces of mineral oil make the brake fluid unusable or cause the brake system to fail. Brake system plugs and seals are damaged if they come into contact with products containing mineral oils. Do not use rags with traces of mineral oil for cleaning.
- Replace brake fluid every 2 years, if possible after the cold season.
Warning: Brake fluid is a problematic material, so under no circumstances should it be poured onto the ground or disposed of with household waste. Municipal authorities should inform about the location of the nearest special waste collection points.
Removal air
After each brake repair, during which the hydraulic system was opened, air could get into it. This air must be removed from the brake system. If there is air in the brake system, the brake pedal easily "falls through" when pressed. In this case, it is necessary to eliminate the leak and remove air from the brake system.
At the service station, filling the brake system with fluid and removing air from the system is usually done using a special device. It is prescribed to use a device for removing air in cases where the brake hose has been dismantled or when at least one of the chambers of the expansion tank is completely empty. In this case, we are talking about performing the operation without this device. Air is removed from the brake system by bleeding it using the brake pedal; an assistant is required to perform this work. If air is to be removed from the entire system, it must be removed from each wheel brake cylinder and from the clutch hydraulic drive slave cylinder. This must be done every time air has entered each wheel brake cylinder. If only one brake caliper has been repaired or replaced, it is usually sufficient to remove air from the corresponding wheel brake cylinder only.
Safety instructions for vehicles with ABS
If one chamber of the brake fluid expansion tank is completely empty (for example, as a result of a leak in the brake system or the chamber was not replenished in a timely manner when filling the system with brake fluid), then air enters the system and reaches the ABS hydraulic pump. In this case, the air must be bled from the brake system at a service station using a bleeding device. If the vehicle is equipped with the EDS system, it must also be adjusted using a diagnostic device. When installing a new brake hose, the air must also be bled from the system using a device.
The sequence of operations when removing air: 1 - front left brake caliper; 2 — front right brake caliper; 3 — rear left brake caliper; 4 — rear right brake caliper.
Raise the car onto the trestles.
Before removing air, unscrew the cap of the expansion tank, put it aside and add new brake fluid up to the MAX mark.
Caution: Open the bleed valve carefully so as not to twist it. It is recommended to treat the valve with a rust converter about 2 hours before bleeding. If the bleed valve does not open, the bleed operation should be performed at a service station.
Caution: Place or hold a container for draining old brake fluid at least 30 cm above the bleed valve and monitor the brake fluid level in the expansion tank. The fluid level must not drop too low, otherwise air will be sucked in through the expansion tank. Always top up with new brake fluid!
For a vehicle without ABS but equipped with a mechanical brake force regulator (export option), when bleeding the rear wheel brakes, the brake force regulator lever should move.
Remove the dust cap from the brake cylinder bleed valve. Clean the bleed valve, attach a clean hose to it, and insert the other end into a container half filled with brake fluid (a suitable hose and container can be purchased at a store that sells automotive accessories).
Ask an assistant to press the brake pedal (pump up) until pressure builds up in the brake system. This is felt as increasing resistance when you press the pedal.
If sufficient pressure has been achieved, press the pedal all the way down and hold it with your foot.
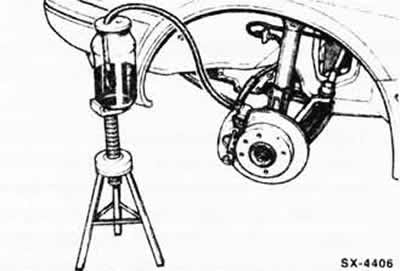
Open the air bleed valve on the brake caliper with a ring spanner about half a turn.
Collect the leaking brake fluid in a container. Make sure that the end of the hose in the container is always below the fluid level in this container.
Once the brake fluid pressure drops, close the air bleed valve.
Repeat the process of pumping the pressure using the brake pedal until the pressure rises again. Press and hold the brake pedal with your foot, open the air bleed valve until the brake fluid pressure drops, then close the air bleed valve.
The process of removing air from the brake cylinder should be repeated until air bubbles stop flowing in along with the brake fluid that flows into the container.
After removing the air, remove the hose from the valve and place the dust cap on the valve.
Similarly, remove air from the brake cylinders of the other wheels, following the order described above.
After removing the air, top up the brake fluid level in the expansion tank to the MAX mark.
Attention, perform a safety compliance check:
- Are the brake hoses tightly tightened?
- Is the brake hose in the holder?
- Are the air bleed valves tightened?
- Is there enough fluid in the brake system?
- With the engine running, perform a leak test. To do this, apply a force of 200 to 300 N to the brake pedal for approximately 10 seconds (from 20 to 30 kg). Do not loosen the brake pedal. Check all connections for leaks.
Finally, perform several braking maneuvers on a street with little traffic. At least one hard braking maneuver must be performed with the ABS functioning (the system's operation is detected by the pulsation of the brake pedal).
Caution: Before braking, make sure there are no vehicles behind you.
Warning: Old brake fluid is a problematic material and should never be dumped on the ground or thrown away with household waste. District and city administrations should inform about the location of the nearest special waste collection points.
Visitor comments