
English Русский
Български
Беларускі
Український
Српски
Hrvatski
Română
Polski
Slovenský
Magyar
  |  Articles  |  Sitemap  |  Contacts  |    |
Car maintenance Ford Car maintenance Hyundai Car maintenance Chevrolet Car maintenance BMW Car maintenance Audi Car maintenance Opel Car maintenance AvtoVAZ
VWmanual.ru


Main   Passat   Golf   Polo   Touareg   Tiguan   Sharan   Transporter   Others  
Passat B2 (1981-1988) Passat B3 (1988-1993) Passat B4 (1988-1996) Passat B5 (1996-2005) Passat B6 (2005-2010)

Removal and installation rear disc brake pads (VW Passat B3)

  • Main
  • Passat
  • Passat B3
  • Chassis
  • Brake system
  • Removal and installation rear disc brake pads
            0


Contents: Removal ↓ Installation ↓

Removal


Loosen the wheel bolts, raise the rear of the car, and remove the wheels.

Caution: If the brake pads are to be re-installed, their location must be marked before removal. Swapping the pads, for example, swapping the outer pad with the inner pad or moving the pad from the right wheel to the left wheel and vice versa, is not allowed. Changing the location of the pads may result in uneven braking action. It is recommended to use only genuine VW/AUDI brake pads. The rear brake pads must be replaced as a set, even if only one pad has reached the wear limit.
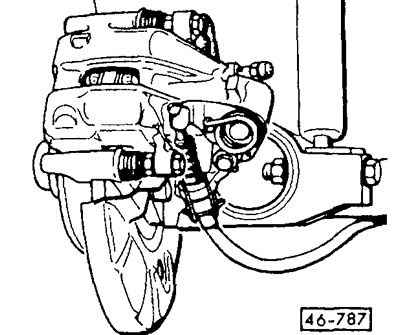

Caution: If the brake pads are to be re-installed, their location must be marked before removal.…


Remove the handbrake cable from the caliper.
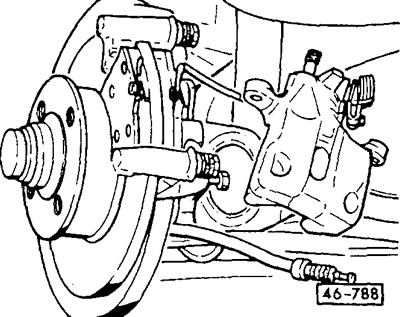
Remove the handbrake cable from the caliper.


Unscrew the 2 caliper mounting bolts, holding the guide pins. Remove the caliper and hang it on a wire to the body so as not to squeeze the brake hose. Do not unscrew the brake hose, otherwise it will be necessary to remove air from the brake system.


Remove the brake pads.

Installation


Caution: When the brake pads are removed, do not depress the brake pedal, otherwise the piston will be pushed out of the caliper body.


Clean the guide surfaces or lining areas of the pads with a suitable soft metal brush or wipe with a cloth soaked in alcohol. Do not use solutions containing mineral oils or tools with sharp edges,

Before installing the pads, examine the brake discs by touch with your fingers to check for dents. Discs with dents can be ground down (workshop work), depending on whether they are thick enough. Always turn the discs on both sides and pay attention to whether there is enough wear reserve left after turning.

Measure the thickness of the brake discs, see below.

Check the dust caps for cracks. Replace damaged caps immediately, as penetrating dirt will quickly damage the caliper seal. In this case, the caliper must be removed and disassembled (workshop work).
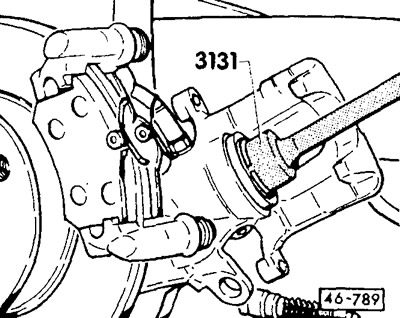
Check the dust caps for cracks. Replace damaged caps immediately, as penetrating dirt will quickly…


Turn the piston to the right using the special VW-3131 key and screw it in under strong pressure. If there is no special tool, insert an iron plate into both of its grooves to screw in the piston.


Caution: The piston must not be pressed in with the return device, otherwise the automatic adjustment in the caliper will be disrupted.


Caution: When pressing the piston into the cylinder, the brake fluid from the brake cylinder is squeezed into the expansion tank. Monitor the fluid level in the tank and, if necessary, suck out excess fluid with a siphon.


For suction, use a bottle that was used to remove air from the hydraulic system, or a plastic bottle that has previously only come into contact with brake fluid. Do not use bottles intended for drinking liquids! Brake fluid is poisonous and should never be sucked out by mouth through a hose. After replacing the brake pads, the brake fluid level in the expansion tank should also not exceed the "MAX" mark, since the liquid expands when heated. Brake fluid leaking from the tank gets under the master brake cylinder, destroys the varnish coating and leads to corrosion.

Insert both brake pads into the brake shield. Make sure that both pressure springs are positioned evenly upwards and parallel to the upper edge of the pads.

Insert the caliper and secure it to the brake shield with new self-locking bolts to a torque of 35 Nm, while simultaneously holding the guide pins.

Please note: Each VW/AUDI brake pad repair kit comes with 2 new self-locking bolts for each caliper. These bolts must be used every time.


After each replacement of brake pads, perform a basic adjustment of the rear wheel disc brake.

Connect the handbrake cable to the caliper body.

Tighten the wheel. Lower the car and tighten the wheel bolts crosswise to 110 Nm.

Check the brake fluid level in the expansion tank and, if necessary, top up the tank to the "MAX" mark.

Caution: Press the brake pedal firmly several times until you feel a strong resistance. This will center the brake pads and position them according to the operating conditions.

This article is available at russian, bulgarian, belarusian, ukrainian, serbian, croatian, romanian, polish, slovak, hungarian
The text has been checked: Medvedeva Elena

Share information:

Previous articles
Girling Rear Brake Caliper
Removal and installation front disc brake pads Ate/Teves
Front brake caliper Ate/Teves (cars with engines of 150, 174 hp from 10/93)
Removal and installation Girling front disc brake pads
Girling Front Brake Caliper
Removal and installation front disc brake pads VW II
Next articles
Eliminating Disc Brake Squealing
Checking the thickness of brake discs
Removal and installation the brake disc / brake caliper
Brake drum device
Removal and installation the brake drum
Brake pads device


Similar articles from other manuals for VW cars:
Checking the rear disc brake pads Golf 4 (1997-2004)
Removal and installation rear disc brake pads Polo 4 (2001-2009)
Adjusting brake pads on two wheels Touareg 1 (2002-2006)
Removal and installation rear brake pads CII41 Tiguan 1 (2007-2015)
Checking the thickness of the rear brake pads Sharan 1 (1995-2000)
Front disc brake pads (14-inch wheels) Transporter T4 (1990-2003)
Checking the thickness of disc brake pads Caddy 3 (2003-2010)
Link to this page in different formats


Visitor comments


No comments yet


How much will 21 + 27 =


Passat B6 
  • General information
  • User manual
  • Maintenance
  • Petrol engine 1.6L
  • Engine repair
  • Cooling and lubrication system
  • Fuel injection system
  • Petrol engine 2.0L
  • Engine repair
  • Lubrication system
  • Cooling system
  • Fuel and exhaust systems
  • Diesel engine 2.0L
  • Engine repair
  • Cooling and lubrication system
  • Fuel and exhaust systems
  • Transmission
  • Clutch
  • Mechanical gearbox
  • Automatic gearbox
  • Drive shafts
  • Chassis
  • Wheels and tires
  • Car suspension
  • Steering
  • Brake system
  • Body
  • Exterior (external elements)
  • Electrical equipment
  • Power devices
  • Lighting and appliances
  • Electrical circuits
Passat B5 
  • General information
  • User manual
  • Weekly checks
  • Maintenance
  • Power unit
  • Engine repair
  • Cooling system
  • Fuel system (petrol)
  • Fuel system (diesel)
  • Engine management
  • Exhaust system
  • Transmission
  • Clutch
  • Car gearbox
  • Drive shafts
  • Chassis
  • Car suspension
  • Wheels and tires
  • Steering
  • Brake system
  • Body
  • Exterior (external elements)
  • Interior (internal elements)
  • Doors and covers
  • Ventilation and heating
  • Electrical equipment
  • Power devices
  • Lighting and appliances
  • Electrical circuits
Passat B4 
  • General information
  • User manual
  • Maintenance
  • Technical data
  • 8-valve engine
  • Engine repair
  • Cooling and lubrication system
  • Supply system
  • Ignition system
  • Fuel injection «Mono-Jetronic»
  • Control system «Mono-Motronic»
  • Control system «Digifant»
  • Control system «Simos»
  • 16-valve engine
  • Engine repair
  • Cooling and lubrication system
  • Fuel injection «K-Jetronic»
  • Control system «KE-Motronic»
  • Control system «Digifant»
  • Diesel engine
  • Engine repair
  • Cooling and lubrication system
  • Power and control system
  • Turbocharging system
  • Digital control system
  • Transmission
  • Clutch
  • Manual gearbox
  • Hydromechanical gearbox
  • Front wheel drive
  • Chassis
  • Car suspension
  • Steering
  • Brake system
  • Body
  • Body elements
  • Electrical equipment
  • Power devices
  • Lighting and appliances
  • Electrical circuits
Passat B3 
  • General information
  • User manual
  • Driving Tips
  • Maintenance instructions
  • Technical data
  • Power unit
  • Engine repair
  • Ignition system
  • Lubrication system
  • Cooling system
  • Supply system
  • Petrol injection system
  • Diesel engine
  • Exhaust system
  • Transmission
  • Clutch
  • Car gearbox
  • Chassis
  • Suspension
  • Steering
  • Brake system
  • Wheels and tires
  • Body
  • Exterior
  • Interior
  • Heating system
  • Electrical equipment
  • Power devices
  • Lighting system
  • Equipment and devices
  • Wiper system
  • Electrical circuits
Passat B2 
  • General information
  • Introduction to instructions
  • User manual
  • Power unit
  • Engines 4-cylinder FZ
  • Engines 4-cylinder
  • Engines 5-cylinder
  • Transmission
  • Clutch
  • Four-speed gearbox
  • Five-speed gearbox
  • Hydromechanical gearbox
  • Front wheel drive
  • Chassis
  • Front suspension
  • Rear suspension
  • Steering
  • Brake system
  • Body
  • Body elements
  • Electrical equipment
  • Equipment and devices
  • Electrical circuits
VWmanual.ru © 2016-2026 | Mobile version | News and articles | Sitemap: EN BG BY UA RS HR RO PL SK HU | Write message | Site search
Passat B2 • Passat B3 • Passat B4 • Passat B5 • Passat B6 • Golf 1, diesel • Golf 1, petrol • Golf 2, petrol • Golf 2 • Golf 3 • Golf 4 • Golf 5 • Polo 3 • Polo 4 • Touareg 1 • Tiguan 1 • Sharan 1 • Transporter T3 • Transporter T4 • LT 28 • LT 2D • Beetle • Caddy 3 •
Our website uses cookies to ensure functionality and convenience.