
Removing
Loosen the wheel bolts, raise the car in front, remove the wheels.
Attention: If the brake linings are to be reinstalled, their location must be marked before removal. It is not allowed to change the pads in places, for example, change the outer one from the inner one or rearrange from the right wheel to the left and vice versa. Changing the location of the pads can lead to uneven braking action. It is recommended to use only original VW/AUDI brake pads. The front brake pads must only be replaced as a set, even if only one pad has reached the wear limit.
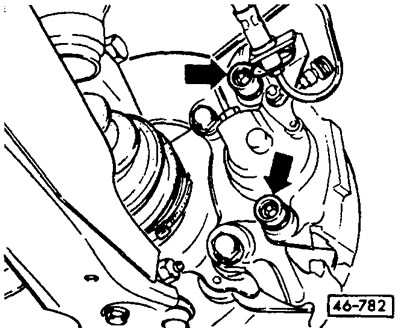
Loosen the fastening bolts with a SW13 wrench.
Caution: The bolts are self-locking, so a relatively high torque must be applied to loosen them. Pay attention to the different lengths of the bolts and put them in their original places when installing.
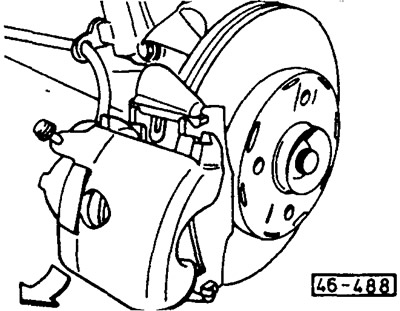
Detach the brake hose retainer from the wheel bearing housing.
Deviate the caliper at the bottom from the brake shield (arrow) and take off.
Hang the caliper on the wire to the body.
Attention: The caliper should not just hang down; the brake hose must not be stretched or twisted.
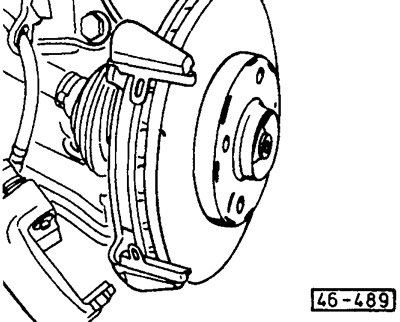
Pull the brake pads out of the brake shield guides.
Remove the brake lining retaining springs.
Installation
Caution: Do not depress the brake pedal when the brake pads are removed, otherwise the piston will be pushed out of the caliper body.
Clean the guide surfaces or pads in the pads with a suitable soft metal brush or wipe with a cloth soaked in alcohol. Do not use solutions containing mineral oils or sharp-edged tools.
Before installing the pads, examine the brake discs to the touch with your fingers for the absence of recesses. Notched discs can be turned (workshop work), depending on whether they have sufficient thickness.
Measure the thickness of the brake discs, see below.
Check dust caps for cracks. Replace damaged caps immediately, as penetrating dirt will quickly break the tightness of the caliper. In this case, the caliper must be removed and disassembled (workshop work).
Bring the piston of the brake cylinder back into the cylinder with a return tool. You can also use a hardwood rod for this (hammer handle), however, pay particular attention to ensure that the piston is not distorted and that the piston surfaces and the dust cap are not damaged. To facilitate installation, first insert the inner brake lining and attach the caliper. Instead of the outer brake lining, insert a pry bar and press the caliper outward, while alternately placing the pry bar from above, then from below. Due to this, the piston of the wheel brake cylinder is pressed into the caliper. Support the mount in the area of the brake shield on the brake disc.
Attention: In order not to damage the brake disc, be sure to place a wooden spacer.
Attention: When installing the piston in the cylinder, the brake fluid is squeezed out of the brake cylinder into the compensation tank. Monitor the fluid level in the tank and, if necessary, suck out excess fluid with a siphon. For suction, use a bottle that was used to remove air from the hydraulic system, or a plastic bottle that previously only came into contact with brake fluid. Do not use bottles intended for drinking liquids! Brake fluid is poisonous and must never be sucked out by mouth through a hose. After replacing the brake linings, the level of brake fluid in the compensation tank must also not exceed the mark «max», because the liquid expands when heated. The brake fluid flowing out of the reservoir gets under the main brake cylinder, destroys the varnish coating and leads to corrosion.
Attention: If the brake linings are heavily worn, check that the piston can move freely. To do this, insert a wooden block into the caliper and ask an assistant to slowly depress the brake pedal. The piston of the brake cylinder should be easily squeezed out and re-entered. During the check, another caliper must be installed in its place. Make sure that the piston is not completely pressed out. If the piston stroke is heavy, the caliper must be repaired (workshop work).
Brake lining retaining springs must be replaced. As a rule, new retaining springs are supplied with brake linings. Insert the retaining springs so that the shorter part points inwards.
Insert the lower retaining spring into the brake shield. Attach the upper spring and insert the inner brake lining into the brake shield from the side above the retaining springs. The inner brake lining has a reduced working surface.
Insert the outer brake lining into the brake shield.
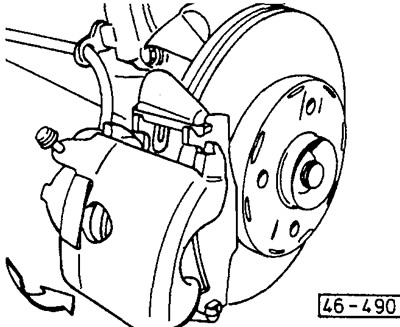
Place the caliper on top of the brake shield and slide it in from below.
Attention: Press the caliper against the brake shield until the fastening bolts can be inserted. If the caliper is pressed during this operation, the springs holding the brake linings may be deformed. This can cause noise when braking.
Treat the fastening bolts with an anti-twist agent, insert and tighten to 25 Nm. The longer bolt is usually inserted from above.
Attach the brake hose retainer to the wheel bearing housing.
Screw on the wheel. Lower vehicle and tighten wheel bolts crosswise to 110 Nm.
Caution: Depress the brake pedal strongly repeatedly until strong resistance is felt. In this way, the brake linings are centered and positioned appropriately for the operating conditions.
Check the level of brake fluid in the expansion tank and, if necessary, top up the tank to the mark «MAX».
Carefully run in new brake linings, for which it is easy to brake the car repeatedly from a speed of 80 km / h to 40 km / h by pressing the brake pedal, between braking, allow the brakes to cool.
Attention: On a distance of up to 200 km, braking to a complete stop should not be undertaken.
Visitor comments