



Internal elements of car body Volkswagen Passat B5

Interior door trim
Location of electrical connector on interior door handle 1 - connector lock, 2 - electrical connector, Arrow - direction of pulling out the electrical connector lock. Removal...
Location of electrical connector on interior door handle 1 - connector lock, 2 - electrical connector, Arrow - direction of pulling out the electrical connector lock. Removal...

Differences when removing the trim of the right front door
Removal the cover from the inside door opening handle 1 - handle cover, 2 - plastic spacer Inner opening handle of the right front door 1, 2 - door trim fastening screws, 3 -...
Removal the cover from the inside door opening handle 1 - handle cover, 2 - plastic spacer Inner opening handle of the right front door 1, 2 - door trim fastening screws, 3 -...

Door mechanism control unit
Door mechanism control unit 1 - block mounting screw, 2 - window lift switch Arrows - control unit lock. Removal 1. Remove the door trim. 2. Unscrew the screw securing the door...
Door mechanism control unit 1 - block mounting screw, 2 - window lift switch Arrows - control unit lock. Removal 1. Remove the door trim. 2. Unscrew the screw securing the door...

Door seal
Location of the door seal on the car body 1 - the starting point for installing the door seal Removal Open the door and pull to remove the door seal located around the perimeter...
Location of the door seal on the car body 1 - the starting point for installing the door seal Removal Open the door and pull to remove the door seal located around the perimeter...

Side trim of the luggage compartment of the Sedan models
Side trim of the luggage compartment of the Sedan models 1 - screws, 2 - loop for attaching luggage, 3 - side trim of the luggage compartment, 4 - pistons, 5 - plug Removal 1....
Side trim of the luggage compartment of the Sedan models 1 - screws, 2 - loop for attaching luggage, 3 - side trim of the luggage compartment, 4 - pistons, 5 - plug Removal 1....

Side trim of the luggage compartment of the station wagon models
Side trim of the luggage compartment of the station wagon models 1 - side trim of the luggage compartment, 2 - combination pistons, 3 - screws, 4 - loop for attaching luggage, 5 -...
Side trim of the luggage compartment of the station wagon models 1 - side trim of the luggage compartment, 2 - combination pistons, 3 - screws, 4 - loop for attaching luggage, 5 -...

Rear luggage compartment trim on Sedan models
Rear luggage compartment trim on Sedan models 1 - screws, 2 - loop for attaching luggage, 3 - plugs, 4 - hairpins, 5 - retainer, 6 - rear luggage compartment trim Removal 1....
Rear luggage compartment trim on Sedan models 1 - screws, 2 - loop for attaching luggage, 3 - plugs, 4 - hairpins, 5 - retainer, 6 - rear luggage compartment trim Removal 1....

Trunk lid trim
Warning triangle fastening elements 1 - cover, 2 - retainer, 3 - emergency stop sign Location of fastening elements of the trunk lid trim on Sedan models 1 - screws, 2 - trunk lid...
Warning triangle fastening elements 1 - cover, 2 - retainer, 3 - emergency stop sign Location of fastening elements of the trunk lid trim on Sedan models 1 - screws, 2 - trunk lid...
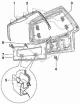
Trunk door trim
Trunk door trim elements 1 - pistons 4 pcs., 2 - upper part of the upholstery, 3 - clamps 4 pcs., 4 - plastic nuts 2 pcs., 5 - plugs 2 pcs., 6 - pistons 12 pcs., 7 - lower part of...
Trunk door trim elements 1 - pistons 4 pcs., 2 - upper part of the upholstery, 3 - clamps 4 pcs., 4 - plastic nuts 2 pcs., 5 - plugs 2 pcs., 6 - pistons 12 pcs., 7 - lower part of...

Luggage compartment floor covering on Estate models
Fastening elements for luggage compartment floor covering 1 - mounting strip, 2 - guide lock, 3 - floor covering Removal 1. Unlock and tilt the rear seatbacks forward. 2. Remove...
Fastening elements for luggage compartment floor covering 1 - mounting strip, 2 - guide lock, 3 - floor covering Removal 1. Unlock and tilt the rear seatbacks forward. 2. Remove...

Interior rear view mirror
Removal To remove the interior rearview mirror (1), tilt it downwards at an angle, separate it from the base and remove it together with the spring. Installation Place the mirror...
Removal To remove the interior rearview mirror (1), tilt it downwards at an angle, separate it from the base and remove it together with the spring. Installation Place the mirror...

Central console
1 - front part of the central console, 2 - ashtray, 3 - protective cover, 4 - decorative overlay, 5 - self-tapping screw, 6 - plug, 7 - cassette block, 8 - decorative cover, 9 -...
1 - front part of the central console, 2 - ashtray, 3 - protective cover, 4 - decorative overlay, 5 - self-tapping screw, 6 - plug, 7 - cassette block, 8 - decorative cover, 9 -...

Front ashtray
Removal 1. Remove the center console. 2. Using a thin screwdriver blade, release the clips (arrows) at the top along the edges of the ashtray (1) and remove the ashtray from the...
Removal 1. Remove the center console. 2. Using a thin screwdriver blade, release the clips (arrows) at the top along the edges of the ashtray (1) and remove the ashtray from the...

Rear ashtray
Removal 1. Open the lid and remove the rear ashtray from its slot. 2. Insert the blade of a thin screwdriver between the ashtray cover (1) and the center console and remove the...
Removal 1. Open the lid and remove the rear ashtray from its slot. 2. Insert the blade of a thin screwdriver between the ashtray cover (1) and the center console and remove the...

Decorative cover for the lever (automatic transmission)
Removal Removal the decorative trim of the selector lever 1 - clamps, 2 - decorative overlay, 3 - electrical connector 1. Remove the center console. 2. Remove the handle from the...
Removal Removal the decorative trim of the selector lever 1 - clamps, 2 - decorative overlay, 3 - electrical connector 1. Remove the center console. 2. Remove the handle from the...

Decorative trims under the radio
Using a screwdriver to remove the trim underneath the radio 1 - left decorative trim, 2 - right decorative trim Removal 1. Using a screwdriver blade, pry and remove the left trim...
Using a screwdriver to remove the trim underneath the radio 1 - left decorative trim, 2 - right decorative trim Removal 1. Using a screwdriver blade, pry and remove the left trim...

Driver's side lower instrument panel trim
Driver side front pillar lower trim fasteners 1 - plug, 2 - screw, 3 - screw, 4 - trim panel Removal the lower trim of the instrument panel on the driver's side 1 - side...
Driver side front pillar lower trim fasteners 1 - plug, 2 - screw, 3 - screw, 4 - trim panel Removal the lower trim of the instrument panel on the driver's side 1 - side...

Glove box
Location of screws securing the bottom of the glove compartment (arrows) 1 - glove compartment lid Location of screws (arrows) for securing the top of the glove compartment 1 -...
Location of screws securing the bottom of the glove compartment (arrows) 1 - glove compartment lid Location of screws (arrows) for securing the top of the glove compartment 1 -...

Interior decorative trim for outside rear view mirror
Removal Removal the interior decorative trim with speaker from the door 1 - decorative trim for outside mirror, 2 - electrical connector of the high-frequency loudspeaker, 3 -...
Removal Removal the interior decorative trim with speaker from the door 1 - decorative trim for outside mirror, 2 - electrical connector of the high-frequency loudspeaker, 3 -...

Ceiling handle
Ceiling handle fastening elements 1 - handle, 2 - plugs, 3 - screws Removal 1. Tilt the ceiling handle downwards. 2. Using a screwdriver blade, remove the plastic caps covering...
Ceiling handle fastening elements 1 - handle, 2 - plugs, 3 - screws Removal 1. Tilt the ceiling handle downwards. 2. Using a screwdriver blade, remove the plastic caps covering...

Sun visors
Sun visor mounting elements 1 - sun visor, 2 - internal support of the visor, 3 - electrical connector, 4 - visor ball joint, 5 - screw, 6 - plug, 7 - support casing, 8 - screw...
Sun visor mounting elements 1 - sun visor, 2 - internal support of the visor, 3 - electrical connector, 4 - visor ball joint, 5 - screw, 6 - plug, 7 - support casing, 8 - screw...
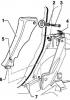
Door sill trims
Elements of interior trim of the rear door opening 1 - decorative overlay, 2 - nut, 3 - screw with safety catch, 4 - clamp, 5 - retainer, 6 - locking protrusion, 7 - threshold...
Elements of interior trim of the rear door opening 1 - decorative overlay, 2 - nut, 3 - screw with safety catch, 4 - clamp, 5 - retainer, 6 - locking protrusion, 7 - threshold...

Windshield and rear glass
The windshield and rear glass are glued to a rubber gasket fixed to the body. Replacing the glass is a labor-intensive task that requires special skills. Without special skills,...
The windshield and rear glass are glued to a rubber gasket fixed to the body. Replacing the glass is a labor-intensive task that requires special skills. Without special skills,...

Front seats
Front seat fastening elements 1 - inner seat guide, 2 - outer seat guide, 3 - seat mounting bolts, A, B - sequence of removing the decorative trim from the inner seat guide, C, D...
Front seat fastening elements 1 - inner seat guide, 2 - outer seat guide, 3 - seat mounting bolts, A, B - sequence of removing the decorative trim from the inner seat guide, C, D...

Removal the headrest
Execution order 1. Pull the headrest up until it stops. Press the locking button and remove the headrest from the seat. 2. Insert the headrest supports into the seat guide and...
Execution order 1. Pull the headrest up until it stops. Press the locking button and remove the headrest from the seat. 2. Insert the headrest supports into the seat guide and...

Side airbags
Location of the side airbag in the back of the front seat Along with the driver and front passenger airbags, side airbags are installed in the front seats. The volume of the side...
Location of the side airbag in the back of the front seat Along with the driver and front passenger airbags, side airbags are installed in the front seats. The volume of the side...

Back seat
Removal Lift the front of the rear seat cushion and, by pulling the seat cushion forward, release it from the clips and remove it from the vehicle. Installation 1. Place the rear...
Removal Lift the front of the rear seat cushion and, by pulling the seat cushion forward, release it from the clips and remove it from the vehicle. Installation 1. Place the rear...
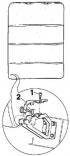
Left backrest of the rear seat
Rear seat back fastening elements 1 - screw, 2 - holder Removal Removal the rear seat back 1 - back of the rear seat, 2 - central back support, 3 - lateral back support 1. Unscrew...
Rear seat back fastening elements 1 - screw, 2 - holder Removal Removal the rear seat back 1 - back of the rear seat, 2 - central back support, 3 - lateral back support 1. Unscrew...
Carpeting
The car floor carpet is secured with screws around the perimeter and in several places in the center. Removing the carpet is not difficult, but it requires removing many...
The car floor carpet is secured with screws around the perimeter and in several places in the center. Removing the carpet is not difficult, but it requires removing many...
Interior finishing elements
Interior finishing elements are attached with screws or various types of staples. Before removing an interior trim piece, check that it is not being held in place by another piece...
Interior finishing elements are attached with screws or various types of staples. Before removing an interior trim piece, check that it is not being held in place by another piece...
This section is available on russian, bulgarian, belarusian, ukrainian, serbian, croatian, romanian, polish, slovak, hungarian
Similar sections from other manuals for VW cars:
Body: Interior (internal elements) Volkswagen Golf 4 (1997-2004)
Body: Interior Volkswagen Polo 4 (2001-2009)
Body: Interior Volkswagen Transporter T4 (1990-2003)
Body and wiring diagrams: Interior and exterior Volkswagen Caddy 3 (2003-2010)
Body: Interior (internal elements) Volkswagen Golf 4 (1997-2004)
Body: Interior Volkswagen Polo 4 (2001-2009)
Body: Interior Volkswagen Transporter T4 (1990-2003)
Body and wiring diagrams: Interior and exterior Volkswagen Caddy 3 (2003-2010)
Passat B6
Passat B5
Passat B4
Passat B3
Passat B2
- General information
- User manual
- Maintenance
- Petrol engine 1.6L
- Engine repair
- Cooling and lubrication system
- Fuel injection system
- Petrol engine 2.0L
- Engine repair
- Lubrication system
- Cooling system
- Fuel and exhaust systems
- Diesel engine 2.0L
- Engine repair
- Cooling and lubrication system
- Fuel and exhaust systems
- Transmission
- Clutch
- Mechanical gearbox
- Automatic gearbox
- Drive shafts
- Chassis
- Wheels and tires
- Car suspension
- Steering
- Brake system
- Body
- Exterior (external elements)
- Electrical equipment
- Power devices
- Lighting and appliances
- Electrical circuits
- General information
- User manual
- Weekly checks
- Maintenance
- Power unit
- Engine repair
- Cooling system
- Fuel system (petrol)
- Fuel system (diesel)
- Engine management
- Exhaust system
- Transmission
- Clutch
- Car gearbox
- Drive shafts
- Chassis
- Car suspension
- Wheels and tires
- Steering
- Brake system
- Body
- Exterior (external elements)
- Interior (internal elements)
- Doors and covers
- Ventilation and heating
- Electrical equipment
- Power devices
- Lighting and appliances
- Electrical circuits
- General information
- User manual
- Maintenance
- Technical data
- 8-valve engine
- Engine repair
- Cooling and lubrication system
- Supply system
- Ignition system
- Fuel injection «Mono-Jetronic»
- Control system «Mono-Motronic»
- Control system «Digifant»
- Control system «Simos»
- 16-valve engine
- Engine repair
- Cooling and lubrication system
- Fuel injection «K-Jetronic»
- Control system «KE-Motronic»
- Control system «Digifant»
- Diesel engine
- Engine repair
- Cooling and lubrication system
- Power and control system
- Turbocharging system
- Digital control system
- Transmission
- Clutch
- Manual gearbox
- Hydromechanical gearbox
- Front wheel drive
- Chassis
- Car suspension
- Steering
- Brake system
- Body
- Body elements
- Electrical equipment
- Power devices
- Lighting and appliances
- Electrical circuits
- General information
- User manual
- Driving Tips
- Maintenance instructions
- Technical data
- Power unit
- Engine repair
- Ignition system
- Lubrication system
- Cooling system
- Supply system
- Petrol injection system
- Diesel engine
- Exhaust system
- Transmission
- Clutch
- Car gearbox
- Chassis
- Suspension
- Steering
- Brake system
- Wheels and tires
- Body
- Exterior
- Interior
- Heating system
- Electrical equipment
- Power devices
- Lighting system
- Equipment and devices
- Wiper system
- Electrical circuits
- General information
- Introduction to instructions
- User manual
- Power unit
- Engines 4-cylinder FZ
- Engines 4-cylinder
- Engines 5-cylinder
- Transmission
- Clutch
- Four-speed gearbox
- Five-speed gearbox
- Hydromechanical gearbox
- Front wheel drive
- Chassis
- Front suspension
- Rear suspension
- Steering
- Brake system
- Body
- Body elements
- Electrical equipment
- Equipment and devices
- Electrical circuits