
Note. If you plan to install old brake pads, then mark with paint before removing them (marker, core) the relative position of the brake pads in relation to the calipers, so that during installation not to confuse the inner and outer brake pads, as well as the wheel on which they were installed.
Withdrawal brake pads of the rear wheels, carry out in the following order:
- slightly loosen the rear wheel mounting bolts;
- mark with paint (marker) mutual arrangement of wheels, brake discs and wheel hubs;
- raise the rear of the car, put it on a support, unscrew the mounting bolts and remove the rear wheels;
- release the parking brake. Disconnect the parking brake cable from the brake caliper;
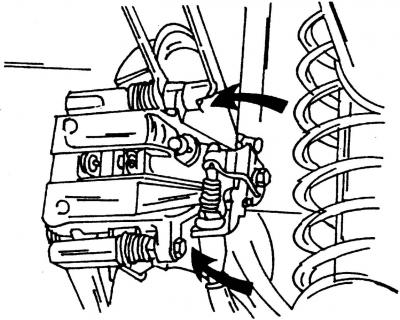
Pic. 322. The locations of the caliper mounting bolts are shown by arrows
- unscrew the upper and lower mounting bolts (pic. 322) brake caliper with a socket hex wrench, while holding the guide pin by its hex part from turning with a thin open-end wrench;
- remove the caliper by moving it up and back and tie it with wire to the rear suspension spring. Do not disconnect the brake hose, do not twist it and leave it taut;
- remove the brake pads, after marking them (if they are used again).
Attention! It is forbidden to press the brake pedal with the brake pads removed, as this will lead to the piston falling out of the brake cylinder, leakage of brake fluid and depressurization of the system.
Check check the technical condition of the brake mechanism before installing the rear brake pads in the following order:
- clean all parts and carefully check their condition;
- check the condition of the surface of the piston and cylinder. If they are worn, damaged, or severely corroded, replace the cylinder and piston. Remove corrosion from the cylinder body with a wire brush;
- thoroughly clean the guide surfaces and the places where the pads are installed in the body opening with a soft metal brush and wipe with a rag soaked in alcohol (gasoline cannot be used). Do not use oily solutions or sharp instruments;
Warning! Carry out all work on cleaning the brake mechanisms in respiratory protection equipment - respirators, since the dust from the brake pads released as a result of the functioning of the brake mechanisms is harmful to health.
- check the protective caps of the guide pins. Replace hardened and torn protective caps;
- remove oil and dirt from the working surfaces of the brake discs. On working surfaces, scoring, warping, deep risks and other damage are not allowed, from which wear of the linings increases or braking efficiency decreases. Grinding or turning of the disc is allowed simultaneously on both sides, but both sides must be machined to the same depth, and the thickness of the rear brake disc should not be less than acceptable;
Attention! Brake discs with corroded brake surfaces must be replaced.
- measure the actual thickness of the rear brake discs and brake pads. Clean brake discs with blue or gray coating before installing new pads;
- check for cracks on the dust cap of the brake cylinder piston. Replace a damaged dust cap, as penetrating dust will quickly cause brake fluid to leak.
Installing rear brake pads
On modern Volkswagen models, the brake cylinder pistons have been upgraded and now to return the self-retracting piston (due to the adjustment mechanism) in the brake cylinder, you must have a special key VW3272. The piston has two grooves located opposite each other, in which a special key is installed. If there is no such key, then a steel strip with a width equal to the diameter of the piston and a thickness equal to the thickness of the screwing grooves can be used instead.
Attention! Unlike front brakes, it is impossible to press the pistons into the brake cylinders with a clamp or a hammer handle, as this can damage the adjusting mechanism (brake lining mechanism).
Installation brake pads in the following order:

Pic. 323. Turning and screwing the piston into the brake cylinder with a special key VW3272. In the place shown by arrow A, you can put on a wrench «by 13 mm»
- using a special key VW3272 (pic. 323) screw the piston into the brake cylinder clockwise.
Note. Before screwing in the piston, pump out some of the liquid from the tank with a pear siphon to prevent it from splashing out of the tank.
Warning! Brake fluid is poisonous, destroys the paintwork and accelerates the corrosion of metals! In no case do not pump out the brake fluid by mouth through the hose, but use a pear siphon for this. Drain the brake fluid into a bottle that should only be used for brake fluid.
- install the brake pads. It may be necessary to screw in the piston by a large amount;
Note. Before installing the caliper in working position, check the correct installation of the brake pads.
- install the caliper on the brake disc, in working position, fix it with new self-locking bolts and tighten them with a tightening torque of 35 Nm. If new bolts are attached to the Volkswagen repair kit, then use them;
- connect the parking brake cable to the brake caliper and adjust the parking brake (see 15.1.2);
- press the brake pedal hard several times until you feel a strong resistance. In this case, the brake pads will take their working position and ensure a good fit to the brake disc;
- bleed the brake system, if necessary;
- install and temporarily secure (by hand) wheel bolts;
- lower the car and tighten the wheel bolts crosswise;
- check connections for tightness. Liquid leakage is not allowed;
- check the brake fluid level in the compensation tank and restore it to the required level;
- check the tightness of the brake system with the engine running. To do this, press the brake pedal several times and hold it for a few seconds. The pedal should not sag.
Visitor comments