
English Русский
Български
Беларускі
Український
Српски
Hrvatski
Română
Polski
Slovenský
Magyar
  |  Articles  |  Sitemap  |  Contacts  |    |
Car maintenance Ford Car maintenance Hyundai Car maintenance Chevrolet Car maintenance BMW Car maintenance Audi Car maintenance Opel Car maintenance AvtoVAZ
VWmanual.ru


Main   Passat   Golf   Polo   Touareg   Tiguan   Sharan   Transporter   Others  
Sharan 1 (1995-2000)

Removal and installation the master brake cylinder (VW Sharan 1)

  • Main
  • Sharan
  • Sharan 1
  • Chassis
  • Brake system
  • Removal and installation the master brake cylinder
            0


The master brake cylinder is located in the engine compartment and is attached with nuts to the vacuum booster.

Removal the main brake cylinder, carry out in the following order:
  • before starting work, press the brake pedal 5-6 times with the engine off to create the same pressure in the vacuum and atmospheric chambers of the vacuum booster, close to atmospheric (remove vacuum);
  • disconnect the vacuum hose from the vacuum booster;
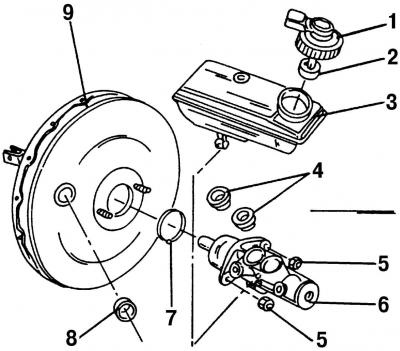
Fig. 327. Fastening the master brake cylinder: 1 - reservoir cover with terminals of the brake…

Fig. 327. Fastening the master brake cylinder: 1 - reservoir cover with terminals of the brake fluid emergency level sensor; 2 - float; 3 - tank; 4 - connecting bushings; 5 - nut, 25 Nm; 6 - master brake cylinder; 7 - sealing ring; 8 - hose tip mounting flange; 9 - vacuum booster

  • using a siphon bulb, pump out the brake fluid from reservoir 3 (Fig. 327), after the sieve has been removed;

Warning: Never pump brake fluid through the hose by mouth - brake fluid is poisonous.

  • disconnect the connector with wires from the terminals of the brake fluid emergency level sensor;
  • disconnect the clutch master cylinder hose;
  • if necessary, remove the reservoir from the master cylinder by rocking it back and forth. Be careful - residual brake fluid may leak out. Put a rag;
  • label and disconnect the lines from the master cylinder and carefully bend them aside;
  • close the openings near the pipes and the master cylinder to prevent fluid leakage and dust and dirt from getting into them;
  • remove the cylinder by unscrewing the nuts that secure it to the vacuum booster;
  • remove the rubber sealing ring 7 (Fig. 327).

Installation the master brake cylinder in the reverse order of removal, taking into account the following:


  • rubber sealing ring 7, always replace with a new one;
  • tighten nuts 5 securing the master brake cylinder to the vacuum booster 9 to a torque of 25 N·m;
  • tighten the union nuts of the brake lines to a torque of 13 Nm;
  • the vacuum booster push rod is not adjustable;
  • lubricate the connecting bushings 4 with brake fluid and press the reservoir into them;
  • after installing the master brake cylinder, restore the fluid level in the reservoir and bleed the hydraulic drive system.


[The original material is available on the portal: vwmanual.ru]

This article is available at russian, bulgarian, belarusian, ukrainian, serbian, croatian, romanian, polish, slovak, hungarian
The text has been checked: Tarasov Ivan

Share information:

Previous articles
Master Brake Cylinder — General Information
Brake disc treatment
Disassembly and assembly of the rear wheel brake mechanism
Replacing rear brake pads
Checking the thickness of the rear brake pads
Removal and installation the front brake caliper
Next articles
Repair of the main brake cylinder
Checking the brake booster
Bleeding the brake hydraulic system
Parking brake — general information
Removal and installation the parking brake cable
Removal and installation the parking brake lever


Similar articles from other manuals for VW cars:
Removal and installation the brake master cylinder Passat B2 (1981-1988)
Master brake cylinder Golf 1 (1974-1984, petrol)
Brake master cylinder and brake booster Polo 3 (1995-2003)
Removal and installation the master brake cylinder Touareg 1 (2002-2006)
Connecting brake pipes from the master cylinder to the hydraulic… Tiguan 1 (2007-2015)
Wheel brake cylinder — removal and installation Transporter T4 (1990-2003)
Vacuum booster and brake master cylinder LT 2D (1996-2003)
Link to this page in different formats


Visitor comments


No comments yet


How much will 20 + 12 =


Sharan 1 
  • General information
  • Introduction to guide
  • Maintenance
  • Petrol engines
  • Engine repair 2.8 l (AAA)
  • Engine repair 2.0 l (ADY)
  • Lubrication system
  • Cooling system
  • Fuel injection system
  • Ignition system
  • Diesel engines
  • Engine repair
  • Lubrication system
  • Cooling system
  • Supply system
  • Transmission
  • Clutch
  • Manual gearbox and shafts
  • Chassis
  • Steering
  • Car suspension
  • Brake system
  • Electrical equipment
  • Equipment and devices
  • Power devices
  • Electrical circuits
VWmanual.ru © 2016-2026 | Mobile version | News and articles | Sitemap: EN BG BY UA RS HR RO PL SK HU | Write message | Site search
Passat B2 • Passat B3 • Passat B4 • Passat B5 • Passat B6 • Golf 1, diesel • Golf 1, petrol • Golf 2, petrol • Golf 2 • Golf 3 • Golf 4 • Golf 5 • Polo 3 • Polo 4 • Touareg 1 • Tiguan 1 • Sharan 1 • Transporter T3 • Transporter T4 • LT 28 • LT 2D • Beetle • Caddy 3 •
Our website uses cookies to ensure functionality and convenience.