



The vacuum booster cannot be repaired and is replaced if it is faulty. If, with the engine running, an unusually large force on the pedal is required to achieve sufficient braking, then check the brake booster.
Check vacuum booster, carry out in the following order:
- press the brake pedal 5-6 times with the engine off to create the same pressure in the vacuum and atmospheric chambers of the vacuum booster, close to atmospheric (remove vacuum);
- keeping the brake pedal depressed, start the engine;
- if the vacuum booster is working properly, the brake pedal should "go forward" after starting the engine and the resistance force on the foot should weaken;
- if the brake pedal does not "go forward", check the tightness of the connecting hose between the intake channel and the booster or the serviceability of the vacuum booster itself.
The reason for the vacuum booster malfunction may also be the check valve. Using a screwdriver, carefully press the valve and blow it in the direction of the arrow stamped on the valve. When blowing, the air should come out on the other side of the valve. If you blow against the arrow stamped on the valve, the air should not come out on the other side. When installing, the valve is pressed into the brake drive vacuum booster.
Attention! The cause of the brake booster malfunction should be sought at a service station.
Removal and installation a vacuum booster without an installed ABS system
Note: A description of how to remove and install the vacuum booster with the ABS system installed is provided in section 15.9.1.
Removal vacuum booster, carry out in the following order:
- remove the "-" wire from the battery terminal;
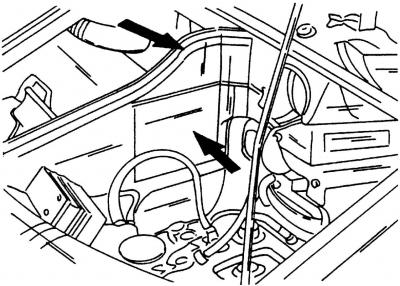
Fig. 328. AB compartment partitions (shown by arrows)
- remove the battery compartment partitions (Fig. 328);
- remove the sound insulation located in the engine compartment;
- remove AB;
- remove the expansion tank of the cooling system;
- disconnect the multi-pin connector block of the coolant temperature indicator and unscrew the two bolts;
- unscrew the two bolts and remove the right partition of the battery compartment;
- unscrew one bolt and remove the left rear partition of the battery compartment. Set the expansion tank aside;
- disconnect the plug connector on the brake fluid reservoir cap and unscrew the reservoir cap;
- using a siphon bulb, pump out the brake fluid from the reservoir and remove the master brake cylinder;
- disconnect the vacuum hose going to the brake booster;
- remove the lower instrument panel cover on the driver's side;
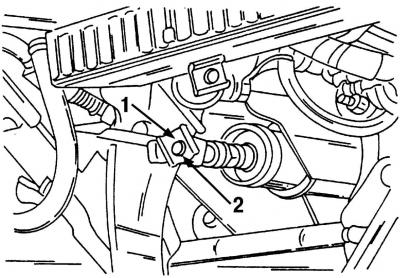
Fig. 329. Disconnecting the brake booster rod from the brake pedal: 1 - spring clamp; 2 - connecting finger
- remove spring clamp 1 (Fig. 329), then remove connecting pin 2 and disconnect the brake booster push rod from the brake pedal;
- unscrew the four nuts securing the brake booster and remove it.
Installation vacuum booster, carry out in the reverse order of removal, doing the following:
- tighten the four vacuum booster mounting nuts to 40 Nm;
- install the master brake cylinder (see paragraph 15.5.1);
- after installation, restore the fluid level in the tank and bleed the hydraulic drive system.
Visitor comments