



Gasoline engine 2.0L (ADY) car Volkswagen Sharan 1

Removal and installation the engine
Removal and installation of the 2.0-liter engine is carried out almost the same as vR6 engine . The engine is lowered together with the gearbox down from the engine compartment of...
Removal and installation of the 2.0-liter engine is carried out almost the same as vR6 engine . The engine is lowered together with the gearbox down from the engine compartment of...
General disassembly of the engine
Before disassembling, the entire surface of the engine should be thoroughly cleaned. All engine openings should be plugged with clean rags to prevent foreign bodies from getting...
Before disassembling, the entire surface of the engine should be thoroughly cleaned. All engine openings should be plugged with clean rags to prevent foreign bodies from getting...
Engine assembly
The engine assembly is carried out in the reverse order of disassembly. However, during each assembly, observe the following recommendations: make sure all parts are clean and...
The engine assembly is carried out in the reverse order of disassembly. However, during each assembly, observe the following recommendations: make sure all parts are clean and...
Cylinder head and valves — general information
Before you begin any work on the cylinder head, review the following general information on the design of the valve timing mechanism: the overhead camshaft is mounted on five...
Before you begin any work on the cylinder head, review the following general information on the design of the valve timing mechanism: the overhead camshaft is mounted on five...

Removal the cylinder head
The cylinder head is removed from the engine on the vehicle if the repair does not require disassembling the entire engine. Caution! Under no circumstances should the cylinder...
The cylinder head is removed from the engine on the vehicle if the repair does not require disassembling the entire engine. Caution! Under no circumstances should the cylinder...

Disassembling the cylinder head
Disassemble the cylinder head in the following order: unscrew all parts located on the cylinder head; clamp the cylinder head together with the clamp screwed to the exhaust...
Disassemble the cylinder head in the following order: unscrew all parts located on the cylinder head; clamp the cylinder head together with the clamp screwed to the exhaust...

Cylinder head repair
Valve springs and valve guides Valve springs should not have cracks and should be sufficiently elastic. For a full check of valve springs, a special spring testing tool should be...
Valve springs and valve guides Valve springs should not have cracks and should be sufficiently elastic. For a full check of valve springs, a special spring testing tool should be...

Cylinder head assembly
Assemble the cylinder head in the reverse order of disassembly, observing the following recommendations: generously lubricate the valve stems with engine oil and insert them into...
Assemble the cylinder head in the reverse order of disassembly, observing the following recommendations: generously lubricate the valve stems with engine oil and insert them into...

Installing the cylinder head
Install the cylinder head in the following order: clean the cylinder head and cylinder block surfaces and place the cylinder head gasket so that the "Oben" or "Top" lettering is...
Install the cylinder head in the following order: clean the cylinder head and cylinder block surfaces and place the cylinder head gasket so that the "Oben" or "Top" lettering is...

Hydraulic pusher
Improper handling of hydraulic lifters can cause engine damage, so follow these guidelines: after removal, hydraulic tappets should be installed with the contact surface facing...
Improper handling of hydraulic lifters can cause engine damage, so follow these guidelines: after removal, hydraulic tappets should be installed with the contact surface facing...

Replacing the camshaft seal
The camshaft oil seal is removed from the engine on the vehicle if there are traces of oil near it. The oil seal is located behind the camshaft pulley. The oil seal is removed in...
The camshaft oil seal is removed from the engine on the vehicle if there are traces of oil near it. The oil seal is located behind the camshaft pulley. The oil seal is removed in...

Removal pistons and connecting rods
The pistons and connecting rods are knocked out of the cylinder block in an upward direction using a hammer handle, after removing the covers and connecting rod bearing shells....
The pistons and connecting rods are knocked out of the cylinder block in an upward direction using a hammer handle, after removing the covers and connecting rod bearing shells....
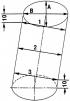
Measuring the inner diameter of a cylinder
Fig. 60. Diagram of measuring the inner diameter of the cylinder: 1, 2 and 3 - upper, middle and lower belts of the cylinder; A, B - transverse and longitudinal directions of...
Fig. 60. Diagram of measuring the inner diameter of the cylinder: 1, 2 and 3 - upper, middle and lower belts of the cylinder; A, B - transverse and longitudinal directions of...
Checking pistons and connecting rods
The procedure for checking pistons and connecting rods is the same as for the VR6 engine ( see p. 2.4.3 ). Check all digital values of clearances and wear limits in the adjustment...
The procedure for checking pistons and connecting rods is the same as for the VR6 engine ( see p. 2.4.3 ). Check all digital values of clearances and wear limits in the adjustment...
Measuring connecting rod clearance
This operation is described in detail in paragraph 3.6.2. The measurement is carried out in exactly the same way as determining the clearance in the main bearings using a plastic...
This operation is described in detail in paragraph 3.6.2. The measurement is carried out in exactly the same way as determining the clearance in the main bearings using a plastic...

Assembly of pistons and connecting rods
To correctly assemble the connecting rod with the piston and install it in the engine in the proper position, use the previously applied markings. If the pistons were replaced,...
To correctly assemble the connecting rod with the piston and install it in the engine in the proper position, use the previously applied markings. If the pistons were replaced,...
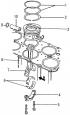
Installing pistons and connecting rods
Install the pistons and connecting rods in the following order: generously lubricate the inner surfaces of the cylinders with engine oil; Fig. 63. Piston group parts: 1 -...
Install the pistons and connecting rods in the following order: generously lubricate the inner surfaces of the cylinders with engine oil; Fig. 63. Piston group parts: 1 -...

Cylinder Block — Design Description
Fig. 135. Front part of the cylinder block with parts installed on it: 1 - cylinder block; 2 - segment key; 3 - O-ring seal; 4 - place of connection of the engine with the...
Fig. 135. Front part of the cylinder block with parts installed on it: 1 - cylinder block; 2 - segment key; 3 - O-ring seal; 4 - place of connection of the engine with the...

Removal the crankshaft
To remove the crankshaft, the engine must be removed from the vehicle. Since the engine must be completely disassembled, follow these guidelines for complete engine disassembly:...
To remove the crankshaft, the engine must be removed from the vehicle. Since the engine must be completely disassembled, follow these guidelines for complete engine disassembly:...

Checking the crankshaft parts
Check the crankshaft parts in the following order: inspect the crankshaft. Cracks in any place of the crankshaft are not allowed. Scratches, nicks and marks are not allowed on the...
Check the crankshaft parts in the following order: inspect the crankshaft. Cracks in any place of the crankshaft are not allowed. Scratches, nicks and marks are not allowed on the...
Installing the crankshaft
Install the crankshaft in the following order: wipe the blind holes in the cylinder block seats and insert the bearing shells with lubrication grooves lubricated with engine oil...
Install the crankshaft in the following order: wipe the blind holes in the cylinder block seats and insert the bearing shells with lubrication grooves lubricated with engine oil...

Crankshaft seals — removal and installation
The front and rear crankshaft oil seals should be replaced after each removal of the crankshaft or oil seal flanges. Oil seals are usually replaced using a special tool and taking...
The front and rear crankshaft oil seals should be replaced after each removal of the crankshaft or oil seal flanges. Oil seals are usually replaced using a special tool and taking...
Removal and installation the flywheel (car with manual transmission)
To remove the flywheel from the crankshaft, lock it with a locking device in a stationary position and unscrew the flywheel mounting bolts, which can be immediately discarded,...
To remove the flywheel from the crankshaft, lock it with a locking device in a stationary position and unscrew the flywheel mounting bolts, which can be immediately discarded,...

Torque converter drive pulley (for vehicles with automatic transmission)
Fig. 147. Automatic transmission torque converter drive pulley with parts: 1 - lining washer; 2 - reinforcement washer; 3 - mounting bolt The automatic transmission torque...
Fig. 147. Automatic transmission torque converter drive pulley with parts: 1 - lining washer; 2 - reinforcement washer; 3 - mounting bolt The automatic transmission torque...
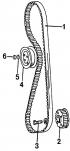
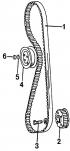
Timing drive mechanism — design description
Fig. 103. Toothed drive belt with belt tensioner and crankshaft toothed wheel: 1 - toothed drive belt; 2 - toothed pulley of the crankshaft; 3 - bolt, 80 Nm; 4 - tensioner for...
Fig. 103. Toothed drive belt with belt tensioner and crankshaft toothed wheel: 1 - toothed drive belt; 2 - toothed pulley of the crankshaft; 3 - bolt, 80 Nm; 4 - tensioner for...

Removal the toothed drive belt
Removal of the timing belt is carried out in the following order: loosen the poly V-belt by screwing a bolt into its tensioner and remove the poly V-belt ( see subsection 3.8 );...
Removal of the timing belt is carried out in the following order: loosen the poly V-belt by screwing a bolt into its tensioner and remove the poly V-belt ( see subsection 3.8 );...

Installing a toothed drive belt
When installing a new belt, you can do without the marks ( see p. 3.7.3 ). When installing the toothed drive belt, none of the pistons should be in the TDC position, otherwise the...
When installing a new belt, you can do without the marks ( see p. 3.7.3 ). When installing the toothed drive belt, none of the pistons should be in the TDC position, otherwise the...

Ignition setup
Setting the ignition is necessary for the correct connection of the distributor with the engine drive and with the spark plugs so that the spark is supplied to the engine...
Setting the ignition is necessary for the correct connection of the distributor with the engine drive and with the spark plugs so that the spark is supplied to the engine...

Adjusting the tension of the drive belt of engine units
The tension of the poly V-belt is carried out by a mechanism with a built-in spring and does not require regular monitoring. Therefore, there is no need to carry out special...
The tension of the poly V-belt is carried out by a mechanism with a built-in spring and does not require regular monitoring. Therefore, there is no need to carry out special...

Intermediate shaft — removal and installation
Fig. 158. Intermediate shaft and its elements: 1 - bolt, 40 Nm; 2 - washer; 3 - gear wheel; 4 - oil seal; 5 - seal holder; 6 - O-ring seal; 7 - segment key; 8 - intermediate...
Fig. 158. Intermediate shaft and its elements: 1 - bolt, 40 Nm; 2 - washer; 3 - gear wheel; 4 - oil seal; 5 - seal holder; 6 - O-ring seal; 7 - segment key; 8 - intermediate...
This section is available on russian, bulgarian, belarusian, ukrainian, serbian, croatian, romanian, polish, slovak, hungarian
Sharan 1
- General information
- Introduction to guide
- Maintenance
- Petrol engines
- Engine repair 2.8 l (AAA)
- Engine repair 2.0 l (ADY)
- Lubrication system
- Cooling system
- Fuel injection system
- Ignition system
- Diesel engines
- Engine repair
- Lubrication system
- Cooling system
- Supply system
- Transmission
- Clutch
- Manual gearbox and shafts
- Chassis
- Steering
- Car suspension
- Brake system
- Electrical equipment
- Equipment and devices
- Power devices
- Electrical circuits