



- clean the cylinder head and cylinder block surfaces and place the cylinder head gasket so that the "Oben" or "Top" lettering is visible on top. Always install a new gasket that matches the part number of the given spare part;
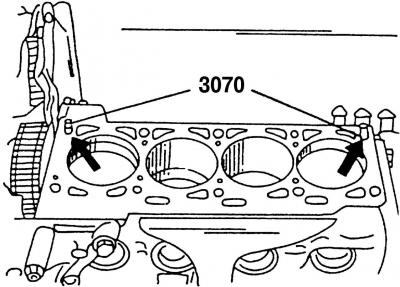
Fig. 124. The locations of the cylinder head guide pins are shown by arrows
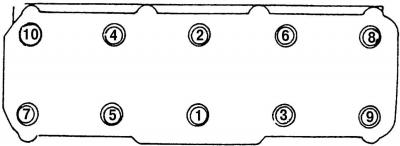
Fig. 125. Cylinder head bolt tightening sequence
- for correct positioning of the gasket, two guide pins 3070 (Fig. 124) must be inserted into the mounting points of bolts No.8 and 10 (Fig. 125) on the cylinder block. If they are missing, insert guide pins into the corresponding holes in the cylinder head;
- install the cylinder head and tap it with a plastic or rubber hammer. To prevent the valves from hitting the bottom of the pistons, set the piston of the first cylinder to the TDC position and turn the crankshaft counter-rotation by 90°. Thanks to this, all the pistons will be located below the TDC position. Install the cylinder head only in this position of the crankshaft;
- insert the eight cylinder head mounting bolts and tighten them by hand;
- unscrew the guide pins 3070 and screw in the remaining cylinder head mounting bolts instead;
- in accordance with the sequence shown in Fig. 125, gradually tighten all cylinder head mounting bolts first to 40 N·m and finally to 60 N·m; in the order shown, insert the key into each bolt, remembering the position of the handle, and tighten each bolt in one go exactly half a turn or twice a quarter turn;
- insert the key into each fastening bolt, remembering the position of the handle and in accordance with the sequence (Fig. 125), tighten each bolt in one go exactly a quarter of a turn;
- repeat this pass exactly the same way again;
Note: To avoid damaging the cylinder head mounting bolts when tightening, use only a special multi-sided key, similar to a hexagon.
(The article is published on this resource VWmanual)
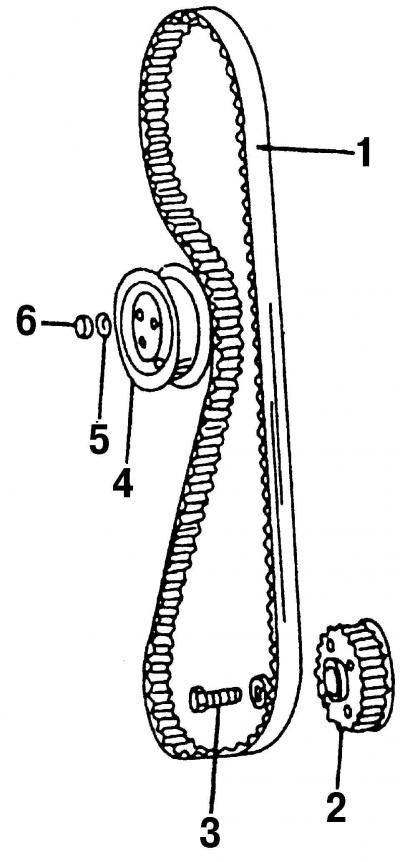
Fig. 103. Toothed drive belt with belt tensioner and crankshaft toothed wheel: 1 - toothed drive belt; 2 - toothed pulley of the crankshaft; 3 - bolt, 80 Nm; 4 - tensioner for toothed drive belt; 5 - washer; 6 - nut, 45 Nm
- install toothed drive belt 1 (Fig. 103) and adjust the timing mechanism drive;
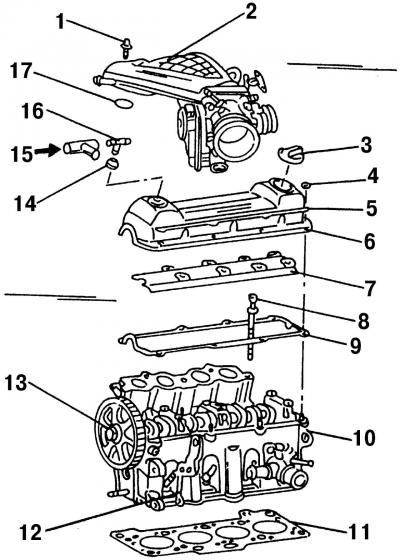
Fig. 105. Details of the upper part of the cylinder head: 1 - bolt, 16 N·m; 2 - central cover (above the top of the intake manifold); 3 - oil filler cap; 4 - nut, 10 Nm; 5 - stiffener; 6 - cylinder head cover; 7 - oil deflector shield; 8 - cylinder head mounting bolt; 9 - cylinder head cover gasket; 10 - cylinder head; 11 - cylinder head gasket; 12 - lifting eye; 13 - camshaft gear wheel; 14 - plug; 15 - from the crankcase ventilation system; 16 - T-shaped fitting; 17 - O-ring (always a replacement)
- stick the gasket 9 (Fig. 105) of the cylinder head cover onto the cylinder head;
Caution! Always install a new sealing gasket. Pay attention to the correct installation of the gasket to avoid oil leakage.
- put on the cylinder head cover. On the left and right of the cylinder head cover, put the reinforcement on the mounting pins and tighten the nuts evenly in a circle with a torque of 10 N·m;
- perform the remaining operations in the reverse order of removal, following the assembly drawings;
- after completing all operations, fill the cooling system with liquid.
Visitor comments