
Pad replacement
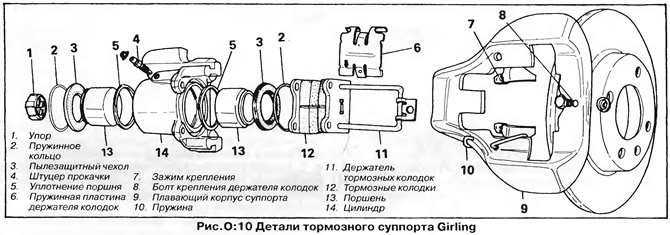
Basically repairing the Girling caliper is done in the same way as described above for the Teves caliper, but removing and installing the brake pads is as follows:
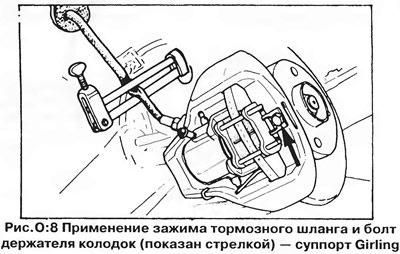
1. Depress the spring plate of the shoe holder on the caliper.
2. Remove the bolt securing the pad holder to the caliper and remove the holder (pic. A:8).
3. Remove the brake pads from the caliper.
4. Press the pistons into the cylinder. As the pistons retract, the fluid level in the master cylinder reservoir rises, so pump out some fluid if necessary to avoid overfilling the reservoir.
5. Install new brake pads in the caliper and make sure they move freely in the caliper cavity.
6. Insert the fingers of the holder into the holes of the pads and the caliper cylinder and secure the holder with a bolt.
7. Install the spring plate on the shoe holder. The arrow stamped on the plate should point down, in the direction of forward rotation of the brake disc.
Caliper replacement (girling caliper)
Removal and installation of the Girling caliper is basically the same as described above for the Teves caliper.
On the latest models, the thread in the brake hose caliper has been changed from right to left. The left-hand threaded hose is shorter and can be recognized by the groove machined around the hex on the fitting.
Only left-hand threaded calipers are available as spare parts, so an appropriate brake hose will be required when replacing a caliper.
Replacement of seals (girling caliper)
1. Remove the cylinder from the floating caliper body (caliper removed from car).
2. Remove spring rings and rubber boots from pistons. Apply compressed air to the cylinder through the hole for connecting the brake hose and squeeze out the pistons.
3. Remove the two O-rings from the grooves in the cylinder using a plastic needle. Be careful not to damage the cylinder.
4. Wash the pistons and cylinder in methanol or clean brake fluid. Do not use gasoline or kerosene for flushing.
5. If the pistons and cylinder are in good condition, assemble the caliper as follows:
6. Lubricate the pistons, o-rings and cylinder with clean brake fluid.
7. Install new O-rings in the cylinder grooves.
8. Insert the pistons bottom-in at opposite ends of the cylinder, then press them all the way in with a soft-jawed vise.
9. Place dust covers on top of each piston and cylinder lip and secure with circlips.
10. Make sure the spring and mounting clips are in the correct position on the floating caliper body.
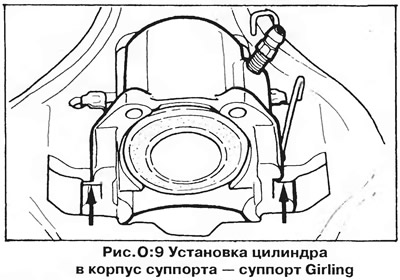
11. Install the nylon stop on the ledge of the floating body and assemble the cylinder with the caliper body (pic. A:9). Push the cylinder into the caliper body until it stops.
Visitor comments