
Pad replacement
Replace brake pads when they are worn to the minimum allowable thickness (7 mm including the metal base of the shoe) or if they cause brake failure.
To maintain uniform braking, replace all four brake pads on both front brakes at the same time, even if only one of them requires replacement.
ATTENTION: If you intend to continue using the removed brake pads, mark their position before removal - swapping the brake pads is not allowed, as this leads to uneven braking.
1. Loosen the front wheel bolts, lift and support the front of the car on supports (see chapter "Basic rules for work"). Remove the front wheels.
2. Remove a clip from fingers of fastening of brake pads and beat out fingers.
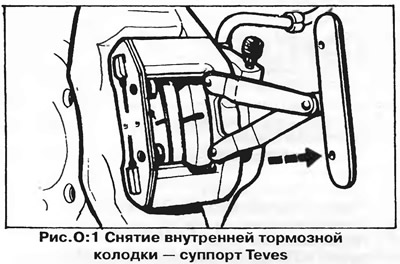
3. Remove the inner brake pad from the caliper. Special fixture (pic. A:1), inserted into the finger holes, will greatly facilitate this operation, however, you can use pliers in combination with a screwdriver.
4. The outer brake pad is fixed with a lug on the floating caliper body, and to remove it, you need to press the caliper body outward.
5. Clean the inner surfaces of the caliper from dirt and dust.
6. Inspect the piston rubber dust boot for cracks or fluid leakage. Replace torn boot or repair caliper cylinder if fluid is leaking (see further in the text).
7. Press the piston into the cylinder.
8. When the piston is pressed into the cylinder, the fluid level in the master cylinder reservoir rises, so to avoid overfilling the reservoir, pump out some liquid from the reservoir.
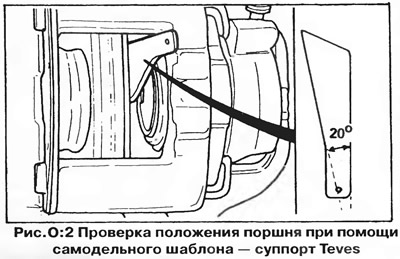
9 Check the position of the notch on the caliper piston using the template shown in fig. A:2; The template can be made from cardboard. Press the template against the upper guide surface of the caliper, if necessary, turn the piston accordingly and set it to the correct position.
10. Be convinced that frictional surfaces of a brake disk are cleared of greasing, oil and a brake liquid.
11. New brake pads must match the type and size of the caliper.
12. Install the brake pads in the caliper. The pads should move freely in the caliper cavity.
13. Install a new compression spring on the brake shoes and insert the shoes fastening pins. If the fingers are fixed with a spring clip, they are inserted from the outside. At the inner end of such a finger there is a hole for a spring clip. The finger should slide into place without force. It is recommended to install a new clamp each time.
Clampless calipers have pins with spring bushings at the outer ends - such pins are inserted from the inside of the caliper, and they must be fully seated in place with a hammer and a suitable drift.
14. Press the brake pedal several times to set the normal operating clearance between the pads and the disc.
15. Install the wheels, lower the vehicle to the ground and check the fluid level in the master cylinder reservoir. Tighten the wheel bolts to the torque specified in section "Technical data".
Removing the caliper (Teves)
1. Remove the brake pads from the caliper as described above.
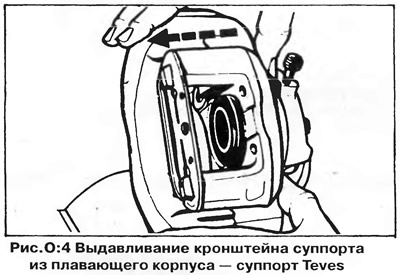
2. If the caliper is to be disassembled, gently depress the brake pedal to push the caliper bracket out of the floating housing with a piston to facilitate piston removal later.
3. Turn out two bolts of fastening of an arm of a support to a rotary fist and remove a support from a brake disk. The spring washers mounted on the caliper mounting bolts can be discarded - their installation is not required during assembly.
4. If the caliper needs to be removed completely, pinch the brake hose with a clamp and unscrew the hose fitting from the caliper. Plug the disconnected end of the brake hose to prevent dirt from entering.
5. If the caliper is removed to gain access to other nodes (e.g. for repairing suspension parts), hang it next to (e.g. suspension spring), without disconnecting the brake hose. Make sure the hose is not stretched.
Caliper installation (Teves)
1. Connect the hose to the caliper.
2. Install the caliper on the steering knuckle and secure it with two bolts, (spring washers under the bolt heads are not installed). Tighten the caliper mounting bolts to the torque specified in section "Technical data".
3. Attach the brake hose to the bracket on the telescopic suspension strut.
4. Install the brake pads as previously described.
5. If the brake hose was disconnected, pump over a corresponding brake contour.
6. Install the wheel, lower the vehicle to the ground and tighten the wheel bolts to the torque specified in section "Technical data".
Seal replacement (caliper Teves)
1. Press the caliper bracket out of the floating body as shown in fig. A:4 (caliper removed from car).
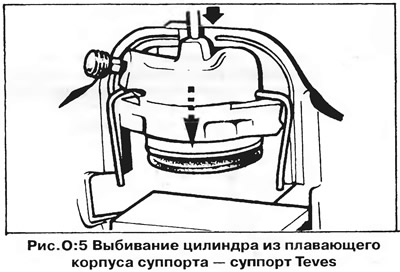
2. Install the floating body as shown in fig. O:5, and knock the cylinder out of it with a brass drift. Place a piece of wood under the piston in the housing to prevent damage to the piston when the cylinder is removed.
3. Remove the piston rubber boot. Apply compressed air to the cylinder through the brake hose connection and remove the piston from the cylinder.
4. Remove the O-ring from the groove in the cylinder using a suitable blunt tool such as a plastic needle or small screwdriver. Be careful not to damage the cylinder.
5. Wash the piston and cylinder with clean brake fluid or methyl alcohol. Do not use gasoline or kerosene for flushing.
6. If the piston and cylinder are in good condition, assemble the caliper as follows:
7. Lubricate the piston, o-ring and cylinder bore with clean brake fluid.
8. Install a new O-ring in the cylinder groove.
9. Insert the piston upside down into the cylinder, then press it in completely with a soft-jawed vise.
10. Place dust cover on top of piston and cylinder and secure with circlip.
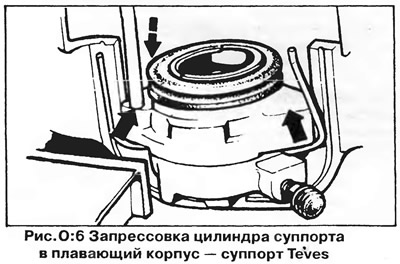
11. Install the retaining spring into the groove on the cylinder body. The bent end of the spring must point in the direction of the forward rotation of the brake disc. Press the cylinder into the floating caliper body using a brass drift (pic. A:6).
12. Install the caliper bracket onto the ends of the retaining spring, then insert the caliper bracket into the floating body so that the bracket grooves align with the ribs on the floating body.
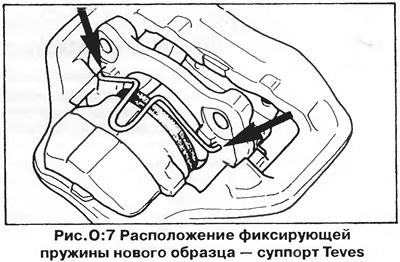
13. Some calipers have a new design retaining spring (pic. A:7) - in this case, the spring must be inserted into the caliper bracket before installing the floating body.
Visitor comments