
Front disc brake pads - check
Approximately the thickness of the brake pads can be determined without removing the wheels, since they are visible through the holes in the rims. Perform a more complete check in the following order:
- 1. Loosen the front wheel bolts, raise the front of the vehicle and remove the wheels.
- 2. Check the thickness of the pads, which are clearly visible through the window in the caliper (pic. A:19).
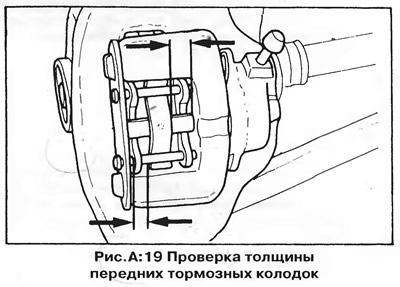
Minimum admissible block thickness (along with a metal base) is 7 mm. If the thickness of at least one pad approaches the minimum, all four pads should be replaced. Approximately, we can assume that the pads wear out by 1 mm over 800 km of run.
Check if the pads are contaminated with brake fluid. If there are signs of fluid leakage, remove the pads for a more complete check (see chapter "Brake system").
NOTE: If at least one of the pads needs to be replaced, replace all four front brake pads at the same time to maintain even braking.
Replacement of pads is described in detail in the chapter "BRAKE SYSTEM". After inspecting / noticing the pads, replace the wheels and lower the car to the ground. Tighten the wheel bolts.
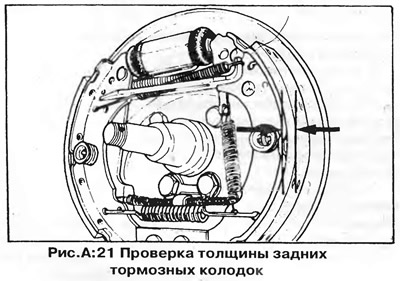
Rear drum brake pads (pic. A:21)
Although the Golf, Jetta and Scirocco rear brake shields have inspection holes covered with rubber plugs, it is recommended to remove the brake drums for a more thorough inspection of the pads.
When inspecting the rear brakes, it may turn out that some parts require replacement. Repair of brake mechanisms is described in chapter "Brake system".
1. Loosen the wheel bolts, raise the rear of the vehicle and remove the rear wheels.
2. Release the handbrake and remove the brake drum - see chapter "Brake system".
3. Clean the brake pads with a wire brush, taking care not to inhale the resulting dust. The pads must be replaced if their thickness approaches the maximum allowable value, i.e. 5 mm for riveted linings or 3.5 mm if the linings are glued (pic. A:21). All four pads must be replaced at the same time to maintain uniform braking. If the pads are contaminated with oil or brake fluid, the source of contamination must be immediately identified and the cause eliminated, and the contaminated pads replaced
Check the working brake cylinders of the rear wheels by lifting the dust covers with a screwdriver. If there are traces of brake fluid under the covers, the brake cylinder should be replaced or repaired (replace seals).
Before installing the brake drum, check the operation of the automatic adjustment mechanism (in the presence of). If the automatic regulator does not work, repair it.
Hoses, tubes and seals
Regularly inspect the hoses and pipes of the brake system in order to timely identify pockets of corrosion of the pipes, as well as cracks, abrasions in the hoses and other damage. If questionable parts or brake fluid leaks are found, repair immediately (see chapter "Brake system").
Carefully inspect the master and working brake cylinders. Because the brake fluid functions as a lubricant, some leakage of fluid through the cylinder seals is acceptable, but the amount of fluid that leaks must be kept to a minimum. If a large amount of fluid leaks through the seal, it is recommended to immediately replace all seals in the brake system components - see chapter "Brake system".
Rear brake adjustment
On vehicles not equipped with an automatic rear brake adjuster, adjust the rear brakes as the brake pads wear. To do this, raise the rear of the vehicle off the ground and remove the rear wheels. Release the handbrake and check that the handbrake cables are not binding and that the wheels turn freely.
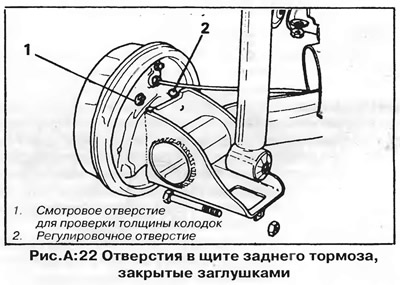
Remove the plug from the adjustment hole in the brake shield (2, fig. A:22). The serrated rear brake adjusting nut is visible through the hole. Turn the nut with a flathead screwdriver to adjust the rear brake pads.
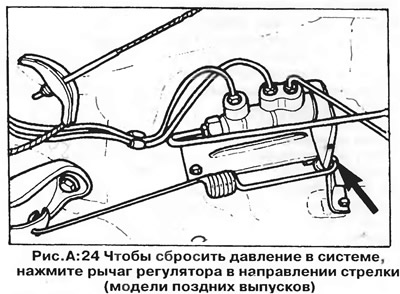
NOTE: If the vehicle is equipped with a load-dependent rear brake pressure regulator, the residual pressure in the brake system must be relieved before adjusting the pads. To do this, press the regulator lever in the direction shown by the arrow in fig. A:23 and A:24.

Turn the serrated adjusting nut down with the screwdriver until the wheel is locked, then turn it back just enough to allow the wheel to turn freely again.
After adjusting both brake mechanisms, press the brake pedal several times and check the adjustment again. Close the adjustment holes with plugs.
Handbrake adjustment
The operation of the handbrake should be checked periodically. After jacking up the car, check the condition and reliability of the handbrake cable fastening, as well as the ease of its movement in the shell and guides.
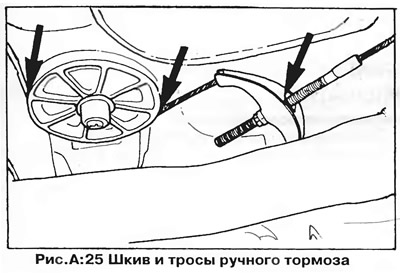
Clean and lubricate cable with spray lubricant. Lubricate the equalizer, the cable pulley, and the sections of the cable where it enters the guides. Lubricate the pulley axle and check for ease of rotation (pic. A:25).
Normally, the handbrake cable does not require adjustment during operation, since its slack is taken up when adjusting the rear brakes (automatically or manually). However, if the cable is loose due to pulling, it can be adjusted as follows:
Adjust the rear brakes as described above, then apply the handbrake.
NOTE: Engage the handbrake by raising the lock lever three clicks if the vehicle's rear brakes have manual adjustment, and four clicks if the rear brakes have automatic adjustment.
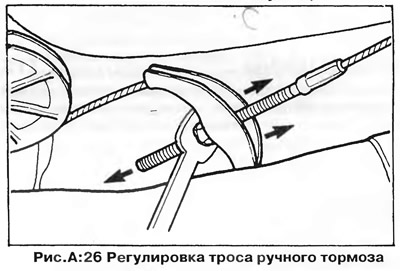
With the handbrake lever in this position, tighten the adjusting nut on the cable equalizer (pic. A:26) so that the rear wheels can be turned with force by hand. Release the handbrake lever and check for ease of rotation of the rear wheels.
Visitor comments