
English Русский
Български
Беларускі
Український
Српски
Hrvatski
Română
Polski
Slovenský
Magyar
  |  Articles  |  Sitemap  |  Contacts  |    |
Car maintenance Ford Car maintenance Hyundai Car maintenance Chevrolet Car maintenance BMW Car maintenance Audi Car maintenance Opel Car maintenance AvtoVAZ
VWmanual.ru


Main   Passat   Golf   Polo   Touareg   Tiguan   Sharan   Transporter   Others  
Golf 1 (1974-1984, diesel) Golf 1 (1974-1984, petrol) Golf 2 (1984-1993, petrol) Golf 2 (1984-1993) Golf 3 (1991-1997) Golf 4 (1997-2004) Golf 5 (2003-2008)

Checking the battery (VW Golf 1)

  • Main
  • Golf
  • Golf 1
  • General information
  • Maintenance
  • Checking the battery
            0


Contents: Electrolyte level ↓ General condition and charge level…↓ Battery terminals and wires ↓

Electrolyte level


Cars can be equipped with a maintenance-free battery, which does not require any maintenance during operation. Such batteries are distinguished by a flat removable or non-removable battery compartment cover. In addition, there is a corresponding sticker on the battery.

If the car is equipped with a "traditional" type battery, it is necessary to periodically check the electrolyte level and, if it is below the upper edge of the plates, replenish it by adding distilled water. The electrolyte level should be between the "MIN" and "MAX" marks on the translucent wall of the battery case (figure A:15), or between the upper edge of the plates and the lower edge of the filler neck. Do not raise the electrolyte level above the norm. It is advisable to start the engine immediately after adding distilled water so that the water mixes well with the electrolyte - this will prevent the electrolyte from freezing in cold weather.
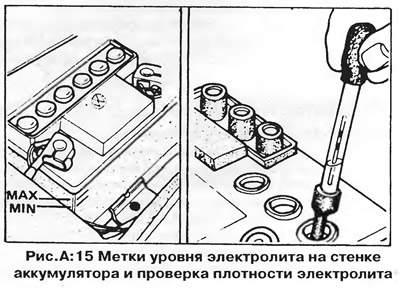
If the car is equipped with a «traditional» type battery, it is necessary to periodically check the…


If you need to add water to the battery frequently, you should find out the reason for this. In particular, the battery may "boil away" due to increased voltage in the charging circuit due to a faulty voltage regulator. Check the electrical system and eliminate the fault as soon as possible (see the chapter "Engine Electrical Equipment"). If you need to add electrolyte only to one of the battery compartments, carefully inspect the case for cracks that may be the cause of electrolyte leakage. If a leak is detected, eliminate its cause.


NOTE: To avoid electrolyte splashing, do not start charging the battery earlier than half an hour after adjusting the electrolyte level (except in cases where the battery is charged by the vehicle's own charging system).


General condition and charge level of the battery


It is impossible to measure the density of electrolyte in sealed maintenance-free batteries, so to assess the general condition, the battery should be removed from the car, fully charged and sent to a battery workshop for a control discharge. In addition, the battery condition can be assessed using a load fork.

A regular battery's charge level is checked by measuring the specific gravity of the electrolyte in each compartment with a special hydrometer, which can be purchased at most auto supply stores. When checking the specific gravity, be careful not to spill acid on your skin or clothing.

Check the density in the following order:
  • 1. Unscrew the battery compartment plugs or remove the cover. Lower the end of the hydrometer into the hole in one of the battery sections (figure A:15).
  • 2. Slowly add electrolyte to the hydrometer until the float rises.
  • 3. The division of the float scale located at the electrolyte level corresponds to the density of the electrolyte in this section. Read the hydrometer readings.
  • 4. Slowly and carefully release the electrolyte back into the battery, then repeat the measurement in all other sections of the battery. A fully charged battery should have an electrolyte density of 1.275 g/cm³. A density of 1.120 g/cm³ corresponds to a completely discharged battery (see section "Technical data").

If the density is low, the battery needs to be charged and check the electrolyte density again no earlier than an hour after charging. If the density is still low, the battery needs to be replaced.


Battery terminals and wires


To ensure reliable contact, the battery terminals must be tightened well. If white residue has formed on and around the terminals, the wires should be disconnected from the battery, the terminals cleaned with a wire brush and the wires reconnected, lubricating the connection points with technical petroleum jelly. When cleaning the terminals, try not to scatter the white residue, as it can cause increased corrosion. Tighten the connections securely. In addition, check the reliability of the connection of the engine and battery ground wires to the body.

This article is available at russian, bulgarian, belarusian, ukrainian, serbian, croatian, romanian, polish, slovak, hungarian
The text has been checked: Tarasov Ivan

Share information:

Previous articles
Brake fluid
Cooling system
Fuel filters
Air filter
Engine oil and filter
Tools and equipment
Next articles
Drive belt
Clutch adjustment
Oil in manual and automatic transmission
Brake system
Wheels and tires
Exhaust system


Similar articles from other manuals for VW cars:
Checking the electrolyte level in the battery Passat B4 (1988-1996)
Checking the battery Polo 4 (2001-2009)
Checking the battery Touareg 1 (2002-2006)
Checking the operation of the intake manifold flap Tiguan 1 (2007-2015)
Checking the battery status Sharan 1 (1995-2000)
Checking the battery Transporter T4 (1990-2003)
Checking the electrolyte level in the battery Caddy 3 (2003-2010)
Link to this page in different formats


Visitor comments


No comments yet


How much will 35 + 33 =


Golf 5 
  • General information
  • User manual
  • Maintenance
  • Troubleshooting
  • Power unit
  • Engine repair
  • Cooling and ventilation system
  • Fuel system
  • Ignition system
  • Transmission
  • Clutch
  • Mechanical gearbox
  • Automatic gearbox
  • Chassis
  • Brake system
  • Car suspension
  • Steering
  • Body
  • Interior (internal elements)
  • Exterior (external elements)
  • Doors and covers
  • Electrical equipment
  • Power devices
  • Washers and wipers
  • Lighting and appliances
  • Electrical circuits
Golf 4 
  • General information
  • User manual
  • Weekly checks
  • Maintenance
  • Power unit
  • Petrol engines
  • Diesel engines
  • Cooling system
  • Fuel system (petrol)
  • Control system (petrol)
  • Fuel system (diesel)
  • Exhaust system
  • Transmission
  • Clutch
  • Car gearbox
  • Drive shafts
  • Chassis
  • Car suspension
  • Steering
  • Wheels and tires
  • Brake system
  • Body
  • Exterior (external elements)
  • Interior (internal elements)
  • Ventilation and heating
  • Car doors and sunroof
  • Washers and glass cleaners
  • Electrical equipment
  • Power devices
  • Lighting and appliances
  • Electrical circuits
Golf 3 
  • Petrol engine
  • Engine repair
  • Lubrication system
  • Cooling system
  • Ignition system
  • Diesel engine
  • Engine repair
  • Diesel injection system
  • Pre-glow system
  • Transmission
  • Clutch
  • Gearbox and drive shafts
  • Chassis
  • Steering
  • Wheels and suspension
  • Brake system
  • Electrical equipment
  • Lighting and appliances
  • Electrical circuits
Golf 2 
  • General information
  • Introduction to guide
  • User manual
  • Petrol engines 1.3 l
  • Engine repair
  • Lubrication system
  • Cooling system
  • Carburetors
  • Supply system
  • Ignition system
  • Petrol engines 1.6/1.8 l
  • Engine repair
  • Supply system
  • Ignition system
  • Diesel engines
  • Engine repair
  • Lubrication system
  • Cooling system
  • Power and exhaust system
  • Transmission
  • Clutch
  • 4-speed gearbox 084
  • 5-speed gearbox 085
  • 4-speed gearbox 020/4R
  • 5-speed gearbox 020/4T
  • Automatic gearbox
  • Drive shafts
  • Chassis
  • Steering
  • Car suspension
  • Brake system
  • Body
  • Body elements
  • Doors, locks and windows
  • Electrical equipment
  • Equipment and devices
  • Power devices
Golf 2 (petrol) 
  • General information
  • Characteristics
  • Car care
  • Maintenance
  • Power unit
  • Engine repair
  • Engine 1.05/1.30
  • Engine 1.60/1.80
  • Cooling and lubrication system
  • Power and exhaust system
  • Transmission
  • Clutch
  • Car gearbox
  • Drive shafts
  • Chassis
  • Brake system
  • Steering
  • Suspension
  • Body
  • Body and equipment
  • Electrical equipment
  • Lighting and appliances
  • Electrical circuits
Golf 1 (petrol) 
  • General information
  • Characteristics
  • User manual
  • Maintenance
  • Power unit
  • Engine adjustment
  • Engine 1.1/1.3
  • Engine 1.5/1.6/1.8
  • Engine electrical equipment
  • Cooling system
  • Fuel system
  • Transmission
  • Clutch and manual gearbox
  • Automatic gearbox
  • Chassis
  • Steering
  • Front suspension
  • Rear suspension
  • Brake system
  • Electrical equipment
  • Lighting and appliances
  • Electrical circuits
  • Body
  • Body and equipment
  • Optional equipment
Golf 1 (diesel) 
  • General information
  • Specifications
  • Maintenance
  • Power unit
  • Engine repair
  • Exhaust and turbocharger
  • Cooling system
  • Fuel system
  • Fuel injection system
  • Transmission
  • Clutch and drive shafts
  • Car gearbox
  • Chassis
  • Suspension and wheels
  • Steering
  • Brake system
  • Wheels and tires
  • Body
  • Heating and ventilation
  • Exterior (external elements)
  • Interior (internal elements)
  • Doors and windows
  • Electrical equipment
  • Equipment and devices
  • Lighting system
  • Power devices
  • Electrical circuits
VWmanual.ru © 2016-2026 | Mobile version | News and articles | Sitemap: EN BG BY UA RS HR RO PL SK HU | Write message | Site search
Passat B2 • Passat B3 • Passat B4 • Passat B5 • Passat B6 • Golf 1, diesel • Golf 1, petrol • Golf 2, petrol • Golf 2 • Golf 3 • Golf 4 • Golf 5 • Polo 3 • Polo 4 • Touareg 1 • Tiguan 1 • Sharan 1 • Transporter T3 • Transporter T4 • LT 28 • LT 2D • Beetle • Caddy 3 •
Our website uses cookies to ensure functionality and convenience.