



Contents: Special tool required: ↓ Necessary consumables: ↓ Battery inspection ↓ Checking the strength of the battery…↓ Checking/replenishing the…↓
Special tool required:
- A suitable container for pouring distilled water.
- Battery-powered densimeter with pipette.
Necessary consumables:
If the electrolyte level is too low: distilled water.
Battery inspection
Inspect the battery case for damage. If the case is damaged, electrolyte may leak and damage nearby parts. Replace a battery with a damaged case as soon as possible.
Checking the strength of the battery mount
If the battery is not secured properly, it may fail prematurely due to shaking. A loose battery can cause wires to catch fire or electrical equipment to malfunction. It also reduces the safety of the vehicle in a collision.
If the battery has a cover, squeeze the plates at the back of the cover and swing the cover forward.
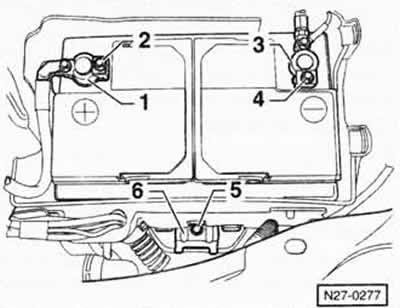
Move the battery strongly from side to side.
If the battery is loose, tighten the mounting bolt -5- of the retaining bracket "6" to a torque of 25 Nm.
Caution: If the positive terminal of the battery is loose, disconnect the ground wire from the battery before tightening it to avoid a short circuit. After tightening the positive terminal, reconnect the ground wire to the battery. Disconnecting the ground wire from the battery stated here.
Move terminals "1" and "3" at the battery terminals in different directions and check the strength of their fastening; if necessary, tighten fastening nuts "2" and "4".
If present, fold back the battery cover and secure it in place.
Checking/replenishing the electrolyte level with distilled water
Battery with status indicator and sealed element plugs (serial):
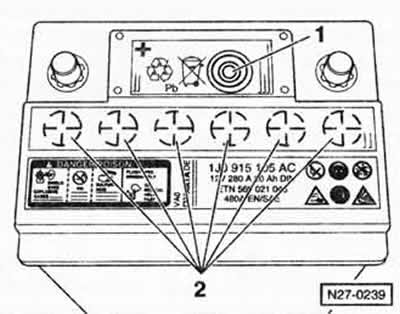
Note: The battery status indicator "1" may be in different positions. To determine the electrolyte level by the indicator, depending on the circumstances, you need to unfasten the fuse holder.
The status indicator "1" can be used to determine the electrolyte level and the state of charge of the battery. Illuminate the indicator with a flashlight, and 3 color indications are possible:
- green color - the battery has sufficient charge
- black color - the battery is not charged or is charged too weakly
- colorless or yellow color - low electrolyte level, the level must be replenished with distilled water.
Note: If an air bubble gets under the status indicator, the color reading may be distorted. In this case, lightly tap the battery case with an object, such as a screwdriver handle, before checking.
Caution: If the battery life is more than five years and the color indication of the status indicator is colorless, the battery needs to be replaced with a new one.
Safety instructions
Only use a flashlight to illuminate the inside of the battery. Do not illuminate the battery with an open flame (with a lighter, a match). Explosive!
Do not stand near an open battery case with a burning cigarette.
Pouring distilled water:
- Turn off the ignition.
- Remove the film from the element plugs.
- Unscrew the plugs "2" of the battery, for example, using the HAZET 4650-3 tool.
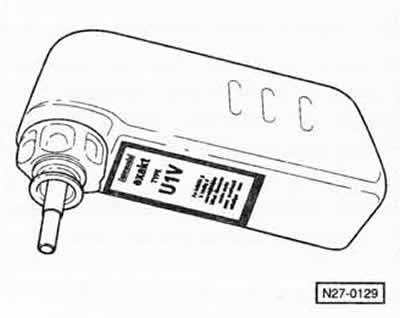
Note: At service stations, the VAS 5045 filling tank is used to top up the electrolyte level.
The design of the VW/SEAT filling tank nipple prevents the battery cell from overfilling and electrolyte from leaking out. When the maximum electrolyte level is reached, further flow of distilled water is automatically stopped.
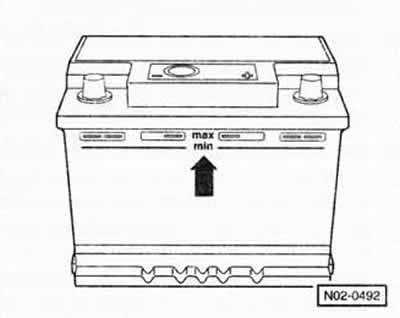
If there is no special tool, add distilled water up to the upper mark MAX "arrow".
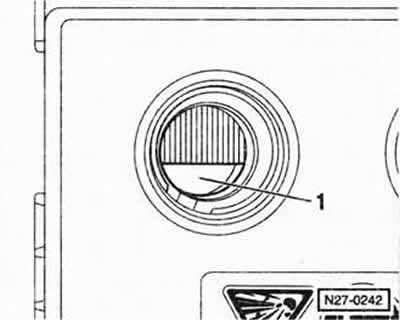
If the electrolyte level is not clearly visible from the outside, add distilled water up to the internal mark of the permissible level (plastic protrusion) -1 -
Screw in the plugs and tighten.
Caution: Never add too much distilled water, otherwise the electrolyte may spill out and damage nearby components. If the level is too high, the excess electrolyte should be sucked out using a densimeter with a pipette.
Battery with status indicator and without cell plugs
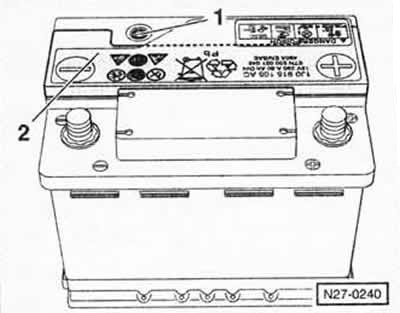
Note: The charge and electrolyte level of a battery without cell plugs are checked in the same way as a battery with cell plugs. First of all, if the electrolyte level is too low, when the color indication of the status indicator "1" is yellow or colorless, the battery must be replaced.
Note: Cover "2" is installed after filling the battery in factory conditions. Do not remove the cover under any circumstances, otherwise the battery will become unusable.
Battery without status indicator:
Checking/replenishing the electrolyte level with distilled water
Check the electrolyte level from the outside through the transparent plastic housing, see figure N02-0492. If the electrolyte level in any element has dropped below the MIN mark, top up the level with distilled water.
Caution: If the electrolyte level is not clearly visible from the outside, remove the plugs and look into the elements, see Figure N₂7-0242. Do not expose the battery to open flame. Explosion hazard! Use a flashlight.
Pouring distilled water:
- Turn off the ignition.
- Remove the film from the element plugs.
- Pour distilled water separately into each element up to the MAX mark or up to the internal mark of the permissible level (plastic protrusion) "1", see figure N₂7-0242.
- Screw in the plugs and tighten.
Caution: Never add too much distilled water, otherwise the electrolyte may spill out and damage nearby components. If the level is too high, the excess electrolyte should be sucked out using a densimeter with a pipette.
Visitor comments