
Instructions: The following describes the removal and installation work on the left side of the car. Removal and installation work on the right side of the car is carried out in the same way. The following describes the removal and installation of a manual seat. Removal and installation of a seat with electroadjustment is made in the same way.
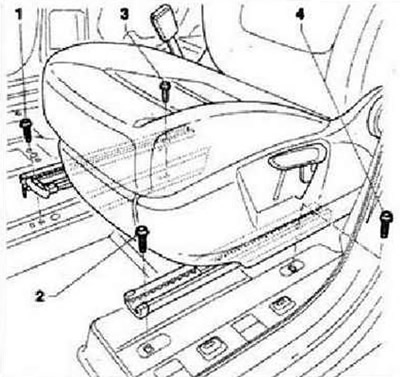
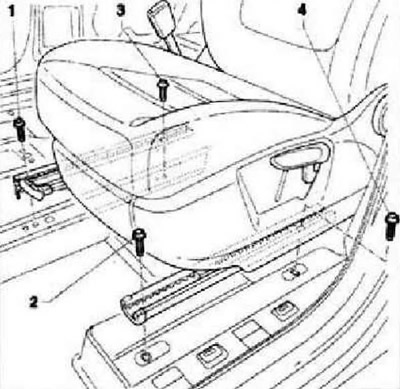
Move the seat as far forward as possible using the longitudinal adjustment mechanism. Remove screws -3- and -4-. Move the seat as far back as possible using the longitudinal adjustment mechanism. Remove the negative terminal from the battery. Remove screws -1- and -2-. Pull the wiring harness out of its socket in the floor.
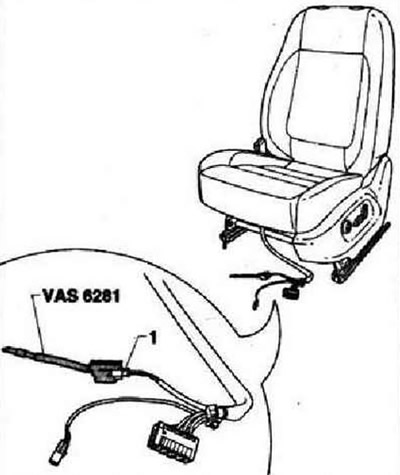
WARNING: Electrostatic discharges can cause the airbags to deploy unintentionally. Therefore, before disconnecting the wires of the squib and ground, the mechanic must remove the electrostatic voltage. To do this, you can touch, for example, the unpainted metal part of the door lock.
Disconnect the seat wiring harnesses from the block (quantity depends on vehicle configuration).
The right hand should be passed between the back and the pillow, with the left hand, grasp the front of the pillow. While holding the seat in this way, remove the seat from the vehicle. Connect airbag adapter -VAS 6281- to side airbag wiring harness connector -1-.
Caution: Only remove airbag adapter -MS 6281- from seat wiring harness after installing it.
Installation
Bring the seat into the vehicle through the front door opening. Install the seat on the pins located near the tunnel, the protrusions of the seat should enter the holes in the floor. Tighten screw -1- on tunnel side. Screw in screw -2- on sill side. Remove airbag adapter -VAS 6281-. Connect the side airbag harness to the connector. Connect the rest of the seat harnesses to the block (quantity depends on vehicle configuration). Turn on the ignition. Connect the negative terminal to the battery. Move the seat as far forward as possible using the longitudinal adjustment mechanism. Tighten screw -3- on tunnel side to 40 Nm. Tighten screw -4- on sill side to 40 Nm. Move the seat as far back as possible using the longitudinal adjustment mechanism. Tighten screw -1- on tunnel side to 40 Nm. Tighten screw -2- on sill side to 40 Nm.
ATTENTION: If the thread in the floor cross member to which the seat is attached is damaged, do not repair the thread! In this case, the floor cross member must be replaced.
Visitor comments