
Removal and installation of a back bench seat
Vehicles with cargo floor
Detach the load platform -18- from the backrest trim -17- and remove it from the vehicle,
All
Remove screws -13-, -14-, -15- and -19- (60 Nm). Remove plugs -3-, -6-, -8- and -10-. Unscrew nuts -2-, -5-, -7- and -9- (60 Nm). Remove seat rail trims -1-, -4- and -11- Pull forward -arrow A- left section of rear seat -16-. Raise the front part of the left side of the rear seat -arrow B-. Tilt the backrest fully forward and remove this part of the seat from the vehicle with the help of a second mechanic.
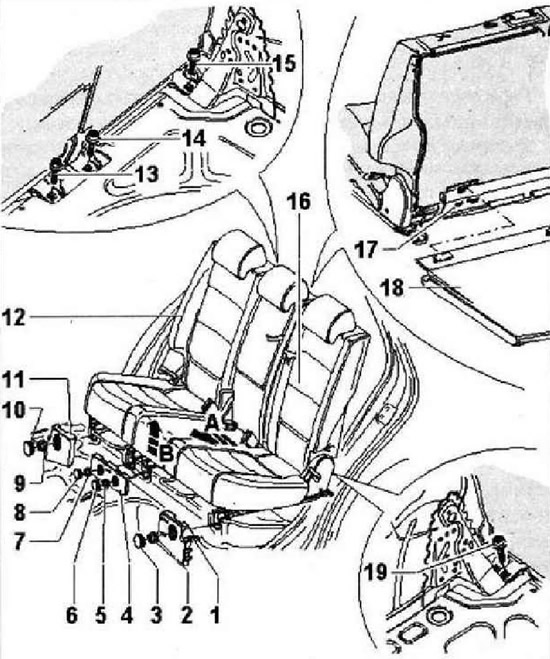
Instructions: Remove the right side of the seat -12- in the same way.
Installation is carried out in the reverse order. After installation, check the operation as follows. Move the part of the seat to be checked in the longitudinal direction - it must move evenly, without distortion. Move both parts of the seat as far back as possible, Unlock the backrests - they should lean forward on their own. If this is not the case, loosen the fastening screws and readjust the position of the seat part.
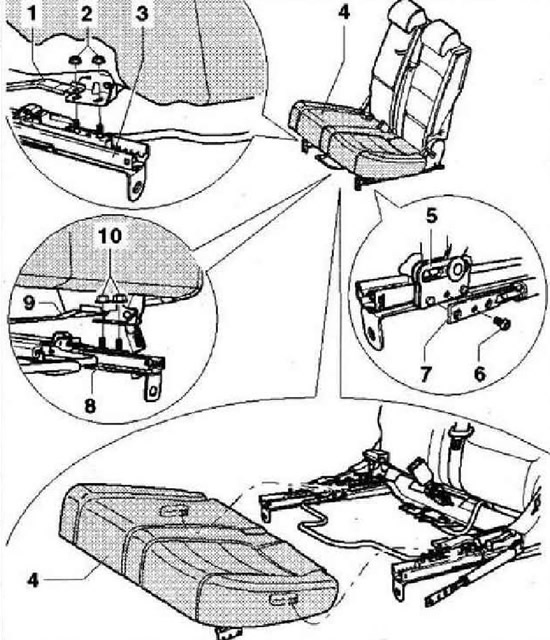
Removal and installation of a pillow of a seat
Instructions: The removal and installation of the left rear bench seat cushion is described below. Removal and installation of the right rear bench seat cushion is carried out in the same way.
Move the left side of the rear seat as far forward as possible. Tilt the seat back forward. Remove screw -6- (6 Nm) and disconnect the gas stop -7- from the slider -5-.
Caution: When releasing the gas stop -7-, the backrest must be folded forward. In this position, there is no force on the pelvic support.
Tilt back again. Remove two nuts -2-. Using a screwdriver, press the bracket -1- slightly upwards and remove the cushion from the studs on the right seat rail -3-.
Instruction: The bracket -1- is not installed on the right side of the seat.
Remove two nuts -10-. Using a screwdriver, press the clamp -9- slightly upwards and remove the cushion from the pins of the left seat guide -8-.
Instruction: The bracket -9- is not installed on the right side of the seat.
Pull cushion -4- upwards from seat frame guides.
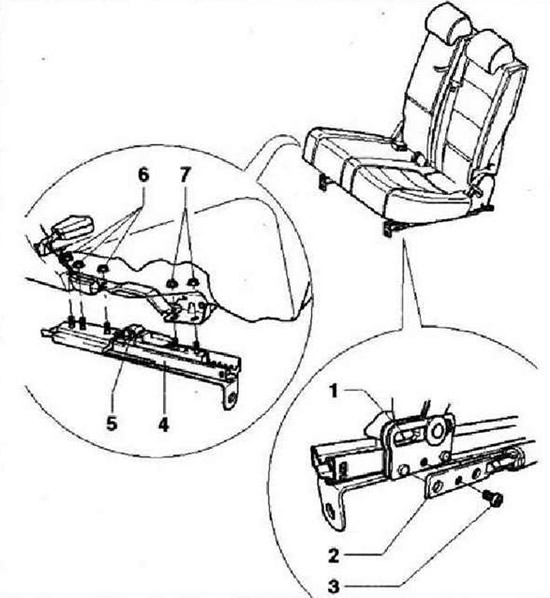
Removal and installation of guides of a back bench seat
Instructions: The following describes the removal and installation of the right rail of the left side of the rear bench seat. Removal and installation of the left guide is carried out in a similar way. Removal and installation of the guides on the right side of the seat is also carried out in the same way.
Remove the relevant part of the rear seat. To remove the left rail of the right side of the seat, the right seat belt buckle must be removed.
Instructions: Guides can be replaced separately. Work should be carried out on the basis of an assessment of the values of -a- and -b- Before performing measurements, do not loosen the tire fasteners.
Move the seat part along both rails as far back as possible. Remove the seat adjustment lever. Remove dimensions -a-, -b-, -c- and -d-.

Tilt the seatback forward. Remove screw -3- (6 Nm) and disconnect the gas stop -2- from the slider -1-.
Caution: The backrest must be folded forward when detaching the gas stop -2-. In this position, there is no force on the pelvic support.
Tilt back again. Unscrew three nuts -6- (48 Nm). Unscrew the two nuts -7- (24 Nm) and remove the guide -4- from the seat frame.
Visitor comments