
English Русский
Български
Беларускі
Український
Српски
Hrvatski
Română
Polski
Slovenský
Magyar
  |  Articles  |  Sitemap  |  Contacts  |    |
Car maintenance Ford Car maintenance Hyundai Car maintenance Chevrolet Car maintenance BMW Car maintenance Audi Car maintenance Opel Car maintenance AvtoVAZ
VWmanual.ru


Main   Passat   Golf   Polo   Touareg   Tiguan   Sharan   Transporter   Others  
Tiguan 1 (2007-2015)

Removal and installation the driver/passenger side upper airbag (VW Tiguan 1)

  • Main
  • Tiguan
  • Tiguan 1
  • Body
  • Internal equipment
  • Removal and installation the driver/passenger side upper airbag
            0


Contents: Removal ↓ Installation ↓

Removal


Instructions: The following describes the removal and installation work on the right side of the car. The removal and installation work on the left side is carried out in a similar manner.


Remove the negative terminal from the battery. Remove the front interior light and reading light.

Car with overhead console


Remove the overhead console.

Car with dividing net


Unscrew one screw "1" in each of the sockets "2" (8 Nm).
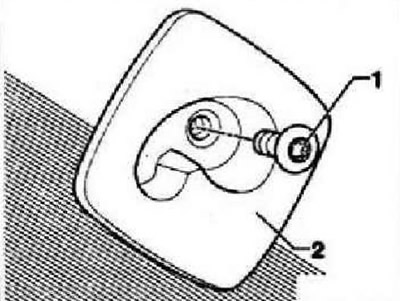
Unscrew one screw «1» in each of the sockets «2» (8 Nm).


All


Remove the roof end trim. Remove the upper A-pillar trims. Unclip the upper B-pillar trims. Remove the roof handles. Remove the sun visors. Fold forward the backrests of both parts of the rear seat. Move the front seats as far forward as possible and lower their backrests. Remove the roof trim. Insert the ends of the jaws of the snap ring pliers (straight jaw pliers) into both holes of bracket "1", squeeze the pliers and carefully remove the bracket from the body hole. In accordance with this description, remove brackets "2", "3" and "4" from the body.

CAUTION: If at least one of the four clips is damaged during removal, the upper airbag must be replaced!
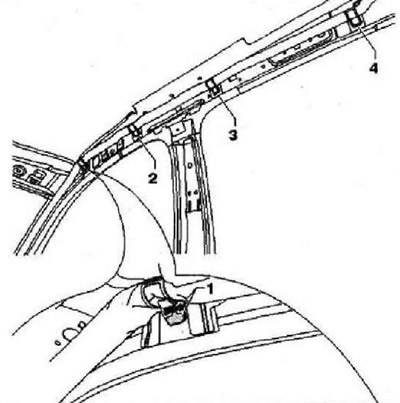


CAUTION: If at least one of the four clips is damaged during removal, the upper airbag must be…


Carefully remove the retainer "1" from the socket on the A-pillar using the puller "T10236".

The original text can be found at: VWManual
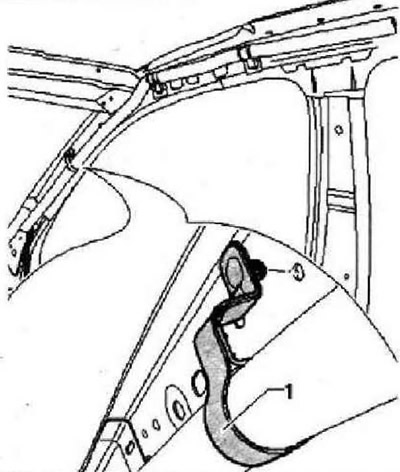
Carefully remove the retainer «1» from the socket on the A-pillar using the puller «T10236».


Pull the strap fastening "2" of the upper airbag "1" as far as possible out of the hole in the lower part of the A-pillar "arrow".
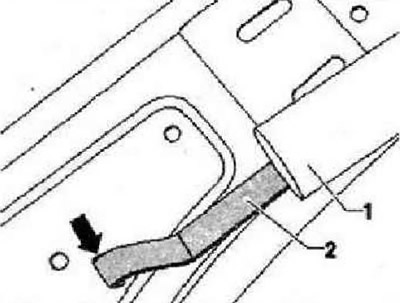
Pull the strap fastening «2» of the upper airbag «1» as far as possible out of the hole in the…


Completely remove the tape fastener "1" using a suitable feeler gauge and pliers.
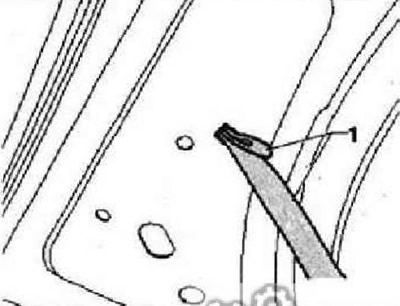

Completely remove the tape fastener «1» using a suitable feeler gauge and pliers.


Remove the retainer "3" from the connector "2" by hooking it with a small screwdriver "1". Disconnect the wiring harness "4" from the upper airbag. In a car with a panoramic sliding sunroof, remove the drain hose from the gas generator bracket. Remove the tube "7" from the clamp "6". Unscrew the screws "5" and "8". Remove the gas generator assembly with the bracket from the studs. Remove the upper airbag from the car through the trunk lid opening.

Installation


Bring the upper airbag into the passenger compartment through the trunk lid opening. Secure the gas generator assembly with the bracket using screws "5" and "8" (9 Nm). In vehicles with a panoramic sliding sunroof, secure the drain hose to the gas generator bracket. Insert tube "7" into clamp "6". Connect wiring harness "4" to the upper airbag.
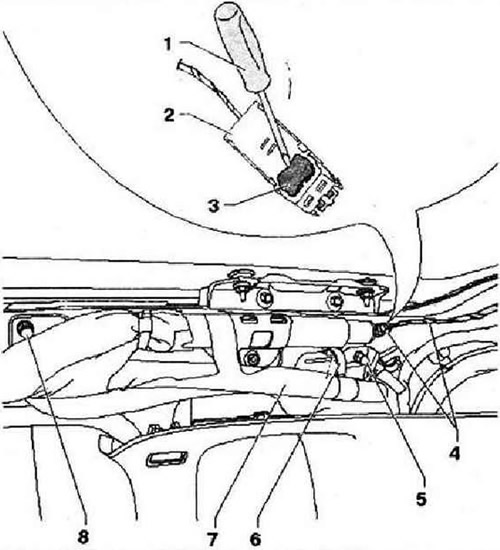
Bring the upper airbag into the passenger compartment through the trunk lid opening. Secure the gas…


Press down and fix the fastening brackets in the corresponding fastening holes. Fixing sequence: "4", "3",
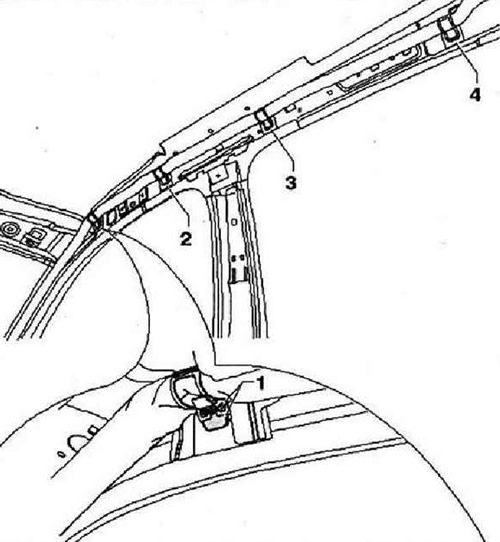
Press down and fix the fastening brackets in the corresponding fastening holes. Fixing sequence:…


CAUTION: Make sure that all the upper airbag mounting brackets are secured on both sides.


The bracket is fixed on both sides
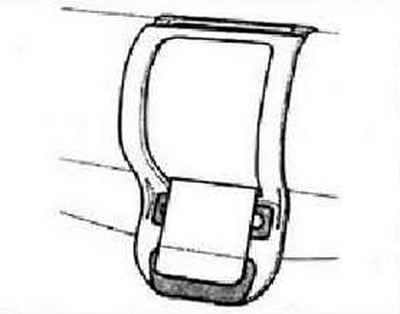


The bracket is fixed on both sides


The bracket is fixed on one side only


Ensure that the bracket is fixed on both sides.
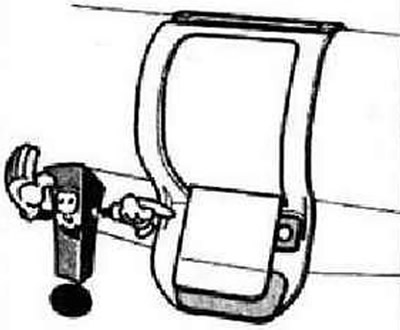
Ensure that the bracket is fixed on both sides.


The bracket is not fixed


Ensure that the bracket is fixed on both sides.
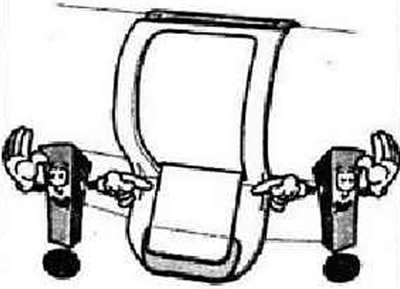
Ensure that the bracket is fixed on both sides.


Insert the retainer "1" into the corresponding socket on the pillar A.

Caution: To prevent extraneous noise, additionally secure the clamp "1" with self-adhesive felt tape (in case the reliability of the fastening is in doubt).
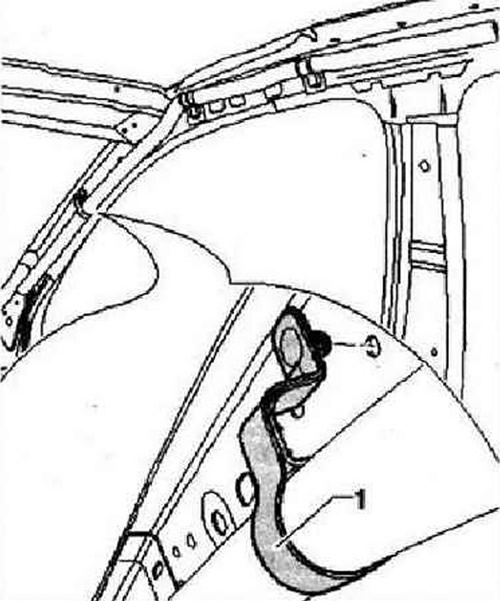

Caution: To prevent extraneous noise, additionally secure the clamp «1» with self-adhesive felt…


Insert the tape fastener "1" into the corresponding hole in the body.
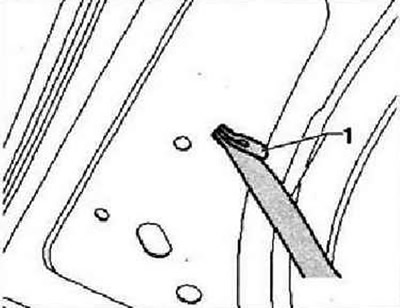
Insert the tape fastener «1» into the corresponding hole in the body.


Further assembly is carried out in the reverse order. Turn on the ignition. Connect the negative terminal to the battery.

This article is available at russian, bulgarian, belarusian, ukrainian, serbian, croatian, romanian, polish, slovak, hungarian
The text has been checked: Tarasov Ivan

Share information:

Previous articles
Removal and installation the rear side airbag
Front passenger and driver seats
Checking the need for laying an additional ground wire in the car
Removal and installation the front passenger airbag
Removal and installation the driver's airbag
Removal and installation the airbag control unit
Next articles
Removal and installation the seat occupancy sensor
Procedure after an accident with deployment of pretensioners and/or airbags
Seat Occupancy Recognition System (USA)
Seat occupancy detection system repair kit
Removal the seat occupied system components
Impact sensors


Similar articles from other manuals for VW cars:
Heated driver and passenger seats next to the driver Passat B3 (1988-1993)
Upper instrument panel trim driver side (Golf) Golf 5 (2003-2008)
Steering column, steering wheel and driver's airbag Polo 3 (1995-2003)
Removal the driver's side windshield wiper arm Touareg 1 (2002-2006)
Upper steering knuckle support Transporter T4 (1990-2003)
Removal and installation the upper engine cover Caddy 3 (2003-2010)
Link to this page in different formats


Visitor comments


No comments yet


How much will 26 + 12 =


Tiguan 1 
  • General information
  • Characteristics
  • Vehicle overview
  • Power unit
  • Petrol engine 1.4 BWK
  • Petrol engine 1.4 CAVA
  • Engine 2.0 (petrol)
  • Engine 2.0 (diesel)
  • Transmission
  • 6-speed manual gearbox 0A6
  • 6-speed automatic gearbox 09M
  • Drive shafts
  • Chassis
  • Front suspension
  • Rear suspension (2x4)
  • Rear suspension (4x4)
  • Air suspension
  • Wheels and rims
  • Brake system
  • Steering gear
  • Body
  • External equipment
  • Internal equipment
  • Electrical equipment
  • Power devices
  • Appliances and lighting
  • Communication systems
  • Heating and air conditioning
  • Electrical circuits
VWmanual.ru © 2016-2026 | Mobile version | News and articles | Sitemap: EN BG BY UA RS HR RO PL SK HU | Write message | Site search
Passat B2 • Passat B3 • Passat B4 • Passat B5 • Passat B6 • Golf 1, diesel • Golf 1, petrol • Golf 2, petrol • Golf 2 • Golf 3 • Golf 4 • Golf 5 • Polo 3 • Polo 4 • Touareg 1 • Tiguan 1 • Sharan 1 • Transporter T3 • Transporter T4 • LT 28 • LT 2D • Beetle • Caddy 3 •
Our website uses cookies to ensure functionality and convenience.