
English Русский
Български
Беларускі
Український
Српски
Hrvatski
Română
Polski
Slovenský
Magyar
  |  Articles  |  Sitemap  |  Contacts  |    |
Car maintenance Ford Car maintenance Hyundai Car maintenance Chevrolet Car maintenance BMW Car maintenance Audi Car maintenance Opel Car maintenance AvtoVAZ
VWmanual.ru


Main   Passat   Golf   Polo   Touareg   Tiguan   Sharan   Transporter   Others  
Tiguan 1 (2007-2015)

Removal the seat occupied system components (VW Tiguan 1)

  • Main
  • Tiguan
  • Tiguan 1
  • Body
  • Internal equipment
  • Removal the seat occupied system components
            0


Instructions: The seat cushion, seat occupancy mat, control unit and pressure sensor must be installed as a single set only. The components are compatible only within one set, the use of individual components from another set is prohibited! Only disconnect the wiring harnesses for which the corresponding instruction is given in the description below!


Mount the seat repair bracket -VAS 6136- on the test stand -VAS6095-. Remove the front seat. Secure the seat to the bracket -VAS 6136-. Remove the front seat belt buckle. Remove the trim on the tunnel side. If present, remove the drawer socket.

Front passenger seat without height adjustment mechanism


Remove the backrest adjustment handle. Remove the trim from the threshold side.

Front passenger seat with folding backrest for transporting long loads


Remove the trim from the threshold side. Remove the trim bracket from the threshold side.

Front seat with manual height adjustment


Remove the backrest adjustment handle. Remove the trim from the threshold side. Remove the trim bracket from the threshold side.

All


Disconnect the two wire harness holders "1" from the seat cushion base. Cut the cable ties "2" of the shielded cable "3", disconnect and pull out the wire harness.
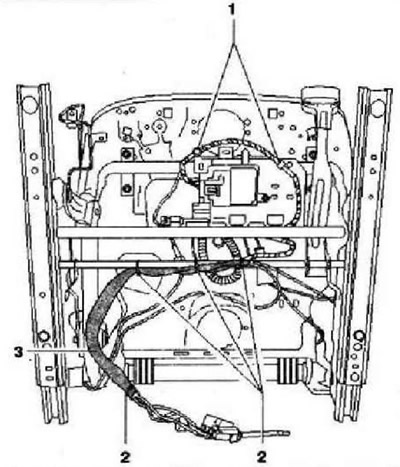
Disconnect the two wire harness holders «1» from the seat cushion base. Cut the cable ties «2» of…


CAUTION: Connector "8" must not be disconnected from the seat occupied recognition control unit -J706-1-


Disconnect connectors "3", "4" and "6". Unscrew screw "2" (1.5 Nm). Remove the seat occupied pressure sensor -G452-7- from the bracket, but do not disconnect the connector from the seat occupied pressure sensor "G452". Remove the hose from the fasteners "5".
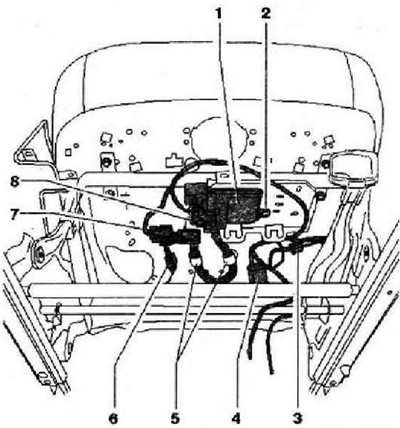
Disconnect connectors «3», «4» and «6». Unscrew screw «2» (1.5 Nm). Remove the seat occupied…


Instructions: In a vehicle with a front passenger seat that has a mechanism for folding the backrest to transport long loads, it is sufficient to simply fold the backrest forward; there is no need to remove the backrest.


Remove the seat back. Remove the upholstery from the front seat cushion (do not detach the seat occupancy mat from the cushion). Raise the front seat cushion "2" without detaching the seat occupancy mat "3" from the cushion. Remove the fasteners "1" and "5" from the seat frame, do not remove the fastener "4".

CAUTION: Do not separate the seat cushion "2", seat occupied detection mat "3", seat occupied detection hose "6", seat occupied detection pressure sensor from each other "G4S2" "8" and the seat occupied detection system control unit J706-7-!


Remove the front seat cushion "2" together with the seat occupancy detection mat "3". At the same time, pull out the hose "6", the pressure sensor for detecting the seat occupancy "G452" "8" and the seat occupancy detection system control unit "J706" "7" through the hole in the base of the seat cushion "arrow".
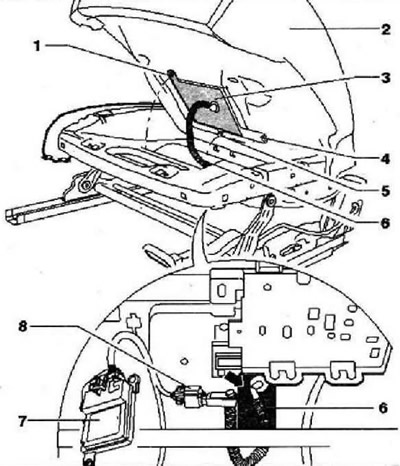
Remove the front seat cushion «2» together with the seat occupancy detection mat «3». At the same…

This article is available at russian, bulgarian, belarusian, ukrainian, serbian, croatian, romanian, polish, slovak, hungarian
The text has been checked: Tarasov Ivan

Share information:

Previous articles
Seat occupancy detection system repair kit
Seat Occupancy Recognition System (USA)
Procedure after an accident with deployment of pretensioners and/or airbags
Removal and installation the seat occupancy sensor
Removal and installation the driver/passenger side upper airbag
Removal and installation the rear side airbag
Next articles
Impact sensors
Removal and installation the front panel
Removal and installation of the supporting frame
Installing the front panel in the correct position
Front panel adjustment
Removal and installation the front door trim


Similar articles from other manuals for VW cars:
Installation of additional components of the electrical… Passat B3 (1988-1993)
Removal anti-lock braking system components Golf 3 (1991-1997)
Checking the components of the exhaust gas recirculation system Polo 3 (1995-2003)
Removal and installation of cooling system components (petrol… Touareg 1 (2002-2006)
Checking the operation of the lighting system Sharan 1 (1995-2000)
Headlight Wash System Transporter T4 (1990-2003)
General information on removing and installing fuel system… Caddy 3 (2003-2010)
Link to this page in different formats


Visitor comments


No comments yet


How much will 49 + 13 =


Tiguan 1 
  • General information
  • Characteristics
  • Vehicle overview
  • Power unit
  • Petrol engine 1.4 BWK
  • Petrol engine 1.4 CAVA
  • Engine 2.0 (petrol)
  • Engine 2.0 (diesel)
  • Transmission
  • 6-speed manual gearbox 0A6
  • 6-speed automatic gearbox 09M
  • Drive shafts
  • Chassis
  • Front suspension
  • Rear suspension (2x4)
  • Rear suspension (4x4)
  • Air suspension
  • Wheels and rims
  • Brake system
  • Steering gear
  • Body
  • External equipment
  • Internal equipment
  • Electrical equipment
  • Power devices
  • Appliances and lighting
  • Communication systems
  • Heating and air conditioning
  • Electrical circuits
VWmanual.ru © 2016-2026 | Mobile version | News and articles | Sitemap: EN BG BY UA RS HR RO PL SK HU | Write message | Site search
Passat B2 • Passat B3 • Passat B4 • Passat B5 • Passat B6 • Golf 1, diesel • Golf 1, petrol • Golf 2, petrol • Golf 2 • Golf 3 • Golf 4 • Golf 5 • Polo 3 • Polo 4 • Touareg 1 • Tiguan 1 • Sharan 1 • Transporter T3 • Transporter T4 • LT 28 • LT 2D • Beetle • Caddy 3 •
Our website uses cookies to ensure functionality and convenience.