

- 1 - Hood
- 2 - Adjustable stop, 2 pcs. left and right
- 3 - Noise isolation
- 4 - Loop
- 5 - Hose to windshield washer jets
- 6 - Windshield washer jets
- 7 - Protective film -7D0 827 471-
- 8 - Hood lock
- 9 - Hood support
- 10 - Locking hook of the lock
Removing
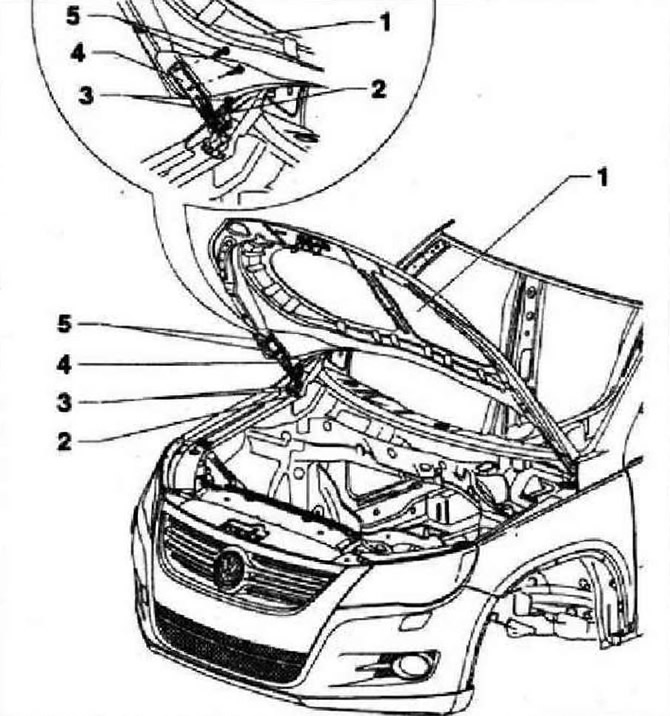
Remove windshield washer jets. Remove the pipe from the hole in the hood -1-. Loosen bolts -5- on left and right (do not twist). Further operations are possible only with the participation of an assistant. Remove the hood support. Fully unscrew and remove bolts -5- and remove bonnet -1- from hinges 4-.
The hood is installed in the reverse order. Bolt tightening torque: 21 Nm.
Removal and installation of hood hinges
Instructions: The removal and installation process is described for the right hinge only. Removal and installation of the left hinge is carried out in a similar way.
Remove hood -1-. Remove the plenum box cover. Release screws -3-. Loosen bolts -2-. Remove loop -4-.
Installing the loop is done in reverse order. Bolt tightening torque: 21 Nm. Install the hood.
Removal and installation of sound insulation
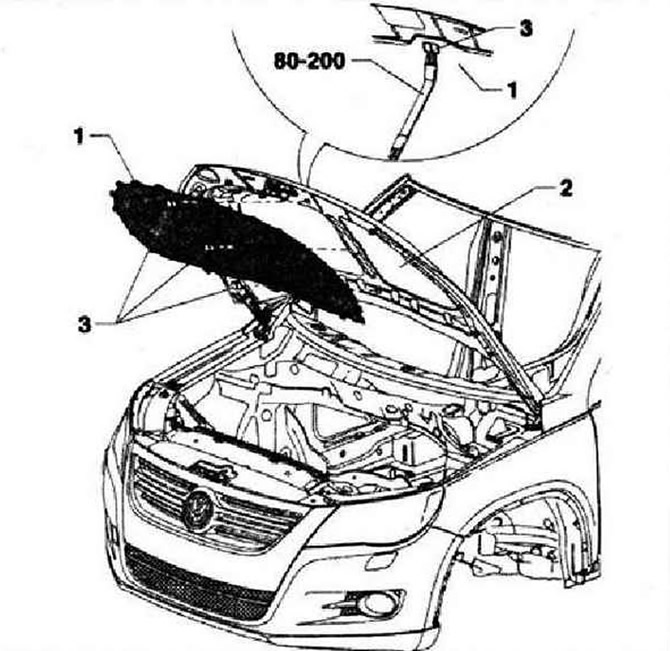
Lever out retainers -3- with release lever -80-200- and remove them from soundproofing panel -1-. Remove soundproofing panel -1- from slots in bonnet -2-.
Installation
Insert the tabs on the panel into the grooves on the hood. Insert all retainer clips into place.
Hood closing and opening mechanism
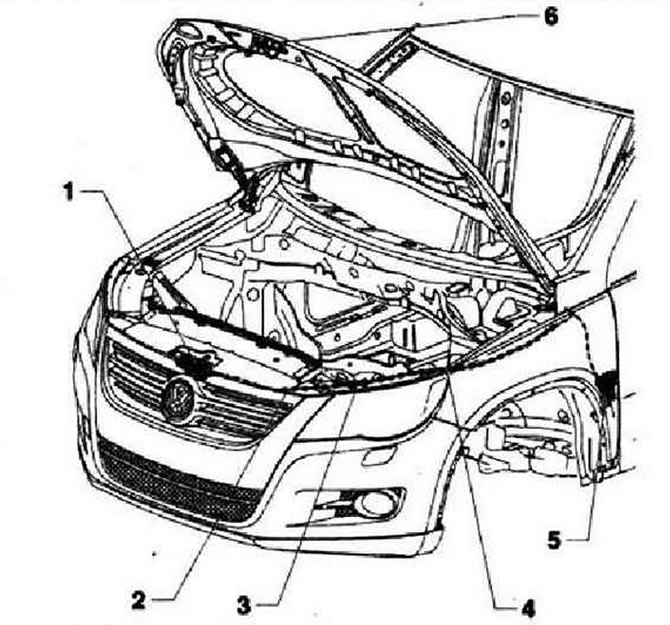
- 1 - Hood lock
- 2 - Cable from the hood lock to the connector, fixed in the lock
- 3 - Cable connector
- 4 - Cable, fixed on the support bracket
- 5 - Drive lever
- 6 - Locking hook of the lock
Removal and installation of a lock hook of the lock
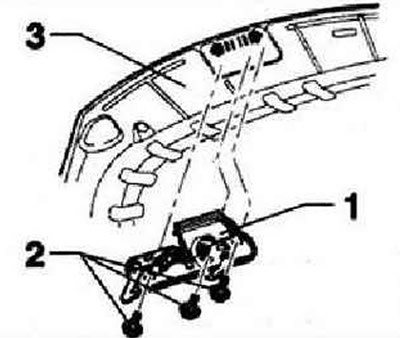
Instructions: To adjust the locking hook -1- loosen the bolts -2- and move the hook within the holes with a margin of diameter -arrows-.
Release screws -2-. Remove hood lock -1- -3-.
Installation is carried out in the reverse order. Bolt tightening torque -2-10 Nm.
Removal and installation of the lock of a cowl

Open the hood. Remove the decorative grille. Disconnect the rope. Disconnect the hood limit switch connector. The connector is located above the headlight on the driver's side. Unscrew bolts -5- located on rear side of panel -3-. Unscrew the bolt -2- located on the front side of the panel -3-. Turn lock -1- -arrow a- and remove upwards. In order to remove the cable -4-, the tabs -arrows b- must be pressed together. The fastening is released and the cable -4- can be removed from the lock -1-.
Installation
Attach cable -4- to bonnet latch -1- -arrows b-. Insert lock -1- into dash panel -3- while turning it. Screw in bolts -5- from rear of panel. Tightening torque for bolts -5- 12 Nm. Screw in the bolt -2- from the front side of the panel. Bolt tightening torque -2- 12 Nm. Connect the hood limit switch connector. Reinstall cable -4-. Adjust the position of the hood. Before closing the hood, check the operation of the cable drive lever.
Instruction: The bolts -5- pass through the lock -1- and are screwed to the cross member.
Visitor comments