



Contents: Removal ↓ Installation ↓
Removal
1 Open the hood.
2. Golf cars. Remove the jets from the hood 6 (see illustration).
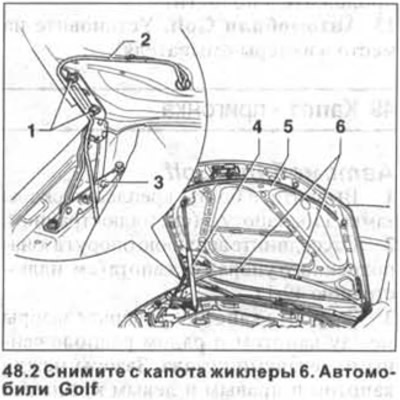
3. Golf cars. Disconnect the washer fluid supply hose and the heater wire from the bonnet, release them from the holder on the hinge 3 (see illustration 48.2) and pull it out of the hood cavity.
Caution! If the old hood is to be reinstalled, tie a string to the ends of the washer hose. When removing the hose from the hood cavity, the string will remain there and can be used to easily pull the hose back into place.
4. Mark the mounting position of the hinges 3 on the hood (see illustration 48.2).
5. Loosen the two nuts 1 securing the hinges on both sides of the hood (see illustration). Do not unscrew the nuts completely.
6. Ask an assistant to hold the hood and disconnect the upper support of the gas-filled strut 4 of the hood from it (see illustration 48.2).
7. Unscrew nuts 1, release the hood, working together with an assistant, from the hinges and place it away from the work area.
Installation
8. Install the hood, working with an assistant, into the hinges.
If the old hood is being installed, align it using the markings made before removal. Tighten the nuts 1 of the hinges by hand (see illustration 48.2).
9. Secure the upper support of the gas-filled strut to the hood.
10. Close the hood and make sure that the gaps between the hood and adjacent body parts correspond to the nominal ones.
11. Tighten the hinge nuts to 22 Nm.
12. Golf cars. Pull the washer hose and the power supply wire of the jet heater into the hood cavity, using the remaining string in the cavity. If a new hood is being installed, then also lay the hoses and wire in the cavity.
13. Golf cars: Reinstall the washer jets.
Visitor comments