
Golf Cars
1. Unscrew the bolts securing the lock bracket 11 to the hood 5 (see illustration).
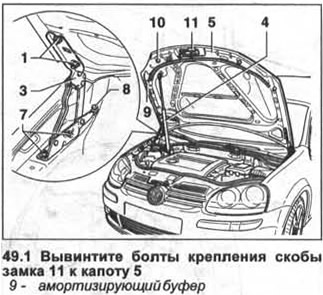
2. Disconnect the upper support of the gas-filled stop 4 from the hood (see illustration 49.1).
3. Close the hood and check the gaps between the hood and adjacent body parts. The gaps between the hood and the right and left fenders must have the same width and run parallel.
Gap width. Golf Cars:
- Gap between hood and fender - 3.5±0.5 mm
- Gap between hood and headlight - 4.5±0.5 mm
If necessary, open the hood, loosen nuts 1 on the hinges, as well as bolts 7 that secure the hood to the body and fit the hood, shifting it to the left or right (see illustration 49.1).
4. Tighten the hood bolts and nuts to 22 Nm.
5. Screw in the adjusting screws 8 so that the rear of the hood fits snugly against the fenders (see illustration 49.1).
6. Screw in the adjusting buffers 10 so that the front hood fits snugly against the fenders (see illustration 49.1).
Attention! To make it easier to fit the hood, use putty or plasticine, which you stick on the adjusting buffers. When the hood is closed, the plasticine will be compressed, which will allow you to determine the fit of the hood.
7. Tighten the bracket mounting bolts with a force of 10 Nm.
8. Lubricate hinges 3, bolts 7 and nuts 1 with protective grease to prevent corrosion (see illustration 49.1).
Touran cars
9. Unscrew the bolts securing the lock bracket 8 to the hood 1 (see illustration).
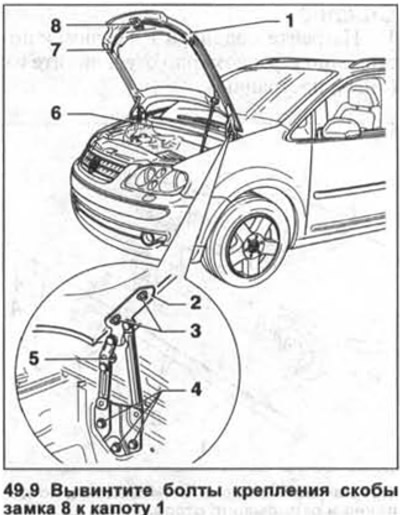
10. Disconnect the upper support of the gas-filled stop 6 from the hood (see illustration 49.9).
11. Close the hood and check the gaps between the hood and adjacent body parts. The gaps between the hood and the right and left fenders must have the same width and run parallel.
Gap width. Touran vehicles:
- Gap between hood and fender - 3.0 + 1 mm
- Gap between hood and headlight - 4.0 +1 mm
If necessary, open the hood, loosen nuts 3 on the hood hinges and adjust the hood by moving it to the left or right (see illustration 49.9).
12. Loosen the bolts 4 fastening the hinges to the body and adjust the hood in height (see illustration (49.9).
13. Tighten the hood bolts and nuts with a force of 22 Nm.
14. Screw in the adjusting buffers 7 so that the front hood fits snugly against the fenders (see illustration 49.9).
Attention! To make it easier to fit the hood, use putty or plasticine, which you stick on the adjusting buffers. When the hood is closed, the plasticine will be compressed, which will allow you to determine the fit of the hood.
15. Tighten the bracket mounting bolts with a force of 10 Nm.
16. Lubricate hinges 2, bolts 4 and nuts 3 with protective grease to prevent corrosion (see illustration 49.9).
Visitor comments