
Golf Cars
Removing
1. Remove the front bumper.
2. Remove the fender liner from the front wheel arches.
3. Unscrew three bolts and remove a lateral directing profile for a bumper.
4. Unscrew nut 6 and unscrew bolts 2 (see illustration).
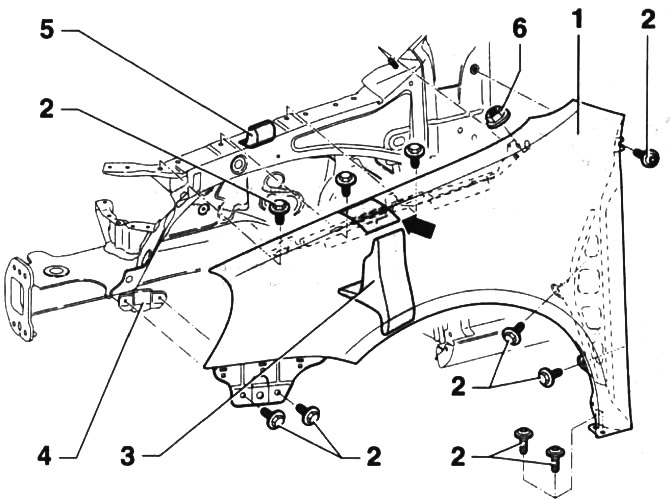
45.4. Front fenders. Golf Cars
1 - wing
2 - bolts. Tightening torque 6 Nm
3 - profile. Located in an unsecured state between the wing and the upper spar
4 - spacer
5 - profile. glued to the wing
6 - nut. Tightening torque 6 Nm
5. Remove profile 3 located between the wing and the upper spar (see illustration 45.4).
6. Heat the fender near profile 5 with a hair dryer (see arrow in illustration 45.4), to loosen the fit of the profile.
7. Remove the fender.
Installation
The wing is installed in the reverse order of removal.
When installing, observe the prescribed clearances between the fender and adjacent body parts.
Nominal clearances:
- The gap between the wing and the hood - 3.5±0.5 mm
- Gap between fender and front door 3.5±0.5 mm
- The gap between the wing and the headlight - 1.2-3.0 mm
- The gap between the wing and the bumper is 0.0-0.5 mm
Touran cars
Removing
8. Remove the front bumper.
9. Remove the fender liner from the wheel arches of the front wheels.
10. Remove the front moldings.
11. Unscrew four bolts and remove a lateral directing profile for a bumper.
12. Unscrew bolts 2 and 6 (see illustration).
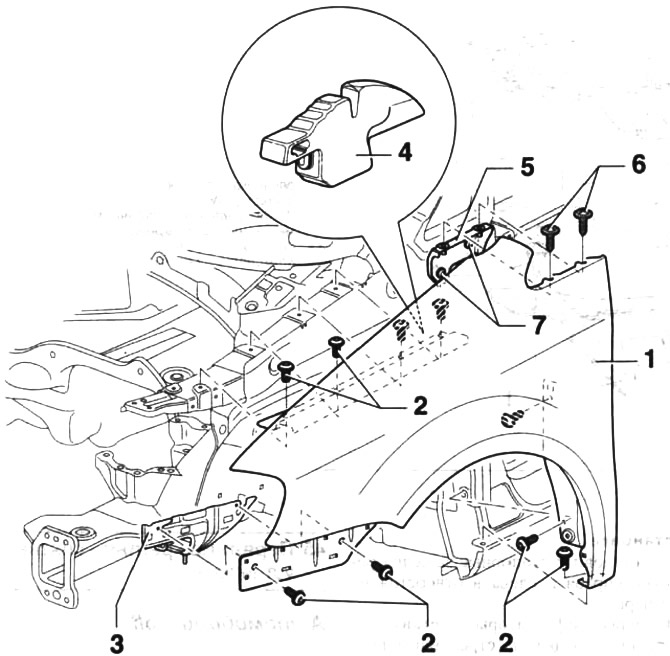
45.12. Front fenders. Touran cars
1 - wing
2 - bolts. Tightening torque 6 Nm
3 - spacer
4 - insert
5 - mounting bracket
6 - bolts. Tightening torque 6 Nm
7 - bolts. Tightening torque 6 Nm
13. Remove the fender.
Installation
The wing is installed in the reverse order of removal. When installing, observe the prescribed clearances between the fender and adjacent body parts.
Nominal clearances
- Gap between fender and hood - 3.0±1.0 mm
- Gap between fender and front door - 3.0±1.0 mm
- The gap between the wing and the headlight - 0.75-2.0 mm
Visitor comments