



Contents: Golf cars ↓ Touran cars ↓
Golf cars
Removal
1. Remove the rear headlights.
2. Unscrew bolts 5 that secure both rear mudguards (see illustration).
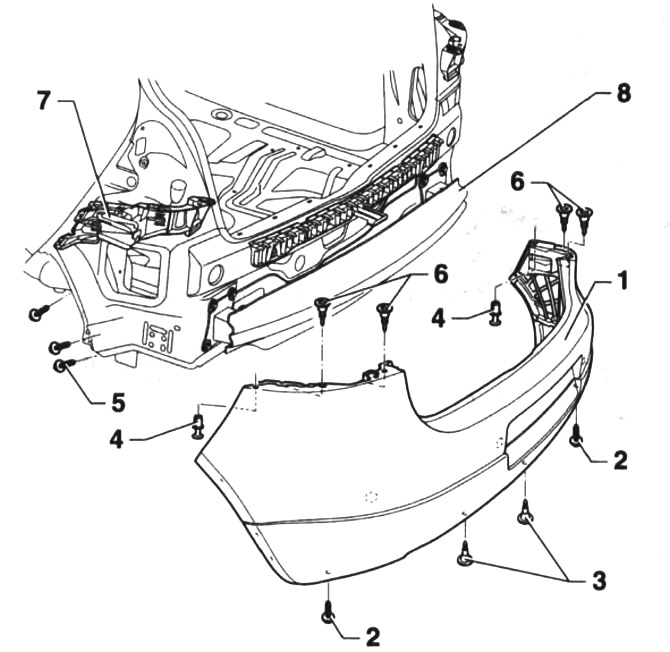
43.2. Rear bumper. Golf cars
1 - rear bumper
2 - mounting bolts
3 - mounting bolts. Tightening torque 5 Nm
4 - expansion clamps
5 - mudguard mounting bolts
6 - mounting bolts. Tightening torque 5 Nm
7 - landing profile
8 - bumper crossbar
3. Use a screwdriver to remove the two release clips 4 (see illustration 43.2).
4. Unscrew bolts 2 and 3 (see illustration 43.2).
5. Unscrew bolts 6 (see illustration 43.2).
6. Remove the bumper, holding it together with an assistant, from the side guide profiles 7 and remove it by pushing it backwards.
7. Disconnect all plugs.
The bumper is installed in the reverse order of removal.
Attention! When removing the rear bumper on Jetta cars, two bolts on the left and right sides of the trunk must be unscrewed. The tightening torque for these bolts is 8 Nm. In order to unscrew these bolts, you need to remove the side trim in the trunk. In addition, three more bolts must be unscrewed on the right side below the bumper.
Touran cars
Removal
8. Remove the rear headlights.
9. Unscrew bolts 4 that secure both rear mudguards (see illustration).
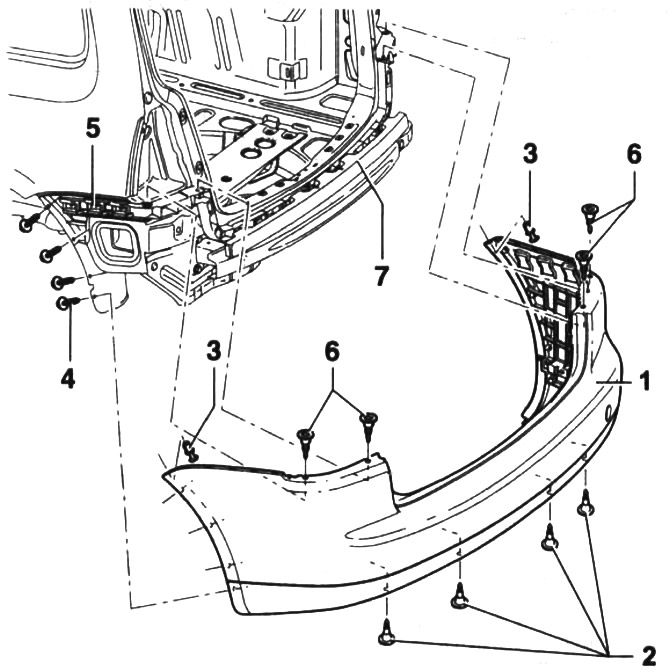
43.9. Rear bumper. Touran cars
1 - rear bumper
2 - mounting bolts. Tightening torque 6 Nm
3 - expansion clamps
4 - mudguard mounting bolts
5 - landing profile
6 - mounting bolts. Tightening torque 6 Nm
7 - bumper crossbar. Fastened with seven bolts. Four of them are on the right side, and three are on the left. Tightening torque of the bolts is 20 Nm
10. Use a screwdriver to remove the two release clips 3 (see illustration 43.9).
11. Unscrew the lower bolts 2 (see illustration 43.9).
12. Unscrew bolts 6 (see illustration 43.9).
13. Remove the bumper, holding it together with an assistant, from the side guide profiles 5 and remove it by pushing it backwards.
14. Disconnect all plugs.
The bumper is installed in the reverse order of removal.
Visitor comments