



Important! This chapter describes the procedure for removing and installing the bonnet lock and the lock bracket on Golf vehicles. Removing and installing the bonnet lock are identical.
Removal
1. Open the hood.
2. Remove the radiator grille.
3. Disconnect the hood lock drive cable.
4. Disconnect the 5-pin hood lock switch plug (see illustration).
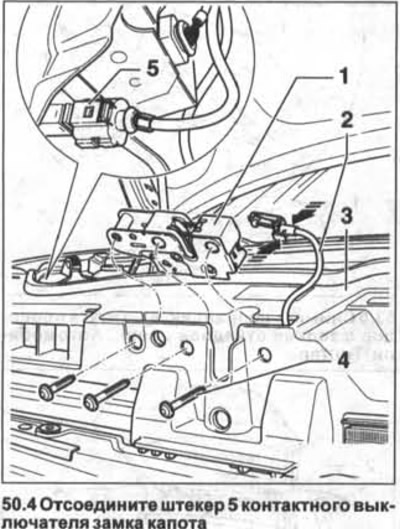
Attention! The plug is located next to the right headlight.
5. Mark the installation position of the hood lock 1 with a marker (see illustration 50.4).
6. Unscrew the three bolts 4 and remove the hood lock 1 from the front cross member 3 by pushing it upwards (see illustration 50.4).
7. Tighten the leashes (see arrows in illustration 50.4) and disconnect the 2 drive cable from the lock.
Installation
8. Connect the drive cable to the hood lock.
9. Replace the lock and tighten the bolts by hand, aligning the lock with the marks made before removal.
10. Connect the hood contact switch plug.
11. Adjust the position of the lock on the crossbar by moving it on the bolts. The hood should close and open without any problems.
12. Make sure that the gaps between the hood and adjacent parts correspond to the nominal ones. If necessary, adjust the hood.
13. Tighten the bonnet lock mounting bolts to 12 Nm.
14. Secure the hood lock drive cable.
15. Reinstall the radiator grille.
Hood lock bracket
Removal
16. Open the hood.
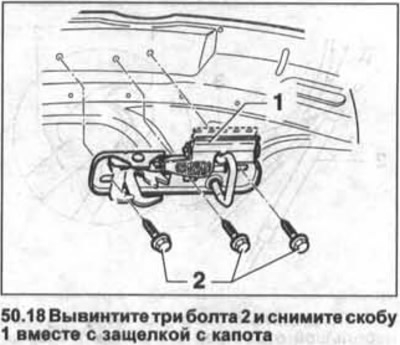
17. Use a marker to mark the mounting position of the bracket on the hood.
18. Unscrew three bolts 2 and remove bracket 1 together with the latch from the hood (see illustration).
Installation
19. Secure the bracket to the hood by screwing in the mounting bolts by hand. Then align the bracket with the marks made before removal.
20. Adjust the position of the bracket by moving it on the mounting bolts. The hood should close and open without any problems.
21. Make sure that the gaps between the hood and adjacent parts correspond to the nominal ones. If necessary, adjust the hood.
22. Tighten the bonnet lock mounting bolts to 10 Nm.
Hood trim
Removal
23. Open the hood.
24. Pry up the trim mounting clips with a wedge, for example HAZET 799-3, and remove their mounting protrusions from the longitudinal holes in the bonnet.
25. Remove the hood trim.
Installation
The installation of the trim is carried out in the reverse order of removal.
26. Touran vehicles: Ensure that the clamps are installed with the wide side facing downwards.
Visitor comments