
English Русский
Български
Беларускі
Український
Српски
Hrvatski
Română
Polski
Slovenský
Magyar
  |  Articles  |  Sitemap  |  Contacts  |    |
Car maintenance Ford Car maintenance Hyundai Car maintenance Chevrolet Car maintenance BMW Car maintenance Audi Car maintenance Opel Car maintenance AvtoVAZ
VWmanual.ru


Main   Passat   Golf   Polo   Touareg   Tiguan   Sharan   Transporter   Others  
Polo 3 (1995-2003) Polo 4 (2001-2009)

Removal and installation/adjustment of the engine compartment hood lock (VW Polo 4)

  • Main
  • Polo
  • Polo 4
  • Body
  • Exterior
  • Removal and installation/adjustment of the engine compartment hood lock
            0


Contents: POLO ↓ IBIZA ↓ For locking bracket only ↓

POLO


Removal


Open the engine compartment hood.

Remove the radiator grille, see the relevant chapter above.

Release the hood lock cable from the holders in the engine compartment.

To facilitate subsequent assembly, mark the mounting position of the hood lock with a felt-tip pen.

Unscrew 3 bolts and move the hood lock upwards from the lock beam.
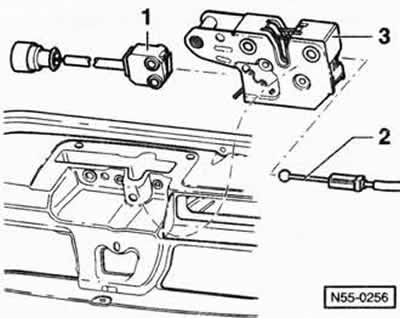
Unscrew 3 bolts and move the hood lock upwards from the lock beam.


Using a screwdriver, pull the cable rod "2" out of the support at the hood lock "3" and unhook the spherical end of the cable rod from the eye.

Disconnect switch "1" from the hood lock or, accordingly, disconnect the switch plug connector.

Installation


Attach the switch to the hood lock or connect the switch plug connector accordingly.

Attach a cable traction to the lock.

Screw the lock to the lock beam by hand and align the lock according to the marks applied.

Adjust the hood lock by moving it within the holes. The hood should lock and unlock without problems. Check the correctness of the gaps in the joints of the hood of the engine compartment and adjust the gaps if necessary, see the corresponding chapter above.


Tighten the hood lock mounting bolts.

Secure the cable traction to the holders in the engine compartment

Install the radiator grille, see the relevant chapter above.

IBIZA


Removal


Open the engine compartment hood and unscrew the 2 hood lock mounting bolts.

Using an upward movement, remove the lock from the lock beam and unhook the cable traction from the lock.

Disconnect the plug connector from the switch near the hood lock.

Installation


Installation is carried out in reverse order.

For locking bracket only


Removal


Open the engine compartment hood.

To facilitate subsequent assembly, mark the mounting position of the locking bracket on the hood with a felt-tip pen.

To facilitate subsequent assembly, mark the mounting position of the locking bracket on the hood…


Unscrew 3 bolts - 1 - and remove the locking bracket "2" from the hood together with the catch hook "3".

Installation


Screw the locking bracket by hand to the engine compartment hood and align it with the marks applied.

Adjust the locking bracket by moving it within the holes. The hood should lock and unlock without problems. Check the correctness of the gaps in the joints of the hood of the engine compartment and adjust the gaps if necessary, see the corresponding chapter above.

Tighten the locking bracket mounting bolts to 10 Nm.

This article is available at russian, bulgarian, belarusian, ukrainian, serbian, croatian, romanian, polish, slovak, hungarian
The text has been checked: Semenova Anna

Share information:

Previous articles
Removal and installation/adjustment of the engine compartment hood
Removal and installation the radiator grille
Removal and installation wheel arch trim
Removal and installation the front wing
Removal and installation the rear bumper/bumper cover IBIZA
Removal and installation the rear bumper/bumper cover POLO
Next articles
Removal and installation the engine compartment hood lock cable
POLO rear door
Removal and installation/adjustment of the rear door
Removal and installation the rear door lock POLO
Removal and installation the rear door trim POLO
Removal and installation the rear door trim IBIZA


Similar articles from other manuals for VW cars:
Opening the engine compartment hood Passat B5 (1996-2005)
Engine compartment hood Golf 4 (1997-2004)
Opening the engine compartment hood Touareg 1 (2002-2006)
Control units in the engine compartment Tiguan 1 (2007-2015)
Checking the engine oil level and replacing it Sharan 1 (1995-2000)
Windscreen Washer Jets — Removal, Installation and Adjustment Transporter T4 (1990-2003)
Visual inspection of parts in the engine compartment and on the… Caddy 3 (2003-2010)
Link to this page in different formats


Visitor comments


No comments yet


How much will 20 + 24 =


Polo 4 
  • General information
  • User manual
  • Maintenance
  • Power unit
  • Engine repair
  • Cooling and lubrication system
  • Control system
  • Injection system (diesel)
  • Supply system
  • Exhaust system
  • Chassis
  • Front suspension
  • Rear suspension
  • Steering
  • Wheels and tires
  • Brake system
  • Body
  • Interior
  • Exterior
  • Electrical equipment
  • Equipment and devices
  • Wiper system
  • Lighting system
  • Electrical circuits
Polo 3 
  • General information
  • User manual
  • Maintenance
  • Power unit
  • Petrol engines 1.4 and 1.6
  • Petrol engines 1.4 (V16)
  • Petrol engines 1.6 and 1.8
  • Diesel engines 1.7 and 1.9
  • Diesel engines 1.9 D and TD
  • Transmission
  • Mechanical gearbox 085
  • Mechanical gearbox 020/02K
  • Chassis
  • Front suspension
  • Rear suspension
  • Steering
  • Brake system
  • Body
  • Exterior
  • Interior
  • Electrical equipment
  • Equipment and instruments (until 2000)
  • Equipment and instruments (after 2000)
  • Electrical circuits
  • Wiring diagrams (petrol)
  • Wiring diagrams (diesel)
VWmanual.ru © 2016-2026 | Mobile version | News and articles | Sitemap: EN BG BY UA RS HR RO PL SK HU | Write message | Site search
Passat B2 • Passat B3 • Passat B4 • Passat B5 • Passat B6 • Golf 1, diesel • Golf 1, petrol • Golf 2, petrol • Golf 2 • Golf 3 • Golf 4 • Golf 5 • Polo 3 • Polo 4 • Touareg 1 • Tiguan 1 • Sharan 1 • Transporter T3 • Transporter T4 • LT 28 • LT 2D • Beetle • Caddy 3 •
Our website uses cookies to ensure functionality and convenience.