



POLO
Removal
With the ignition off, disconnect the ground (-) cable from the battery.
Attention: Follow the instructions given in the chapter "Removal and installation the battery".
Remove the rear door trim, see the relevant chapter below.
Disconnect the plug connectors of the rear window heating and cleaning systems, as well as the additional brake light and central locking system. Disconnect the washer fluid hose from the rear window washer nozzle.
Note: To facilitate subsequent installation, tie a cord to the ends of the wires, which should remain in the rear door after the wires are pulled out.
To facilitate subsequent assembly, mark the mounting position of the hinges "13" in relation to the rear door with a felt-tip pen, see figure N55-0268.
On each side of the door, loosen, but do not unscrew, 2 "12" bolts securing the hinge, see Figure N55-0268.
Safety instructions
Before releasing the spring-gas stop, ask an assistant to support the door. Otherwise, the door will fall down, because one stop will not be able to hold it.
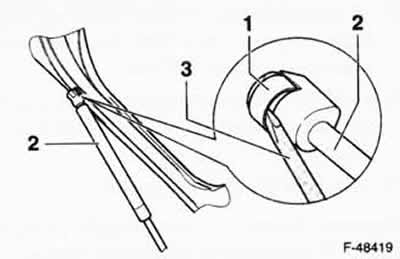
Using a small screwdriver "3", slightly press the locking bracket "1" and remove the spring-gas stop "2" from the upper spherical journal. Remove the second spring-gas stop in the same way.
Unscrew bolts "12" and, together with an assistant, remove the rear door "1" and carefully place it aside, see figure N55-0268.
Installation
With the help of an assistant, place the rear door on the hinges. Align the used rear door according to the marks made before removal.
Tighten the bolts "12" by hand on the left and right. See figure N55-0268.
Place the spring-gas strut on the spherical journal and secure it. Install the second spring-gas strut in the same way.
Check the clearances at the rear door joints. The rear door is adjusted correctly if, when closed, the clearance is uniform on all sides, and it does not protrude too far in or out, and its contours match the adjacent parts.
Prescribed joint clearance values/POLO:
- Rear door - rear body sides/roof 4.5+1,0 mm
- Rear Door - Rear Light 3.0+1,0 mm
- Rear Door - Bumper Cover 4.0+1,0 mm
If the prescribed values are not observed, unscrew the fastening of the locking bracket "7" and align it by moving the rear door left and right. If necessary, loosen the nuts "11" at the body, see figure N55-0268.
After alignment, tighten the hinge mounting bolts to a torque of 10 Nm and the nuts to a torque of 24 Nm.
Tighten the locking bracket fastening to a torque of 22 Nm.
Pull the washer fluid hose and electrical wires in with a cord and route them accordingly in the new door.
Install the rear door trim, see the relevant chapter below.
Connect the ground (-) cable to the battery.
Attention: Follow the instructions given in the chapter "Removal and installation the battery".
Adjustment
Note: When adjusting, the vehicle must be on its wheels.
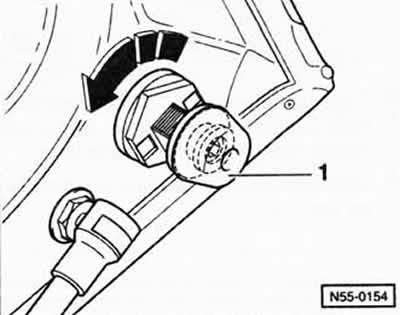
Open the rear door, use a 24 mm ring spanner to turn the adjustment buffer 90° counterclockwise "arrow" and remove it from the profiled hole.
Using a 3 mm Allen key, loosen the locking bolt enough to remove the locking mechanism. 1 - Rubber cap.
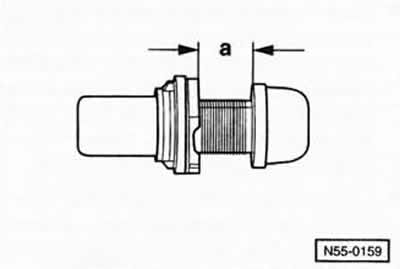
Remove the locking mechanism from the housing and adjust to size a = 12.5 mm.
Note: The new buffer has a preset distance of 12.5 mm.
Insert the adjustment buffer, turn it 90° clockwise and thus fix it in the profiled hole.
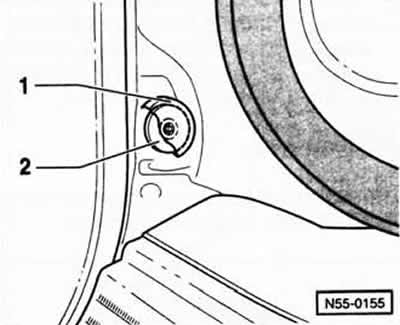
On the left and right sides, above the rear light, unscrew the cap "1" from the blind rivet nut "2".
Close the back door, but do not lock it.
Set the gap at the joint between the rear door and the side of the body to 4.5 mm.
At the service station, the VW-3371 gap adjusting gauge is used for this purpose.
Open the back door again.
Note: The tailgate is now adjusted to a preload of approximately 3mm.
On the left and right sides, above the rear light, screw the cap into the blind rivet nut.
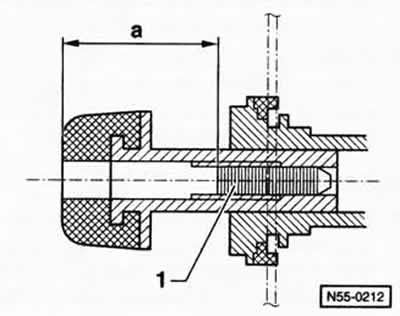
Using an external Allen key, screw in the locking bolt "1" to a distance of no more than a = 25 mm.
Close the back door and check that the gaps in the joints are correct.
Only IBIZA
Removal and installation of the rear door, as well as its adjustment for the IBIZA model, are carried out, in principle, in the same way as for the POLO.
The rear door is secured to each hinge with two nuts. The tightening torque for the nuts during installation is 22 Nm.
Prescribed joint clearance values/IBIZA:
- Rear door - rear side parts of the body from 3 to 4 mm
- Rear Door - Bumper Cover 3.5mm
Only the luggage compartment lid of the POLO Limousine model
Prescribed joint clearance values/POLO for Limousine model:
- Trunk Lid - Rear Side Body Parts 3.0+1 mm
- Trunk lid - bumper cover 4.5+1 mm
Screw in the locking bolt "1" to a distance of no more than a = 16 mm, see figure N55-0212.
Visitor comments