
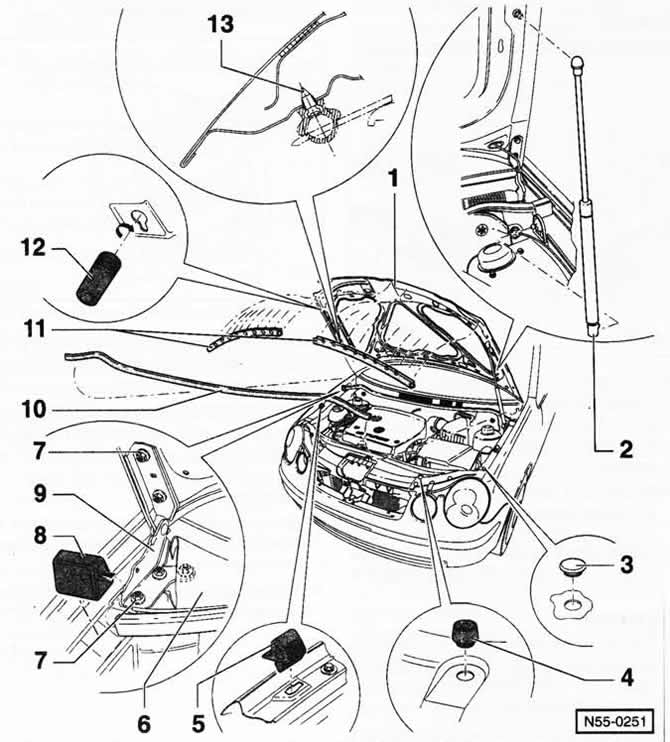
1 - engine compartment hood
2 - spring-gas stop
3 - plug
4 - stop buffer
5 - guide piece
6 - fairing grille
7 - bolt, 23 Nm
8 - insert
9 - hinge
10 - sealing of the drainage casing
11 - CW seal
12 - adjusting buffer
To adjust the height of the hood, the buffer must be screwed in or out.
13 - clamp
For fixing the CW seal.
POLO
Note: the removal and installation of the engine compartment hood, as well as its adjustment for the IBIZA model, are carried out, in principle, in the same way as for the POLO.
Removing
Open engine compartment hood -1-.
Remove windshield washer jets.
Disconnect the washer fluid hoses and electrical wires of the heating system from the washer nozzles and detach from the hood.
Note: If the removable hood is to be installed again, attach a cord to the ends of the hoses. When pulling out the hoses, the cord is pulled into the hood and remains in it.
To facilitate subsequent assembly, mark the mounting position of the hinges -9- on the hood with a felt-tip pen.
On each side, loosen but do not unscrew the 2 bolts -7- securing the hinges to the hood.
Ask an assistant to support the hood. Using a small screwdriver, slightly press the retaining clip and remove the spring-gas stop -2- from the upper spherical pin.
Unscrew bolts -7- and, together with an assistant, remove the engine compartment hood and carefully lay it aside.
Installation
Together with an assistant, attach the engine compartment hood to the hinges. Align the used hood according to the marks made before removal. Tighten bolts -7- by hand.
Put the spring-gas stop on the spherical pin and fix it.
Close the hood of the engine compartment and adjust the gaps in the joints with adjacent parts, see this chapter below.
Tighten the hinge bolts to 23 Nm.
Pull in the washer fluid hoses, as well as the electrical wires of the washer nozzles, with a cord, and route them accordingly in the new hood. Hoses and wires attach and connect to the washer nozzles.
Adjustment
Unscrew the fastening of the bonnet locking bracket, see the relevant chapter below.
Loosen bolts -7- securing hinges to bonnet.
Close the hood of the engine compartment and check the gaps in the joints. In this case, the gaps at the right and left wings must be the same and parallel
Prescribed joint clearances/POLO:
- Engine Compartment Hood - Wing 3.0+1,0 mm
- Engine Compartment Hood - Grille/Headlight 4.0+1,0 mm
Specified joint clearances/IBIZA:
- Engine compartment hood - 3 to 4 mm fender
- Engine Compartment Hood - 4mm Headlight
If necessary, open the hood of the engine compartment, loosen the bolts -7- for attaching the hinges to the body and, moving the hood to the left or right, adjust the gaps.
Tighten the hinge bolts to 23 Nm.
Screw in adjusting buffers -12- so that the hood in the closed position rests snugly on the fenders.
Note: To check the correct fit of the hood, you can use bread paste or chewing gum glued on the stop buffers. After the hood is closed, it can be determined from the imprint on the bread mass whether the hood fits correctly.
Tighten the bolts securing the locking bracket to the hood to 10 Nm.
Disposal of the spring-gas stop
Attention: If the spring-gas stop is to be replaced, then before it is disposed of, it is necessary to release gas from it.
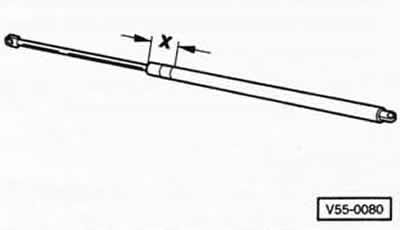
Clamp the spring-gas stop in the zone x = 50 mm in a vise.
Attention: It is obligatory to clamp only in the specified area, otherwise the possibility of an accident cannot be excluded!
Saw through the cylinder of the spring-gas stop in the first third of its total length, counting from the restrictive edge on the side of the piston rod. Cover the cut area with a rag to contain the spilled oil.
Attention: When sawing, it is necessary to work with safety glasses.
Visitor comments