



Contents: Removal ↓ Installation ↓
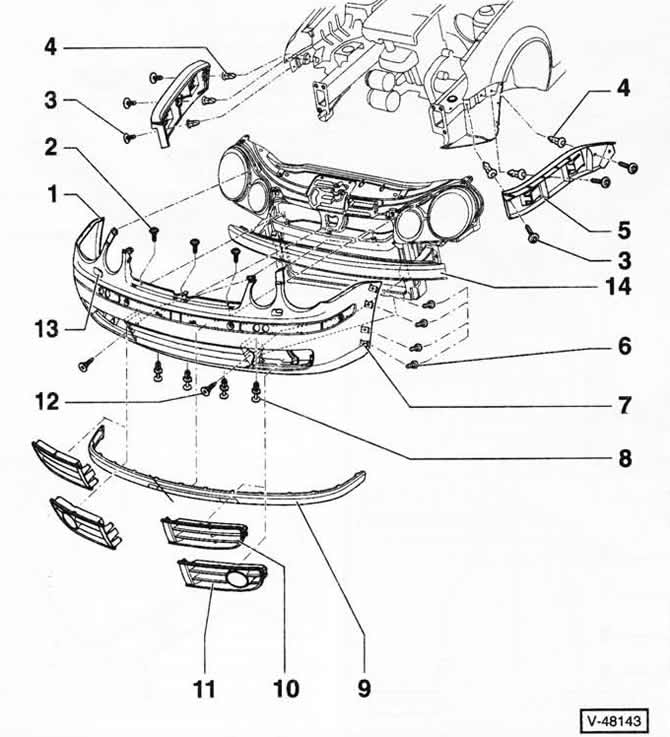
1 - bumper cover
2 - 3 screws, 8 Nm
3 - 6 screws
4 - 6 spacer nuts
5 - guide piece
6 - 4 screws
7 - self-locking nut
8 - 4 spacer clamps
9 - protective cover Attached to the bumper casing.
10 — ventilation grille Attached to the bumper casing.
11 - ventilation grille with opening for fog lamp.
Mounts in the bumper casing.
12 - 2 screws, 8 Nm
13 - Headlight cleaning system cover
14 — bumper beam
Removal
Note: The bumper consists of a casing and a bumper beam.
Open the engine compartment hood.
Remove the radiator grille, see the relevant chapter below.
Depending on the version, remove cover "13" from the bumper casing -1 - and detach it from the headlight cleaning system nozzle rod.
Remove 4 screws "6" and separate the bumper cover from the wheel arch trim.
Unfasten the ventilation grilles -10/11- from the bumper casing on the right and left.
Remove 4 spacer clips "8".
Disconnect the air temperature sensor and fog lamp connectors, if any.
Remove screws "2" and "12"
Together with an assistant, pull the bumper cover horizontally forward from the guides "5" and remove it.
Remove 2 screws and 3 hex bolts on the right and left and remove the bumper beam from the car's side members.
Installation
Screw the bumper beam to the side members. Tighten the 3 bolts on the right and left to 30 Nm.
With the help of an assistant, insert the bumper cover into the guides. Make sure that the bumper cover enters the guides evenly and does not warp. Secure the bumper cover with screws.
Connect the plug connectors of the air temperature sensor and fog lights, if any.
Further installation is carried out in reverse order.
Visitor comments