
Until 9/93
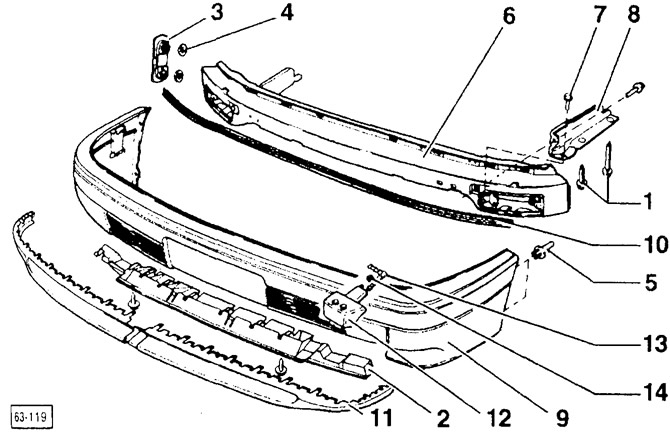
- 1 - bolt, 80 Nm
- 2 - ventilation grill
- 3 - guide piece
- 4 - sealing washer
- 5 - spacer rivet
- 6 - beam
- 7 - bolt with captive washer, 25 Nm
- 8 - bracket
- 9 - casing
- 10 - sealing profile
- 11 - spoiler
Attaches to casing.
- 12 - washer with nozzles
- 13 - angle fitting
If installed.
- 14 - nut, 10 Nm
Since 10/93
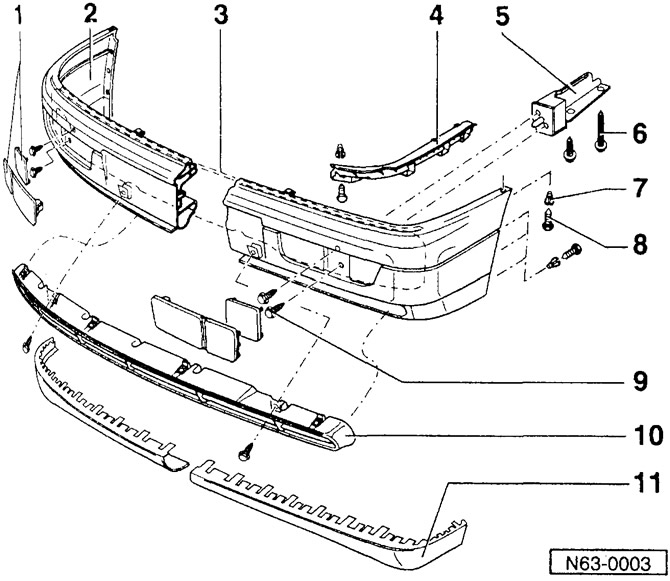
- 1 - decorative overlay
- 2 - casing
- 3 - beam
- 4 - guide piece
- 5 - bracket
- 6 - bolt, 80 Nm
- 7 - spacer rivet
- 8 - bolt with captive washer
4 pieces per side.
- 9 - bolt, 20 Nm
- 10 - ventilation grill
- 11 - spoiler
Attaches to casing.
Attention: Do not travel without the front bumper, as the strength of the front axle beam is not guaranteed.
Removing
Attention: It is not allowed to drive without the front bumper or bumper bracket, as the strength of the front axle beam is not guaranteed.
Remove ventilation grille. To do this, unscrew crosshead screws -1- on left and right.
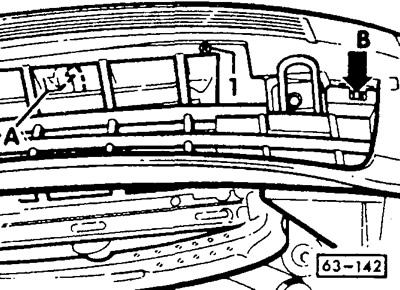
Use a screwdriver to press out locking lug -A- on the reverse side and locking lug -B-. Tilt the ventilation grill down.
Pull out the expansion rivets on the left and right.
Vehicles with fog lamps: Disconnect the electrical connectors on the back of the fog lamps.
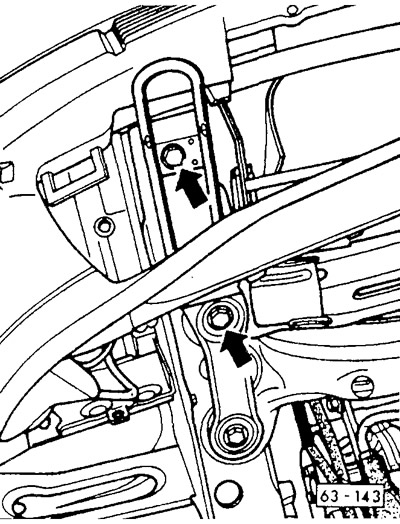
Loosen the 2 bumper mounting bolts on the bottom left and right.
Together with an assistant on both sides of the body, pull the bumper forward parallel to the road from the side rails.
Headlight cleaning system: pull the bumper forward a little and release the hose from the distributor fitting between the bumper and the end piece.
Pull the bumper forward.
Installation
Position the bumper, slide it into the side guides and push it back in parallel on both sides.
If required, connect hose for headlight cleaning system.
Screw bumper to bracket to 80 Nm.
On vehicles with fog lamps, connect the plug.
Insert spacer rivets left and right.
Install decorative caps for mounting bolts.
Attach from below and screw on the ventilation grille.
Visitor comments