
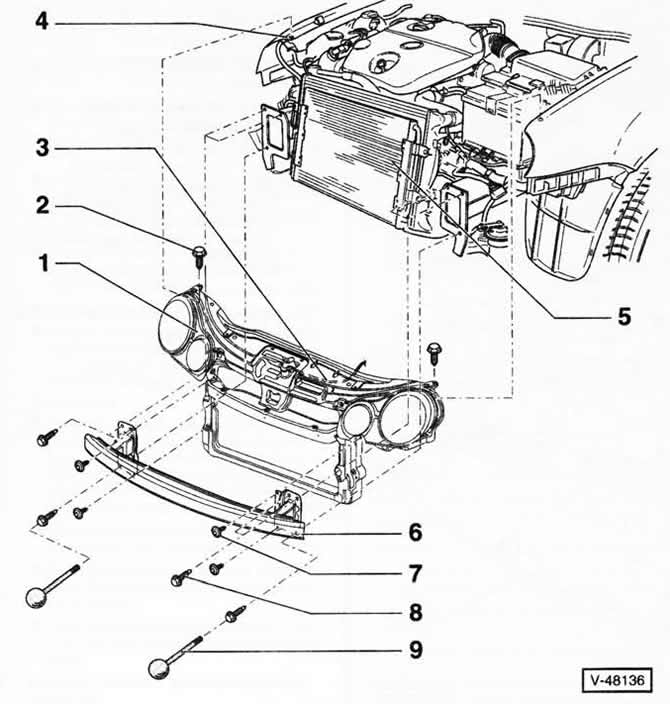
1 - lock beam
2 - 2 bolts, 8 Nm
3 - cable traction for the drive of the hood lock
4 - hole in the wing
5 - radiator
6 - bumper beam
7 - 4 screws, 8 Nm
8 - 6 bolts, 30 Nm
9 - guide rods
Special tool VW 3411.
POLO
Position for maintenance work
When carrying out certain adjustment and disassembly work, for example with V-ribbed or toothed belts, the front of the vehicle must be moved to the so-called maintenance position. In this case, the lock beam moves forward.
Remove the front bumper cover see relevant chapter below.
Remove the grille, see relevant chapter below.
Remove the engine compartment hood latch see relevant chapter below.
Detach cable tie -3- from bonnet lock.
Remove bolts -8- each from the longitudinal members on the right and left respectively and screw guide rods -9- into both holes.
Unscrew the remaining bolts -8- from the side members on the right and left
Unscrew the bolts -2- from the holes -4- in the wings
Pull lock carrier -1- forward onto guide rods.
Installation
Move the lock beam on the guide rods to the side members and screw on.
Screw in bolts -2- and tighten to 8 Nm.
Unscrew guide rods, screw in remaining bolts -8- and tighten to 30 Nm.
Further installation is carried out in the reverse order.
After installation, check the headlight alignment and adjust the headlights if necessary (at the service station).
Only IBIZA
Note: The work steps for the IBIZA model are carried out in the same way. However, the radiator grille and hood latch do not need to be removed.
Remove the lower engine compartment cover.
Screw the SEAT-T20070 guide rods into the side members.
When installing, tighten bolts in side members to 20 Nm.
Visitor comments