
English Русский
Български
Беларускі
Український
Српски
Hrvatski
Română
Polski
Slovenský
Magyar
  |  Articles  |  Sitemap  |  Contacts  |    |
Car maintenance Ford Car maintenance Hyundai Car maintenance Chevrolet Car maintenance BMW Car maintenance Audi Car maintenance Opel Car maintenance AvtoVAZ
VWmanual.ru


Main   Passat   Golf   Polo   Touareg   Tiguan   Sharan   Transporter   Others  
Tiguan 1 (2007-2015)

Door adjustment (VW Tiguan 1)

  • Main
  • Tiguan
  • Tiguan 1
  • Body
  • External equipment
  • Door adjustment
            0


Instructions: Before adjusting the front door, place the car on a hard, level surface. The door is considered to be adjusted correctly if the gaps around its perimeter are the same when closed and its contours fit well into the overall outline of the car. After installation or adjustment, it is necessary to carry out anti-corrosion treatment of the hinges and bottons.
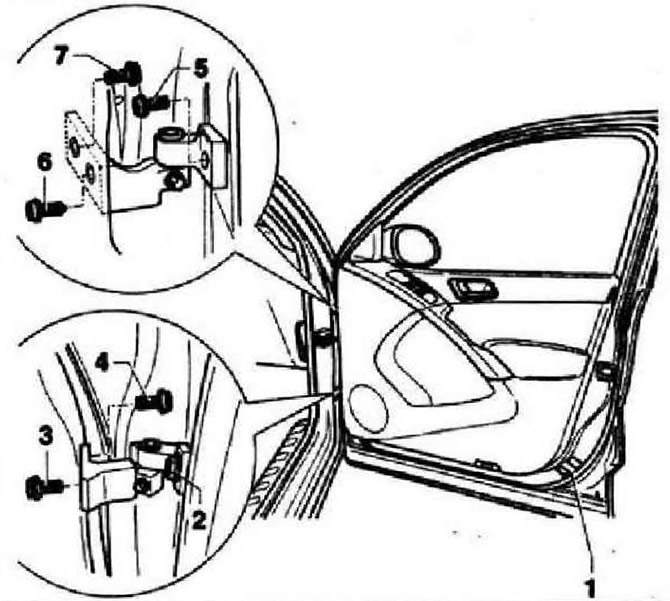

Instructions: Before adjusting the front door, place the car on a hard, level surface. The door is…


To perform correct adjustment, bolts "3, 4, 6 and 7" on pillar A must be loosened. To access bolt "5", it is necessary to remove the lower part of the A pillar trim. Other adjustment methods, for example, by moving the door upwards, will not give a result. Subsequently, the door will still sag under its own weight. To correctly adjust the door installation depth, it is necessary to loosen bolts "2 and 5". In this case, it is necessary to use a special tool - door adjustment key "3320" and bit -3320/3-.

This article is available at russian, bulgarian, belarusian, ukrainian, serbian, croatian, romanian, polish, slovak, hungarian
The text has been checked: Tarasov Ivan

Share information:

Previous articles
Upper door hinge bolt
Removal and installation door hinges
Door hinges
Front door device
Filler cap and actuator
Gas struts
Next articles
Door support panel with hanging equipment
Removal and installation of the supporting panel with attachments
Door opening limiter
Door handle and lock
Removal and installation the roof of the lock cylinder
Removal and installation of the stuttering larva


Similar articles from other manuals for VW cars:
Removal and installation / adjustment of the door Passat B3 (1988-1993)
Engine adjustment data Golf 1 (1974-1984, petrol)
Removal and installation/adjustment of the rear door Polo 4 (2001-2009)
Door adjustment Touareg 1 (2002-2006)
Knock sensor. Knock adjustment Sharan 1 (1995-2000)
Removal, installation and adjustment of the front door Transporter T4 (1990-2003)
Tall van rear door — removal, installation and adjustment LT 28 (1975-1991)
Link to this page in different formats


Visitor comments


No comments yet


How much will 31 + 39 =


Tiguan 1 
  • General information
  • Characteristics
  • Vehicle overview
  • Power unit
  • Petrol engine 1.4 BWK
  • Petrol engine 1.4 CAVA
  • Engine 2.0 (petrol)
  • Engine 2.0 (diesel)
  • Transmission
  • 6-speed manual gearbox 0A6
  • 6-speed automatic gearbox 09M
  • Drive shafts
  • Chassis
  • Front suspension
  • Rear suspension (2x4)
  • Rear suspension (4x4)
  • Air suspension
  • Wheels and rims
  • Brake system
  • Steering gear
  • Body
  • External equipment
  • Internal equipment
  • Electrical equipment
  • Power devices
  • Appliances and lighting
  • Communication systems
  • Heating and air conditioning
  • Electrical circuits
VWmanual.ru © 2016-2026 | Mobile version | News and articles | Sitemap: EN BG BY UA RS HR RO PL SK HU | Write message | Site search
Passat B2 • Passat B3 • Passat B4 • Passat B5 • Passat B6 • Golf 1, diesel • Golf 1, petrol • Golf 2, petrol • Golf 2 • Golf 3 • Golf 4 • Golf 5 • Polo 3 • Polo 4 • Touareg 1 • Tiguan 1 • Sharan 1 • Transporter T3 • Transporter T4 • LT 28 • LT 2D • Beetle • Caddy 3 •
Our website uses cookies to ensure functionality and convenience.