
Door fixing
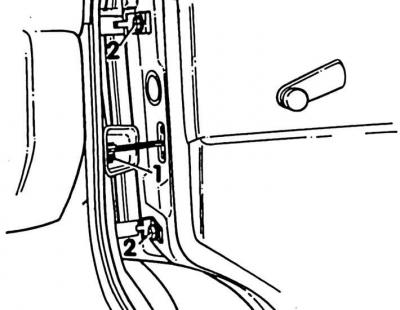
1. Nut; 2. Hex screws
Removing
1. Unscrew the nut (1) and remove your finger.
2. Unscrew hex screws (2) from the upper and lower hinge and remove the door. If the door is to be installed again, outline the screw heads with a felt-tip pen. This will make subsequent assembly easier.
Attention! Vehicles with special equipment such as central locking, power windows, electrically adjustable and heated outside mirrors or loudspeakers in the doors: Disconnect the wiring harness and remove it from the door, to do this remove the door trim.
Installation
1. Install the door and screw to the hinges by hand.
2. Screw on the nut (1) door limiter torque 7 Nm.
Adjustment
1. Door adjustment is always required when installing a new door. When adjusting, you should pay attention to the same, parallel size of the groove along the perimeter of the door relative to the body and adjacent parts.
2. Adjustment of the front parts of the door: loosen the hinge screws (2) and fit the door (see fig. door fixing), moving it in the openings of the enlarged hinge holes.
3. Fit the door to the contour of the body. In this case, the grooves of the door must coincide with the grooves of the wing.
4. To avoid wind noise, slide the door in or out until its top surface is aligned with the front fender. The front door must be recessed relative to the edge of the wing by no more than 1 mm.
5. Tighten screws to 55 Nm.
6. At the rear, the door is adjusted relative to the locking pin. To do this, loosen the locking pin so that it can be moved with force. Close and fit the door. Then carefully open the door and tighten the locking pin.
Visitor comments