
English Русский
Български
Беларускі
Український
Српски
Hrvatski
Română
Polski
Slovenský
Magyar
  |  Articles  |  Sitemap  |  Contacts  |    |
Car maintenance Ford Car maintenance Hyundai Car maintenance Chevrolet Car maintenance BMW Car maintenance Audi Car maintenance Opel Car maintenance AvtoVAZ
VWmanual.ru


Main   Passat   Golf   Polo   Touareg   Tiguan   Sharan   Transporter   Others  
Sharan 1 (1995-2000)

Spark plugs — removal, installation and adjustment (VW Sharan 1)

  • Main
  • Sharan
  • Sharan 1
  • Petrol engines
  • Ignition system
  • Spark plugs — removal, installation and adjustment
            0


The spark plugs have a thread diameter of 14 mm. The manufacturer recommends specific spark plugs, but spark plugs from other manufacturers with the appropriate combustion heat can also be used.

The distance between the spark plug electrodes is shown in the adjustment and control table.

Before removing the spark plugs, clean the wells in which the spark plugs are located so that dirt does not get into the holes for them after removing the spark plugs. To remove the spark plugs, use only a specially designed key, and the high voltage wires from the spark plugs on the VR6 engine can only be removed with a special tool.

When working with spark plugs, observe the following rules:
  • when removing the high voltage wire from the spark plug, do not pull on the wire itself, but only on the tip of the high voltage wire;
  • after removing the spark plugs, arrange them in the order of the cylinders;
  • if, when removing, a spark plug is stuck, do not use force, as you can strip the threads in the cylinder head made of light alloy. In this case, as an exception, try to remove the spark plug by warming the engine to operating temperature, observing safety precautions;
  • wait until the engine has cooled down before installing new spark plugs. Otherwise, the threads will be too tight (due to thermal expansion of the cylinder head material);
  • spark plugs should be tightened to 30 Nm (2.0-liter engine) or 25 Nm (vR6 engine);
  • if you don't have a torque wrench, tighten the new spark plug lightly with a spark plug wrench so that the sealing ring fits into place, then tighten it another 90° with a spark plug wrench. If you're installing old spark plugs, tighten them another 15° or so.

In the company's maintenance schedules "Volkswagen" it is recommended that spark plugs be replaced every 60,000 km or every 3 years. Even if the spark plugs are working without problems, they should still be replaced at the recommended intervals.


Adjusting the gap between the spark plug electrodes
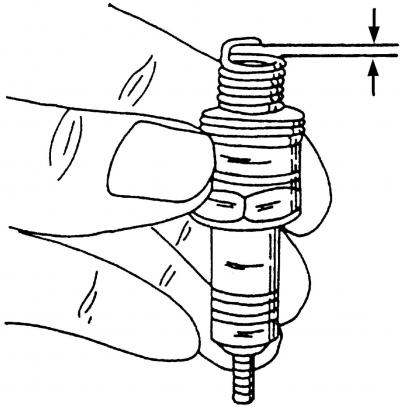


Fig. 224. The gap between the central and side electrodes of the spark plug. The feeler gauge…

Fig. 224. The gap between the central and side electrodes of the spark plug. The feeler gauge should be inserted into the gap between the electrodes


Before installing the spark plug, check and adjust the gap between the central and side electrodes (Fig. 224).

This operation must be carried out before winter operation of the car. The gap between the spark plug electrodes must be within 0.7-0.9 mm.

During operation, this gap constantly increases due to natural wear of the contact material. An increase in the gap leads to an increase in breakdown voltage, which causes a disruption in spark formation and increased fuel consumption.

The gaps between the electrodes should be checked using a round feeler gauge. A flat feeler gauge does not take into account the unevenness of the electrode wear and can give a large error in measuring the gap.
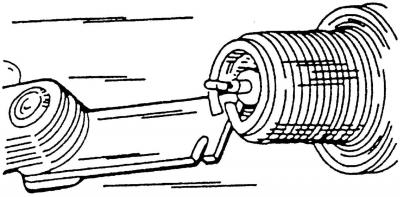
Fig. 225. Adjusting the clearance using a special tool

Fig. 225. Adjusting the clearance using a special tool


The gap between the electrodes can be increased or decreased only by bending the side electrode using a special tool (Fig. 225). To do this, place the hook of the tool on the side electrode and carefully bend or straighten it.

This article is available at russian, bulgarian, belarusian, ukrainian, serbian, croatian, romanian, polish, slovak, hungarian
The text has been checked: Tarasov Ivan

Share information:

Previous articles
Adjusting the ignition timing of a 2.0-liter engine
Ignition distributor repair
Removal and installation the ignition distributor
Servicing the ignition distributor
Ignition distributor for 2.0 liter engine
Checking the Hall and Knock Sensor
Next articles


Similar articles from other manuals for VW cars:
Spark plugs Passat B3 (1988-1993)
Spark plugs Golf 1 (1974-1984, petrol)
Replacing spark plugs Polo 3 (1995-2003)
Removal, installation and adjustment of the multi-function… Touareg 1 (2002-2006)
Damping adjustment key E387 Tiguan 1 (2007-2015)
Replacing spark plugs Transporter T4 (1990-2003)
Replacing spark plugs Caddy 3 (2003-2010)
Link to this page in different formats


Visitor comments


No comments yet


How much will 50 + 40 =


Sharan 1 
  • General information
  • Introduction to guide
  • Maintenance
  • Petrol engines
  • Engine repair 2.8 l (AAA)
  • Engine repair 2.0 l (ADY)
  • Lubrication system
  • Cooling system
  • Fuel injection system
  • Ignition system
  • Diesel engines
  • Engine repair
  • Lubrication system
  • Cooling system
  • Supply system
  • Transmission
  • Clutch
  • Manual gearbox and shafts
  • Chassis
  • Steering
  • Car suspension
  • Brake system
  • Electrical equipment
  • Equipment and devices
  • Power devices
  • Electrical circuits
VWmanual.ru © 2016-2026 | Mobile version | News and articles | Sitemap: EN BG BY UA RS HR RO PL SK HU | Write message | Site search
Passat B2 • Passat B3 • Passat B4 • Passat B5 • Passat B6 • Golf 1, diesel • Golf 1, petrol • Golf 2, petrol • Golf 2 • Golf 3 • Golf 4 • Golf 5 • Polo 3 • Polo 4 • Touareg 1 • Tiguan 1 • Sharan 1 • Transporter T3 • Transporter T4 • LT 28 • LT 2D • Beetle • Caddy 3 •
Our website uses cookies to ensure functionality and convenience.