
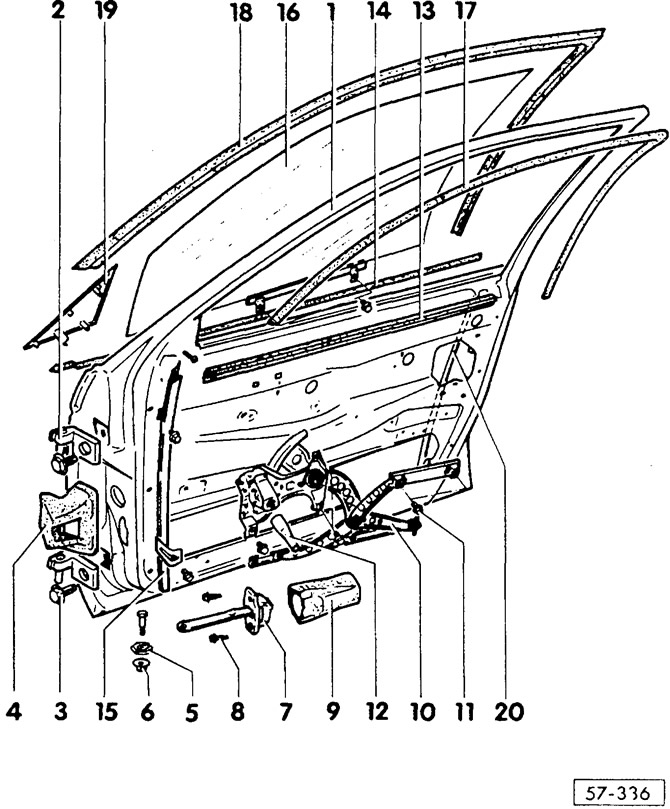
- 1 - door
- 2 - door hinge
The hinge is screwed to the door, inserted into the A-pillar and locked with a countersunk screw.
- 3 - bolt, 55 Nm
- 4 - door latch cover
Self-adhesive, glued to the A-pillar.
- 5 - bracket
- 6 - lock nut, 6.5 Nm
- 7 - door latch
- 8 - screw, 7 Nm
- 9 - shell
- 10 - power window
- 11 - screw, 7 Nm
- 12 - plug-in sleeve
Before dismantling the window lifter: remove it from the window lifter shaft with pliers.
- 13 - internal seal of the window glass shaft
Planted on the edge.
- 14 - outer seal of the window glass shaft
Planted on the edge.
- 15 - front window glass guide
It is removed from the door frame down.
- 16 - window glass
- 17 - inner window glass guide
- 18 - outer window glass guide
Attached to the door frame, damaged during assembly.
- 19 - cover
- 20 - rear power window guide
Removing
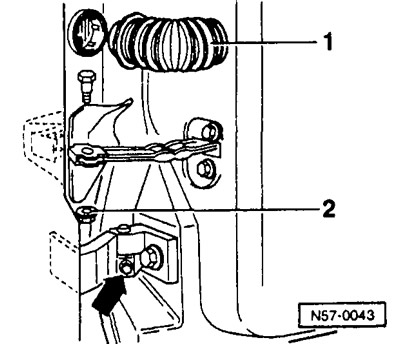
From 10/93: Disconnect multi-pin connector -1- for central locking/electric window regulator. For older vehicles, remove the door trim and wire.
Loosen nut -2- and remove pin.
Loosen the grub screw (arrow) from the top and bottom hinges.
Lift the door up from the corners of the hinges.
Installation
Insert the door from above and secure with new countersunk screws. If used screws are used, first clean the threads with a wire brush and treat with VW AMV 19700001.
Tighten nut -2- to 7 Nm.
Connect the central locking/electric window connector.
Adjustment
Adjustment is necessary if a new door is installed.
When adjusting, it is imperative to ensure the same gaps around the entire perimeter and parallelism with respect to adjacent parts.
To adjust the door, loosen the bolts -3- and properly align the door at the hinge within the enlarged bolt holes.
Align the door to the contour of the body. In this case, the indented bands on the door must coincide with the indented bands on the wing.
To reduce wind noise, move the door in or out so that its surface matches that of the front fender. It is allowed to sink the door inside with respect to the surface of the front wing by no more than 1 mm.
Tighten bolts to 55 Nm.
In the rear area, the door must be adjusted at the locking pin. To do this, release the locking pin so that it can be mixed with some effort. Close the door and align. Then carefully open the door and tighten the locking pin.
Visitor comments