
English Русский
Български
Беларускі
Український
Српски
Hrvatski
Română
Polski
Slovenský
Magyar
  |  Articles  |  Sitemap  |  Contacts  |    |
Car maintenance Ford Car maintenance Hyundai Car maintenance Chevrolet Car maintenance BMW Car maintenance Audi Car maintenance Opel Car maintenance AvtoVAZ
VWmanual.ru


Main   Passat   Golf   Polo   Touareg   Tiguan   Sharan   Transporter   Others  
Tiguan 1 (2007-2015)

Removal and installation the sun blind (VW Tiguan 1)

  • Main
  • Tiguan
  • Tiguan 1
  • Body
  • External equipment
  • Removal and installation the sun blind
            0


Contents: Removal ↓ Installation ↓

Removal


Open the sunshade fully.

Instructions: If the electric drive fails, the curtain can be fully opened by rotating the motor with a regular Allen key.


Remove the rear section of the hatch. Unscrew bolt "3" securing cover "2" (2 Nm). Using a screwdriver, disconnect the latches "arrow" securing cover "2" to the rear part "4" and tilt cover "2" upwards. Inner seal "1" must be in place.
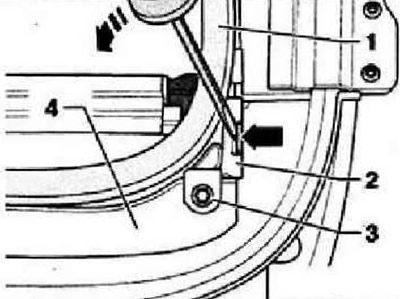
Remove the rear section of the hatch. Unscrew bolt «3» securing cover «2» (2 Nm). Using a…


Carefully lift the curtain bar "2" together with the slider "1".

Instructions: Do not allow damage to the material of curtain "3".

Remove slider "1" in the direction of the "arrow" from the curtain strip "2". Remove the ceiling trim.
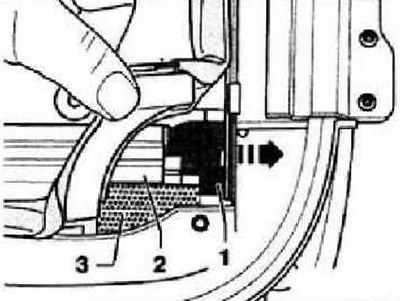
Remove slider «1» in the direction of the «arrow» from the curtain strip «2». Remove the ceiling…


Unscrew bolts "1" securing cassette "2" (3.5 Nm). Remove curtain cassette "2" in the direction of "arrow" and move it slightly downwards to bypass curtain drive motor "3".
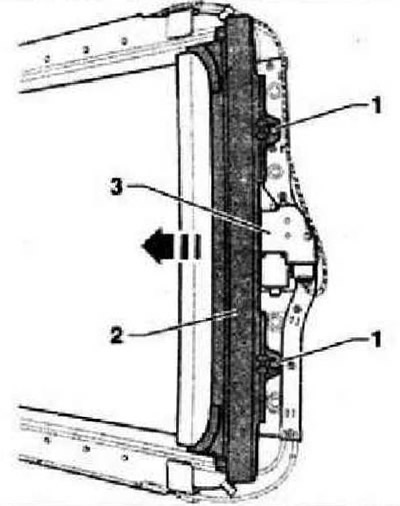


Unscrew bolts «1» securing cassette «2» (3.5 Nm). Remove curtain cassette «2» in the direction of…


Remove the curtain cassette "2" together with the steel tape "4" in the direction of the "arrow" and from the curtain guide "1".
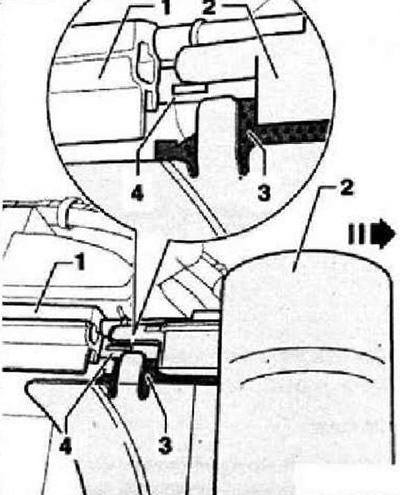
Remove the curtain cassette «2» together with the steel tape «4» in the direction of the «arrow»…


Instructions: Do not allow damage to the material of the curtain "3". When the curtain is removed, the curtain film can be replaced.


Carefully move the strip "1" in the direction of the "arrow" from the edge "3" of the curtain "2". Carefully put the new strip "1" on the edge of the curtain "3".
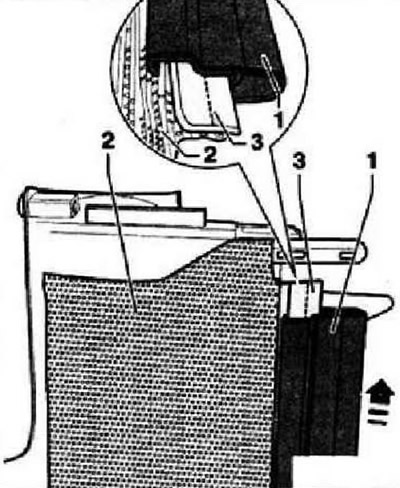
Carefully move the strip «1» in the direction of the «arrow» from the edge «3» of the curtain «2».…


Instructions: Do not allow damage to the material of curtain "2".


Installation


Instructions: The bar must be placed on the slide before installing the cassette. The sliders and cables of the curtain drive must not be lubricated.

Insert the curtain cassette "2" together with the steel tape "4" in the direction of the "arrow" into the curtain guide "1".

Instructions: Do not allow damage to the material of curtain "3".

Instructions: Do not allow damage to the material of curtain «3».


The tongue "3" of the cassette "2" must be moved under the tire "1".
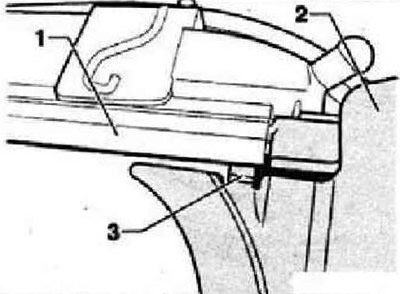
The tongue «3» of the cassette «2» must be moved under the tire «1».


Insert slider "1" into bar "3" in the direction of the "arrow".
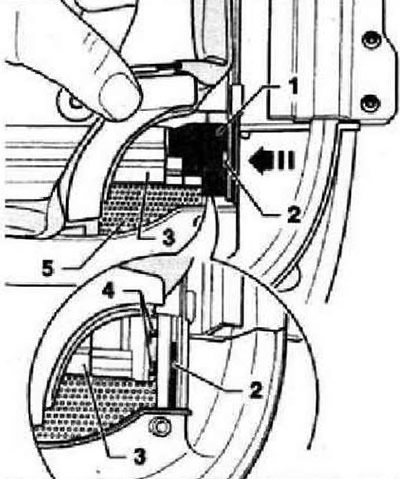
Insert slider «1» into bar «3» in the direction of the «arrow».


Instructions: Make sure that slider "1" enters the groove on steel rod "4" and engages with the curtain drive cable mount "2".


Further installation is carried out in the reverse order. Tightening torques: cassette mounting bolts 3.5 Nm, cover mounting bolts 2 Nm.

Instructions: After installing the curtain, it is necessary to check the uniformity and ease of its movement. To do this, set the curtain in motion manually, turning the drive motor with a regular Allen key, and make sure that the curtain material is not excessively stretched and that no folds are formed on it.


Install the headliner. Install the rear hatch section. After all work is completed, initialize the sunshade motor.

This article is available at russian, bulgarian, belarusian, ukrainian, serbian, croatian, romanian, polish, slovak, hungarian
The text has been checked: Tarasov Ivan

Share information:

Previous articles
Removal and installation the sunroof fairing
Replacing hatch seals
Height adjustment of the front and rear sections of the hatch
Removal and installation the rear glass section of the sunroof
Removal and installation the front glass section of the sunroof
Initializing the sunshade motor
Next articles
Removal and installation the lifting mechanism and drive cable of the front section of the hatch
Hatch frame device
Hatch maintenance
Opening and closing the hatch without power supply
Cleaning drain hoses
Front bumper trim


Similar articles from other manuals for VW cars:
Removal and installation the sun blind Golf 4 (1997-2004)
Link to this page in different formats


Visitor comments


No comments yet


How much will 12 + 11 =


Tiguan 1 
  • General information
  • Characteristics
  • Vehicle overview
  • Power unit
  • Petrol engine 1.4 BWK
  • Petrol engine 1.4 CAVA
  • Engine 2.0 (petrol)
  • Engine 2.0 (diesel)
  • Transmission
  • 6-speed manual gearbox 0A6
  • 6-speed automatic gearbox 09M
  • Drive shafts
  • Chassis
  • Front suspension
  • Rear suspension (2x4)
  • Rear suspension (4x4)
  • Air suspension
  • Wheels and rims
  • Brake system
  • Steering gear
  • Body
  • External equipment
  • Internal equipment
  • Electrical equipment
  • Power devices
  • Appliances and lighting
  • Communication systems
  • Heating and air conditioning
  • Electrical circuits
VWmanual.ru © 2016-2026 | Mobile version | News and articles | Sitemap: EN BG BY UA RS HR RO PL SK HU | Write message | Site search
Passat B2 • Passat B3 • Passat B4 • Passat B5 • Passat B6 • Golf 1, diesel • Golf 1, petrol • Golf 2, petrol • Golf 2 • Golf 3 • Golf 4 • Golf 5 • Polo 3 • Polo 4 • Touareg 1 • Tiguan 1 • Sharan 1 • Transporter T3 • Transporter T4 • LT 28 • LT 2D • Beetle • Caddy 3 •
Our website uses cookies to ensure functionality and convenience.